DIY towel animals. How to fold a waffle towel: three ways. How to fold a bear out of a towel
Hello, friends! On the eve of the holiday, like many of you, I am busy making gifts. And every gift, especially handmade, deserves decent packaging. There are many wonderful master classes on this topic in the Land of Masters. I will offer another option: we will make a one-piece scan of the box with a hinged lid of a given size, for example, length 9 cm, width 7 cm, height 3 cm, lid depth 1.5 cm - on an A4 sheet.
MATERIALS AND TOOLS
I needed:
* paper or cardboard (I have ordinary drawing paper, I cut an A3 sheet into two halves) - white or colored;
* scissors, ruler, pencil, creasing tool (I don't have a very sharp awl);
* double-sided tape (I use it more often than glue, because the paper does not get wet and does not deform);

If you make markings on colored cardboard, for accuracy, you need to do it from the wrong side, or make a drawing of the perimeter of the sweep on front side, and then only outline the points that will be connected when punching the fold lines (the creasing stage). The dimensions are labeled on the diagram to make everything clear.

On the this stage I work on the computer in Photoshop to paint the box in the colors I need (and drive a stagnant printer) and insert the picture I like on the lid. At the same time I'm doing additional details necessary to finalize the box inside. Moreover, I paint only the details, the background remains white. This saves ink and paper. I take backgrounds on the site http://www.liveinternet.ru/community/4091266/rubric/1693222/.

If desired, the printout can be "laminated" with a transparent self-adhesive. And then cut out the resulting details.

Next, I do a scoring. This is a very important step. It depends on him how neat the folds will be and how exactly the lid will lie on the bottom. There is a peculiarity here: on the cover of the line we push through from the outside of the marking lines, and we make the creasing of the lower part of the box from the inside of the marking lines. It turns out a small gap between the fold lines, which allows the lid to fit normally on the box.

I make cuts and bend along the pressed lines. Further, while the box is not glued yet, it is convenient to stick the label on the inside of the lid.

Apply double sided tape to the valves.

I'm not trying to fit the tape perfectly to the valve. I just cut off the edges of the paper without tape.

I remove the film from the adhesive tape on the valves of the bottom of the box and glue the valves. And then I try on how the lid fits on the box, see if it is necessary to slightly move the sides relative to each other for the normal putting on of the lid.

Got a box. It remains to make an insert at the bottom of the box.
Love to make gifts with your own hands? Looking for new packaging ideas? Now you will learn how to make a cardboard box with your own hands. The schemes given in the text can be printed and used unchanged. If you like to bring something of your own, refine them as you wish.
Which form to choose
You may never have guessed how easy and quick it is to make a cardboard box with your own hands. Schemes and blanks are very different, respectively, and the final configuration of products is very different. It is often said that beautiful packaging is already half the gift. If you want to surprise with your souvenir, come up with an unusual box shape. At the same time, not even additionally decorated, but simply made from a colored sheet, the packaging will look impressive.
In the event that you do not want attention to be diverted to packaging, but it is needed simply for safety and ease of transportation, the usual shape in the form of a cube or parallelepiped will suffice. However, it is worth considering that you are preparing for the holiday, so it is good to add to the usual configuration beautiful decor. Any of the options can be used, and complete the box according to ready template It won't be difficult, even if you've never done it before.
What will be required
You need to prepare the following so that you get a beautiful do-it-yourself cardboard box:
- Schemes, or, as they are also called, sweeps.
- Cardboard (white, colored, decorative).
- Printer or if you build a template yourself.
- Scissors or knife.
- Knitting needle, non-writing pen, or similar tool to draw invisible grooves along future fold lines.
- Glue or heat gun.
- Decorative elements (satin ribbons, stickers, bows, flowers).
As you can see, the work on creating beautiful packaging will not cause much trouble. Complex devices are not needed. If you do not have a thermal gun and a printer, you can do without them by using your own construction of a box scan with a pencil and a ruler and gluing with ordinary PVA or a quick-fix composition.

Manufacturing technology
Consider how a gift card is made of cardboard. The scheme of work will be as follows:
- Find a template that suits your configuration.
- Print it on a printer either directly on a large cardboard format, if possible, or on paper sheets, which can then be glued together and transferred to a cardboard blank. It is most convenient, of course, to work with boxes whose scans fit on A3 or even A4 format. This is usually the maximum capacity of a standard home printer.
- So, in front of you is a packaging template obtained in any way. Cut it out of the sheet along the contour and make cuts in the right places where gluing will take place.
- Take the knitting needle or whatever tool you prepared and run it along all the lines where the folds will go. It is better to do this on the reverse side, and not on the front. In professional slang, this operation is called creasing, and in printing houses, of course, it is performed by a machine. Such grooves prevent the cardboard from creasing during folding, that is, bending. So do not neglect it, otherwise the box may turn out to be sloppy and deformed.
- Make folds along the appropriate guides.
- Glue the three-dimensional form from a flat blank.
- Decorate the package with satin ribbon ties, a bow or something else.
Do-it-yourself cardboard box: diagrams
The square pack is the most commonly used. The options are different, both solid and consisting of two parts - the base and the cover. It's easier to make boxes from one piece. Such packaging can be closed with ties or with the help of a cardboard "tongue" that goes into a slot in the opposite part of the box. Below is a simple cube-shaped package.

As you can see, the scan is based on a square. The top of the product looks like a "roof" when assembled. To fasten the four parts of the top, you can use a beautiful ribbon.
Do-it-yourself cardboard box: simple but unusual schemes
If you want to make a package with an unusual shape, use one of the following models. The first photo shows the simplest option. It is very easy to make as there are only four folds to make. At the top, the box is assembled due to the slot and the fastening element included in it.

If you have a triangular souvenir, use the following package. The development, although it looks quite complicated, the assembly is easy and fast. The main thing is to carefully draw the fold lines. The gluing elements are small, made in the form of triangles.

According to the following template, a beautiful do-it-yourself rounded cardboard box can be made. The diagram is also simple and clear. The most important thing is to evenly draw arcuate fold lines. It depends on how neatly the shape of the package is formed.

How to decorate the box
You have figured out the technology for creating the base, but just white packaging is not suitable for a gift. It should complement and decorate your souvenir. You can turn an ordinary box into a masterpiece of artistic craftsmanship in the following ways:
- Choose beautiful cardboard or thick paper (designer or for children's creativity). Sheets are metallized, mother-of-pearl with embossing, patterns and other decor options.
- Cut out the second unfolding of the box from thin packaging or other paper used in arts and crafts, and glue it on top of the base. This option is suitable when you need to make a box of very thick cardboard, which is not possible to find with a decorative surface.
- Apply drawings or patterns to the box with paints using a brush, stencils, using stickers, decoupage napkins.
- If you are proficient in computer graphics editors on high level, you can come up with your own design of the box by completing the selected outline before printing with any images, including photorealistic ones, for example, even with the birthday person himself. The one to whom you give such a gift will definitely be surprised. It should only be taken into account that if you are going to print on color cardboard, all your pictures will acquire the appropriate shade, so you will either have to color-correct the workpiece, or not use colors that are unacceptable to change (portrait photos).
There are as many options for decorating a product as there are possible scan patterns. It's good to combine different ideas.
So, you saw how easy it is to make a cardboard box with your own hands. The diagrams above are easy to use to create beautiful packaging for a souvenir for any occasion. By scaling the templates, boxes of different sizes can be made identical in shape. Create, decorate, surprise your friends and relatives with your skill.
Today I am sharing with you my development of a reamer for a box with high sides. This scan is unusual in that it saves paper, and also allows you to place it on a smaller paper format, which is important when assembling boxes with high sides.
Of course, we are talking only about such boxes and only in the case of a double side (hard). For other types of boxes or lids, it will be more efficient to use standard reamers.
It all started with the fact that I needed such boxes for the "mother's treasures" project, and the standard scan did not fit into the A3 paper format precisely because of the double high sides.

The unwrapping was born from several mistakes, and now, based on another mistake, I will show you how to make such boxes.
There are two mistakes in the photo - a box with the wrong lid and a lid that I assembled by mistake the same size as the box, because of which it simply did not fit =)
For this cover, I will now make a box.

Get ready, now there will be some numbers, geometry and spatial white shapes. But I tried to make as many explanations and photos of the process as possible for you, so it should be clear.
So, first decide on the desired size of the box. It is better to write them down and sketch them, even if schematically and clumsily, like me =) My box is 5 cm high, width and length are 6 and 9, respectively.
Now you need to draw a sweep, so as not to get confused, it looks like the figure on the right.
The shaded rectangle is the future bottom of the box, it has length/width dimensions.
IMPORTANT: the location of the bottom must be exactly as in the figure: the horizontal dimension "a" (length) is greater than the vertical "b" (width). If they are the same size, it doesn't matter.
The difference between this sweep and the standard one is that in the usual one, one more strip would have to be added on the left and on the right, equal to the height of the box. But sometimes these same two "extra" heights simply do not fit on a sheet of paper.
Now about the sizes. We measure up and down from the rectangle-bottom twice along the height of the box, and the extreme rows are 1-1.5 mm less so that the bends do not overlap the bottom.
To the left and to the right we measure the size "c", equal to the larger of the width and height. In my case, the height is smaller than the width, so I measured the same size as the width of the "b" box. Either way, it should be larger size.

After measurements, we cut out the resulting rectangle and do scoring along the lines. You can use special tools for creasing, you can use a knitting needle or a non-writing pen, whichever is more convenient for you.

Here is another photo, the position is similar to the picture.

Now some geometry again :)
The picture on the left shows what I indicated above: the extreme top and bottom lines should be slightly less than the height, literally 1-1.5 mm. In my case it is 4.9 cm.
When the rectangle is ready, you need to make several cuts, in the places that are shown in the figure on the right with a green marker, and then bend along all lines, so that later it would be easier to glue

This is what should be the result

A little more geometry :)
Now you need to decide what is superfluous on the scan. It all depends on which size (width or height) you have more. Since I had a larger width, I use the diagram on the right: I cut off what is highlighted in green. Oblique cuts are needed in order not to interfere with the bends of the valves, make the bevel small, about 2 mm, and you also need to take into account that these parts will be inside, so the maximum height should be 1-1.5 mm less than the height.
If you have a larger size - height, then the oblique cuts are purely symbolic (1-2 mm), but the upper flaps will need to be cut to fit the width (smaller size).
Everything sounds probably not clear, so the drawings should be much more informative.

That's how I got it. as you can see, there are only two rectangles from the waste. Unlike standard scheme, where at least 4 is cut off, and sometimes more.

Now it remains the simplest physically and the most difficult theoretically (it is difficult to explain in the figures what to stick where).
So let's start with the top valve. We simply glue it and bend it (indicated as 1).
Then we will deal with the left inner valve, why it is indicated by different numbers, but in one block - I will explain later.

This is what the reamer should look like when the top flap is glued on.

Now we proceed to the left inner valve.
Apply glue to the part where my finger is pointing

And in this way we glue it, assembling one of the sides

Here's what happens

We lay the layout down with the place that sticks together, and iron it well so that the surfaces are held together.
I have such a pen, it has a smooth tail, but at the same time slightly pointed

With it, I press down all the corners that my finger does not have access to, as well as the entire gluing area at the same time. Since I work with a glue stick, gluing is fast, and the paper (in my case, drawing paper) does not warp.

Now let's deal with the second part of the inner valve. We smear it with glue

And glue to the bottom side. The result is a figure like this. Similarly, we iron the place of gluing well so that everything holds firmly.
And now let's take a look at the right side. We work with it in the same way, first we glue the part that the finger points to

And glue the sidewall to it

And then .... and here is the reason why in Figure 11 I painted over the internal valve with one figure, although it denotes two stages. We are left with one valve at the end, which is very problematic to push inward, especially if the paper is thick, and it is difficult to crawl with glue so as not to stain everything around.
That is why I smear the entire painted valve at once, and quickly glue it alternately to the two sides. Since it is solid, it is easier to smear it entirely with glue. By placing it inside immediately, nothing gets dirty and it is more convenient to align the corners.
Preparations are in full swing for the second issue of the DIY Gift Wrapping series - the Romantic Collection training set. 35 models of charming boxes for every taste with ready-to-print layouts and step by step diagrams assemblies - in the coming days, friends, you will be able to replenish your packaging collections with them. I myself look at them and am touched))) Here, I could not resist, I wanted to show you a couple of boxes right now.
And, of course, I will reveal all the cards, how to make such handmade gift boxes. And they are VERY easy to make.
Before we start, download the sweeps:
How to open a pdf file? Instruction.
For making boxes will need:
- stationery knife and ruler,
- scissors (you can even without them),
- a creasing tool (for example, a knitting needle, compass, awl, etc.),
- hole puncher,
- Ribbons, ribbon or decorative cord.
No double sided tape or glue needed.
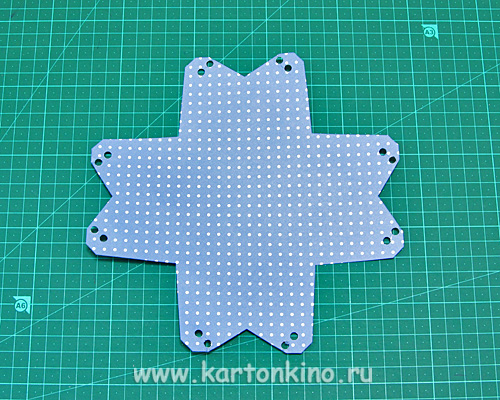
So let's print and cut out the pattern. Let's be the first to assemble a box in bright sunny colors (I didn’t come up with a name for the boxes, I leave it to your imagination :))

I “colored” this box (as well as the second one) in a graphic editor (I used the background from the free scrap-set “Cheerful” from Fanta Ymoments - Scraps and more), and printed it on a regular drawing paper.
Holes can be punched with an ordinary clerical hole punch, paper punch or eyelet installer - whoever has what.

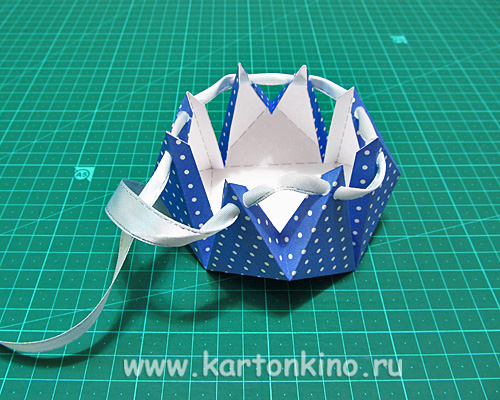
Now let's fold the halves of the inner box, connecting them with a "latch".

And finally, we will pass the ribbon through the holes and tie a beautiful bow.

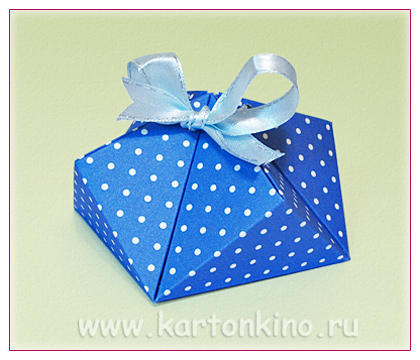
The second box is assembled no less simply:

After we have run through and bent, we will pass the ribbon through the holes, as shown in the photo:
Gently tighten the ribbon and tie a bow.

Just 10-15 minutes - and 2 wonderful gift boxes are ready!

In the very near future I will present you the entire collection of boxes from the second issue of the series "Gift packaging with your own hands". This time, in addition to a set of high-quality developments (in PDF and PSD formats), the set includes 3 master classes on decorating boxes in different techniques: artistic cutting, scrapbooking and quilling - from Olga Kachurovskaya, Evgenia Yarovaya and Ekaterina Shkodovskaya.
Privacy Policy
By subscribing to the newsletter, you can receive other free materials for paper art, as well as information about new products, discounts and promotions in the KARTONKINO Store (you can unsubscribe from the newsletter at any time).
- there is a lot of interesting things ahead!
See you soon at KARTONKINO!
Outside the window is 2012. New Year's holidays behind. But doesn't the symbol of 2011 look like an Easter bunny?
Soon New Year! And if you need to give a lot of gifts in, this article will be of interest to you.
because it contains the most diverse New Year's boxes))
You can put any little thing (like sweets or cookies) in these, so that the result is a nice warm gift!
It seems like a little effort, but a handmade gift, pleasant.
About what else you can put in a small box - at the end of the article.
Look!
By the way. We recently printed several boxes here and I can tell you that a gift in a box looks much more interesting than a gift wrapped in paper.
Maybe just because it's unusual.
Since 2011 is considered the year of the rabbit, let's start with rabbits!

Source ,
download box template for printing
and here is another rabbit - a funny gift box with long ears:

Source ideem, download outline vector template
(to download, check the box in front of "I have read and accepted Idea's Terms of use.")

Photo, you can download templates in vector and jpeg
but the box is more complicated:

Photo ustamp4fun , download template


Photo donteatthepaste , download contour template or
* * *
It's not really a box...
But if desired, it can be used in this capacity:
all! while the rabbit hares are over, let's go through the rest of the characters))
Gift box "Snowman"!

Photo dianaevans , download template
another one:
herringbone box:

Photo rubberstamping , download template
and now a small selection of pyramidal boxes.
Such boxes look very advantageous and can also serve as a Christmas tree decoration:

Photo accucut, you can download the template

Photo by polkadotprintsstudio, you can download the template


Photo mariestamps, you can download the template, see the lesson

Photo rubberstamping, you can download the template
And in the year of the rabbit, it’s good to give gifts in carrot boxes))
What is the main thing in the new year? So that there are enough carrots! And everyone has carrots - this is something of their own:
luck, happy occasions, romantic encounters, money or something else))
and here is another package, which (as Nastya suggested in a comment) is well suited for carrots
And finally, the funniest thing, otherwise we are all about rabbits, but about Christmas trees ...
How do you like the idea of giving a gift in a hat box?
Or number all the gifts, put leaflets with numbers in a hat and invite guests to pull them out))
Or arrange a New Year's fortune-telling, as described at the beginning of this article))
or make a hat and get presents for everyone from it ...
All in all, what an idea! Rich!

The source was given in a bank, you can also give it in a box,
falling asleep all this beforehand in a transparent bag
and as always if you like surprises) a photo of any large gift (along with instructions on where to find it)
can be rolled up and hidden among sweets small box!
Happy gift giving and a good New Year's mood!