How to create your own maps in Google Maps. Services for creating interactive maps Online map constructor
I am writing a post so that you, with the help of 7 pictures, create maps of your travels in Belarus, those points that you have already written about, about which you will write more. We need it for you and for us :)
It will help you (the authors) to structure trips and write reports. It will help us (readers) to lay new routes and see the unprecedented!
Especially the post is dedicated to taborovtsova
, victogan
, azarkinm
, whom I already advised to create maps :)
And to many friends (including mutual ones) who constantly surf the country!
So, 7 pictures:
(you need an account with the Good Corporation, so if you don't have one yet, it's time to catch up!)
1. Explanations are superfluous
2. Explanations are superfluous
3. Explanations are superfluous
4. We do it in the indicated order, guided by fantasy and inspiration in writing the name :)
So, an empty map with a name has already been created! Now it remains to draw points!
5. Explanations are superfluous
6. We do in the indicated order. Steps 1 to 5 are repeated n times (the more dots, the happier the readers!). After completing the drawing of points (or when it's time to leave work:) press the "Finish" button. You can continue editing the map on the next business day. 
And 7! Share a link to your map or embed the code in a blog (subject to HTML editing)
That's all. Now you can see where you have been most and where you have missed. Congratulations!
See also: 
Want to create your own Google Maps of all the beautiful cities you've been to? Or maybe you want to create your own annotated map that shows convenient driving directions to your company or home? Or maybe you have clients in different parts of the world and you'd like to display their reviews on a Google map.
These are just a few of the many possible scenarios that might push you to build your own maps. Let's now take a look at some of the best online tools that make it easy to create your own maps in the browser without requiring any programming knowledge.
How to make a Google Maps map
One of the most simple ways To create custom maps, do it through the Google Maps site itself. Open maps.google.com and click Create Map under My Places. Next, find a place, or enter the coordinates manually, and save them in a custom map. Repeat that step until all places have been added to the Google map.
Later, you can change the style of individual pins, add text descriptions of points of interest, photos and videos - these will be displayed when the user clicks on your label or flag.
You can also use the "My Places" option in Google Maps to create a destination map. In this case, select the "draw line" tool and move it along the desired route. Double click to complete the drawing.
How to create more accurate route maps
If you have a smartphone, you can also use GPS apps like My Tracks for android free download from the website, which capture your location at different times and then create a complete route from those points. Once at the starting point, press the Start button on your phone. Once you have reached your destination, stop recording and the app will export your route as a Google Map.
Another option for drawing a travel map is QuikMaps . The program converts Google Maps to an image, and you can get directions on the map just like you would draw by hand on any canvas. After you sketch out the route, export it as a KML file that can be imported into Google Maps or Google Earth for publication.
Creating Google Maps from Excel Sheets
One slight inconvenience with the Google Maps tool is that the service does not allow you to enter waypoints in bulk. Yes, there are options to import KML and GeoRSS files, but how do you create those files?
Use BatchGeo, an interactive tool where you can import location data from a spreadsheet and mark those addresses on a Google map. You can copy and paste postal addresses or latitude and longitude coordinates and BatchGeo will display them all after decoding. This is useful tool, but you cannot export the map using a free account.
How to add animation to your Google maps
You may have seen flight tracking maps where multiple images of an aircraft follow different paths on the same Google map. If you would like to have something similar for your own Google Map, take a look at the Animaps service.
With Animaps, you can quickly create animated markers that move along a predefined path above the map. You can have multiple markers on the same map and their respective playback speed can also be adjusted.
Custom Google Maps for Advanced Users
Advanced users can create their own Google Maps by simply changing a few parameters in the maps URL. API (Static Maps API) of static maps has full list options supported by Google Maps, as well as a few examples. The big advantage of using maps is that you can change them fairly quickly and easily embed them into web pages without using IFRAMES or JavaScript.
The idea of writing this article was born back in the New Year holidays, when I was explaining how to make navigation maps based on satellite images. Then the main part of the screenshots was taken, but the article was left gathering dust in the back of the hard drive. And now the sun is shining with might and main on the street and the snow is melting, a new hiking season is approaching, and I finally overcame laziness and added the text.
Now many people have devices, one way or another equipped with satellite GPS-navigation. It can be a smartphone, a pocket computer, a communicator or just a navigator. In many cases, the quality of the preinstalled maps leaves much to be desired, especially for hiking. Online sources of satellite images and maps can help here. It is enough to compare two images of the same area:
On the left is a satellite image of Google maps, on the right is the same area on the map. Which one looks more detailed?
To create a full-fledged raster map, we need a set of two programs, some amount of time and Internet traffic. The resulting maps can be used on any device for which the OziExplorer program or its analogues is available.
The instruction is step-by-step, illustrated in detail and should be clear to any beginner.
Obtaining a satellite image or map of the area
At this stage, we need the SAS.Planet program, which can be downloaded from the official website sasgis.ru

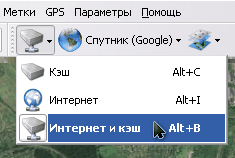
The first step is to specify the Internet and the cache as the data source:
And also choose the type of card you want. What it will be - a satellite or a Google map, Yandex maps or satellite images from the Roscosmos geoportal, or even General Staff maps - depends only on your personal preferences and the quality of the source in the required area.

So, we find visually, by coordinates or built-in search, the desired area. Determine the required detail by zooming in on the image. The current scale is indicated on the left, below the scale bar, in relative levels (z14, z16, and so on). It will be useful to us in the next step. Be guided by the fact that the desired objects are clearly distinguishable and not “blurred”. But do not forget that each level of detail increases the size of the resulting map.

Reduce the scale until the entire desired area of the map enters the screen. Select the “rectangular selection” tool (the second button on the left on the toolbar or the Ctrl + R combination on the keyboard), and select the borders of our future map.

When the selection is complete, the Selection Operations dialog box will appear. Now we are interested in the "Download" tab. The desired map type has already been selected, and the required level of detail must be selected in the drop-down list (we specified it a little earlier). It remains only to click the "Start" button.


After some time (depending on the detail and area of the map), its sections will be loaded, and the message “File processing completed” will appear in the window. You can close the download window and proceed to the next step - merging images.

Select the “Previous Selection” item in the selection menu, or press Ctrl + B on the keyboard so as not to re-select the same area, and the familiar window will appear.

This time we are interested in the "Glue" tab. Here you will need to configure more parameters:
- Resulting Format- the image format in which our map will be saved. For further processing, it is desirable to choose BMP, although it takes up more space, it is understood by all programs and has no encoding losses.
- Where to save- here you need to specify the folder and file name in which the map will be saved.
- Card type— the current source will be automatically substituted.
- Scale — do not forget set the desired level of detail. By default, the program has set low-detailed, which is currently displayed on the screen.
- Impose- here you can overlay additional layers on the map. Such as the Hybrid for Google maps, which displays the main roads and symbols. Sometimes it can be useful for refining satellite images or putting names of settlements on them. To do this, do not forget to load an additional layer with the desired level of detail using the method described above.
- Create a binding file- tick the “.map” item, it will be useful to us in the next step. The file will store the geographic coordinates of the corners of the resulting image.
We press the "Start" button and after a while in the specified folder we get two files - an image with a map and a .map file for binding to coordinates. Some navigation programs may directly use such images. But for handheld devices with a limited amount of resources, it is still better to save the map in a special format.
Image processing in a graphic editor
Often, due to not entirely successful lighting conditions, or interfering haze, or for some other reason, satellite images are “blind”, especially when they are displayed on the screen of a mobile device on a bright sunny day. To improve, you can make a small correction in any graphics editor. I'll show this using the free XnView as an example, but you can use any other suitable one (from IrfanView to Photoshop), this procedure is the same everywhere.
But if you are completely satisfied with the quality and contrast of the image obtained at the previous stage, you can skip this stage.

The image above shows the original image and the location of the Auto Levels menu item, which can be used to automatically adjust the contrast. The picture below shows the result of this operation. As you can see, the color and contrast of the image have increased, the visibility of roads and water bodies has also improved slightly.

You can also use the manual mode - editing contrast and gamma correction (increase both):

or Hue/Saturation/Lightness. Focus on the most suitable option for your conditions.

Converting an image to OziExplorer format
To further convert the image into a more compact format understood by OziExplorer, we need the img2ozf utility. You can download it for free on the official website of OziExplorer: oziexplorer3.com/img2ozf/img2ozf.html. The link is the latest version of the utility that saves the format in ozfx3. For ozf2 files (used in older versions of OziExplorer), you will need to find an older version of the utility. Search will help you with this.
Install and run the program. In the Source Image Folder field, specify the path where the prepared images and their corresponding .map files are located. In the Destination Folder field, specify where to put the converted cards (if you click the blue arrow on the left, the folder with the source files will be used). You can play around with the number of colors (Number Colors field on the left side). The more colors, the smoother the picture, but the larger size resulting file.

Check the boxes for the images you need to convert and click the big Process Image Files to OZF Files button.

The program will shake for a while, processing the files. At the same time, the current operations are displayed in the status bar. The program creates several levels of detail for different magnifications, so as not to waste the resources of a mobile device for recalculating large images. Therefore, encoding occurs in several passes.

As soon as Completed appears in the status bar, the conversion is completed. Two files will appear in the folder specified in the Destination Folder - .ozfx3 (or .ozf2 for the old version) and the corresponding .map file (which, unlike the original one, will have a name like original_name _ozf.map).
Now it remains to upload both of these files to mobile device, and tell OziExplorer where they are.
For example, this is how the OziExplorer window with satellite images looks like in Windows Mobile:


That's it, the cards are ready.
If something remains unclear - ask in the comments - I will try to answer.
Yandex.Maps is a mapping service that can be used to search for specific objects and obtain information about them. Any owner organizations can register in Yandex.Directory and indicate on Yandex.Map the location of your company or office. Yandex Map Constructor is a service with which you can make a location map or a list of stores to embed on your website.
On Yandex.Maps, any of your clients can then find your organization and get directions to it from their current location.
When searching in Yandex or directly on Maps, the user is shown the companies closest to him at his request. This helps to attract customers who are close to you.
This is our Russian analogue Google Maps, which in some cases is more convenient than Western service. First of all, if we are talking about domestic companies: Yandex. Maps update up-to-date information for Russia faster.
Why do you need a Yandex map on the site
We have previously written aboutfactors, which Yandex takes into account when ranking commercial sites. One is the full address, including a map (preferably interactive) on the contact page.
But this is only one of the reasons why you need a map on a web resource.
It is also needed for other purposes:
- To show the client where you are, in which area of the city. Many people just find it easier to navigate on the map, and not on the address.
- With the help of the map, the client will be able to lay out a map or a route on how to get from his current location to your store, cafe or office. At the same time, if the site has an interactive map, he will not need to leave your site.
- If you have several points of sale or offices, you can indicate them all on the map. The client will choose where to get closer, more convenient and faster.
You can’t do without a card for those companies that only talk about their offer through the site, and the completion of the transaction takes place offline. These are workshops, shops, beauty salons, various industries, pharmacies and hospitals. Let's figure out how to make a location map or a list of addresses for installation on the site in the Yandex map designer.
To embed a Yandex map, you need:
- Create a map in the constructor;
- Get the card code;
- Insert the code on the site (it is suitable for sites on any CMS).
There is a special service for creating maps -Yandex Map Constructor .
If you have mail on Yandex, you can switch to the service and immediately start creating a map. Click the Create Map button.
You will see a workspace where you can create your own map. All maps you create will be saved in the map list.

Let's try to create a map. Consider an example: your office is 10 minutes walk from the subway. You want to show on the map the route from the metro to your office.
First of all, we name and set the description of our card (not necessary, but it will be more convenient, especially if there are several cards).

Then you start editing the map. On the map you can:
- Put labels;
- Draw lines and polygons;
- Specify information about traffic jams (pulled up automatically, Yandex itself will take care of this);
- Create layers.
Let's go back to the example. We need to specify the path from the metro station to our office. We find the desired station on the map, then select the "Lines" tool and simply draw the path with the mouse. Then we can adjust the appearance of the line: thickness, transparency, color. As you can see, the designer immediately calculated how many meters you need to go.

Then I propose to put also a label indicating the office. Select the "Marks" tool, and put a mark by simply clicking with the mouse in the right place. Then we set up the label: write a description, select a color and type.


- Interactive - you can increase, decrease, fully interact with the map;
- Static - will be on the site in the form of a simple picture. Suitable if you know that your target audience has a mostly slow connection.
It is better, of course, to use an interactive map.

Let's try to create a map for the case if you have two stores or two offices in the same area.
In the same way, we create a new map, name it and write a description. Then select the Marks tool. We put a label in the right place and set it up.

This will be an indication of the first office (shop, salon, branch). Now we need to specify the second one. We do everything in the same way, only I choose a different color for this label - to distinguish. Let it be green.

That's it, the map is ready. You can save and paste on the site.Even if for some reason you can't do it now, you will always find the finished maps in the list of maps:

As I wrote above, after creating the map, you need to copy the code and embed it on the site.
After you have created a card, click "Get card code". You will see a piece of code that you need to embed into the site.

Usually the map is placed on the site:
- On the "Contacts" page;
- In the footer (footer) of the site;
- Less often - on the main page or the "Delivery and payment" page (mainly when it comes to pickup).
Having a ready-made card code, it is easy to insert it on the site. I will show you several ways, primarily for WordPress site owners. You can even make settings yourself.
Let's look at how to insert a map on a WordPress site on the "Contact" page. We already have our address, phone number written on this page, and a map will be placed below all the content.
We go to the administrative panel of the site. Go to the "Pages" section:

Then we find our “Contacts” page there and select “Edit”. Switch the editor from Visual mode to Text mode.In the map constructor, select the iframe code and copy it:

At the very bottom, after the text, paste this code and update the page.

Here is our map on the site:

You can edit the width and height directly in the code provided by Yandex (width, height tags - set the desired numerical value in quotes).
Another option for placing a map, which is often used on landing pages, is to insert the map into the footer (footer) of the site. To do this, you will need to edit the HTML code of the page by inserting the code proposed by the designer there.
On WordPress, you can edit the footer through the admin panel. Come in Appearance– Editor – Basement:

To edit a file, you need to have at least basic knowledge of HTML. If you are not so good with this, it is better to entrust the work to a web developer (you can even find a craftsman on freelance).
Yandex.Maps plugins
For different CMS, you can use official map plugins, or modules that allow for quick integration.
For example:
- For 1C Bitrix: "Your network of offices on the map" and "Yandex. Map of infoblock objects";
- For Drupal: "Geofield Yandex Maps";
- For WordPress: "Yandex Maps API";
- For Joomla!: "Yandex.Maps for Joomla" and others.
You can see the full list of plugins in Yandex Help.
As you can see, it’s not so difficult to make and embed a Yandex map on a site, and with basic knowledge of HTML, it’s quite possible to do it yourself.
Take care of your customers and help them find your store, restaurant, beauty salon or office faster. Create a map and post it on your website.
In this part I will talk about the very first stage of creating a map. - "platform" setting. The creation of objects and events will be discussed in the following parts, and here I will tell you how to create an empty map, how to make your own copy of an already finished map, and how to import individual objects from other maps into your own. You can create a chronocard in two ways - "from scratch" or "copy". Creating a map is a rather time-consuming process, and I try to simplify it. Copying a finished map can be useful in the following cases:- You want to make a different version of an existing map. With other descriptions, other accents, change some objects. Changing a copy is usually much easier than doing everything from scratch.
- You want to make a map of other events, but in a close time interval. For example, after " civil war in Russia" I want to do "The first world war". Most background objects (countries, cities, railways) will match. No need to apply them again, you can copy existing map, remove the excess, add a new one and save with a different name.
- You just want to experiment on the finished map. You can play with your separate copy as much as you like. In addition to copying the entire map, you can copy individual objects from map to map. For example, rivers and mountains have changed little in the history of mankind (although there are exceptions). I don't want to reapply them on every map. They can be imported from another map. Below I'll show you how.
Creating a new map
First, about how to create "from scratch". To create a chronocard from scratch, you need to click on the "create a chronocard" button on the main page and fill in the required fields:- The name of the card. Here, I think, everything is clear.
- Description and picture for the list of maps on the main page. Your card will not be displayed in the general list of cards on the main page until the "Published" checkbox is checked in the settings (which I will discuss below).
- Time step and time frame of the map (start date and end date). Time on the map is discrete. You can choose the minimum step - day, month or year, depending on how detailed you want to describe the events. The step is common for the whole map, in the current implementation it is impossible to make part of the map in detail, but not part. Unlike all other parameters, the pitch cannot be changed after the map has been created.
- Map type - satellite image or modern map(modern countries and cities). A satellite image is more suitable for describing historical events, a map is more suitable for describing modern ones. The user can always switch to another type (switch in the upper right corner of the map).
- Unknown area. If in the period of history you have chosen, not all of it was known to mankind earth's surface, you can enable this setting. Then the Map will be covered with a black area, in the middle of which there will be a light window that can be adjusted. You can configure this window to change as the map events progress. (the maps of the Great Geographical Discoveries can be based on this). The user can disable this area (icon in the lower right corner of the map).
- Editors - If you want to fill out the map collectively, enter through "," the names of the users to whom you want to open editing (they must be registered). The map will appear in their "My Maps" window.

In addition, the following options can be set in this section:
- "Published" - after that the map will appear in the list on the main page and will be available for viewing by users.
- "Editing is open" - any registered user can edit the map, not just editors. The history of map changes is saved and you can roll back to the previous version. Permissions settings, deleting a map, deleting the latest version are available only to editors.
Copying a map
Now I'll tell you how to copy the finished map. For this you need:- Go to desired card
- Click on the "save a copy" icon on the bottom panel.
- Log in or register (if not already registered).
- Enter a name for the new card and click "save".

Importing objects
"Import objects" allows you to copy individual objects from other maps, so as not to create the same thing every time. To import you need:- Log in to your card
- Switch to edit mode (the "edit" button in the lower right corner).
- Click on the "import objects" icon on the bottom panel.
- Select one of the ready-made maps and click the "Show" button. A list of features on that map will be displayed.
- Select the necessary objects with checkboxes and click the "Add" button under the list.
- Copies of objects will be added to your map. After that, do not forget to save your map to the server.

Next time I will talk about adding your own objects to the map.