Wiring diagram of a chandelier with a double switch. Features of connecting a chandelier. Connection via one-button switch
The topic of connecting a chandelier to a two-gang switch is of particular concern to the owner of the apartment after purchasing a new lamp, because the connection method does not change from the beauty of the product. All the standards that you need to know to install a chandelier depend entirely on its design. Having learned how to connect simple lamps, it will be easy to understand how to connect a chandelier with a remote control. According to the rules, the control setting occurs after the luminaire is connected.
Electricity with a voltage of 220 volts is dangerous for human life. If knowledge in the field of electrics is not enough, then it is advisable to invite a specialist who has permission to work with electrical networks to connect.
If you need to make a connection with your own hands, then before starting installation, you need to find out the parameters that will help to avoid further blunders. Except detailed instructions, it is worth studying the video where the installation of the chandelier is carried out by an experienced master.
Main settings
First of all, it is worth determining what type of lighting the chandelier has, it depends on lighting element. AT modern lamps apply:
- incandescent lamps:
- fluorescent lamps;
- LEDs.
By the number of wires, all chandeliers are divided into several types:
- lamp with two wires;
- chandelier with three wires;
- lighting fixture with four wires;
- chandelier with remote control.
In addition, it is important to determine the number of wires running between the switch and the chandelier. In residential areas, there are 2, 3 or 4 wires in the switch box.

Installing a chandelier on the ceiling
Before installation, it is necessary to assess the degree of novelty of the wiring. Often no one pays attention to the electrical wiring in the house until the time comes to install a new chandelier. And only when the old lamp is removed, it becomes clear that along with the new chandelier, the wiring will also have to be changed.
Wiring
Let's start with electrical wiring, since it depends on its type, material of manufacture, number of cores in the cable, how quickly and competently it is possible to connect. In old houses, 2 wires of the same color were laid between the switch and the chandelier. There were no problems with connecting to such a network.
AT modern houses use 3-4 wires different color. In order not to get confused with the color coding of the wiring, consider their purpose by color:
- yellow-green - ground wire: serves to ground the chandelier, some manufacturers use pure yellow or green for such wires;
- blue wire - zero;
- black, white, red, gray, brown, orange, purple, pink, turquoise - phase wire.
Chandelier with 2 wires
Consider the first option - connecting a chandelier with 2 lamps and 2 wires to a switch with two keyswhen there are 2 wires between the switch and the chandelier. In this case, it will not work to alternately connect one or 2 lamps, because the number of wires is designed for direct connection of the chandelier to the network without options. In this situation, you do not need to use a multi-key device. If there is no need to change it to a single-key one, you can leave everything as it is and install a chandelier. General scheme installation does not differ from the principle of connecting a chandelier with one horn.

Wiring diagram for a chandelier with 2 lamps and 2 wires to a switch with 2 keys
The 2-wire wiring diagram can be found in old houses when a third wire for dimming was not yet used. Today, all new living spaces use three wires.
Chandeliers, where 2 lamps are used without the ability to turn them on alternately, are currently very rarely produced by the industry. Therefore, this lighting installation option arises if you need to swap the lamps in an old house. If such a chandelier is offered in a store, then you need to think about whether this purchase is advisable or not. It may be better to choose a model where the lighting is adjustable.
Let's move on to the installation itself. First we make the connection on the chandelier.
Actions are as follows:
- We turn off the lighting in the selected room using the machine.
- We clean the wires by 2-3 mm, that is, we remove the insulation from it.
- We separate the wires in different directions so that their ends do not touch.
- We remove our hands from the wires and connect the voltage.
- Now we touch the wire with an indicator screwdriver, while holding one finger on the metal part of the handle.
- If the indicator lamp lights up, then we have a phase in front of us, no - zero.
- Now you need to remember the location of the wires and turn off the current in the room.
- In order not to forget where which wire is located, it is worth making a mark with a marker. Usually the first phase is denoted by "1", and the zero - "0".
- Connect the neutral wire on the chandelier with the blue one, and with the phase wire on the chandelier.
- Isolate connections.
Let's go to the switch. Now we need:
- Connect the phase wire located between the switch and the junction box to its common contact.
- Connect the phase wire of the switch coming from the chandelier to one of the normally open contacts to the switch.
- The second contact in this case can not be used. Install the frame with the switch in place.
- Turn on voltage.
- Check functionality.
This completes the installation of the chandelier. You can see detailed master classes on videos, which are many on the Internet.
During testing and determining the phase in the wires, in no case should you touch the bare part of the wire with your hands, connect the wires together, and also touch the screwdriver in the working part. All these actions can lead to electric shock, and the mains voltage is life-threatening. For the same reason, you should not start connecting the wires until you are completely sure that the voltage is off.
According to safety regulations, only the phase conductor passes through the switch, because the zero one does not participate in breaking the circuit.
Chandelier with 3 wires
Consider the second option - connecting a chandelier with three wires to a switch with two keys. There are 3 wires going from the switch to the light. This connection method is the most common.

Wiring diagram with three wires
The connection is made as follows:
- Determine the phase wire with an indicator screwdriver, mark it.
- De-energize the network.
- Connect the blue neutral wire on the chandelier to the neutral wire of the electrical wiring. Produce insulation.
- The remaining two wires from the lamp and 2 wires from the shield, respectively, twist in pairs with each other, collecting in each twist one wire from the chandelier and the switchboard.
Now let's move on to the switch:
- We turn on the voltage and find the phase wire coming from the junction box to the switch. To do this, we also use an indicator screwdriver.
- We de-energize the room.
- The phase wire located between the junction box and the switch is connected to the common contact to the switch.
- We connect the two remaining wires, one at a time, to each open contact of the two-gang switch.
- Next, install two-gang switch into place, turn on the network, check the operation of the chandelier.
Scheme of connecting a five-arm chandelier to a two-gang switch
Chandelier with 3 wires and color coding
Let's consider the third option - connecting a chandelier with two lamps and three wires to a two-gang switch with color-coded wires.
Here you can immediately start by turning off the voltage, then you should connect the blue neutral wire of the chandelier to the blue wire of the electrical wiring. Connect the two remaining wires according to the colors. On the switch, connect the phase wire (see color marking above) to the common contact. Connect the remaining two wires to the remaining contacts of the switch. Set everything in place, turn on the voltage, check.
In any of the connection options, one should not forget about the insulation of the wire. Bare parts of different wires should never come into contact with each other. Moreover, after installing the chandelier, there simply should not be any exposed parts of the wiring, all places of twisting must be reliably protected. For this, it is easiest to use polyethylene terminal blocks.

The need for wire insulation
The connection of wires with a terminal block occurs through a brass sleeve with 2 screws located inside. In such a terminal block, wires are placed and twisted on both sides. At the same time, all bare parts remain insulated, and for twisting, which means that it is not necessary to strip a large surface of the wire.
Similarly, the connection is made if three wires come from each horn of the lamp. Here, all the blue wires are twisted together, and the rest are distributed as convenient. The connection diagram is clearly visible in Figure 4.

Wiring diagram for 3 wires from each horn
Wiring for a 4-wire chandelier
The fourth option is a chandelier with two lamps and four wires, wiring for four wires. We do everything as in the previous paragraph. In addition to the steps taken, you need to connect the yellow-green wire of the chandelier to the corresponding wire of the electrical wiring. The same applies to the switch.
Luminaire with remote control
Usually they ask a lot of questions about how to connect a chandelier with a remote control, because such lamps are often used in apartments. A chandelier with a control panel is connected to the wires as usual. Therefore, you first need to connect the wires in the chandelier with the wiring wires, choosing one of the above options.
It does not matter which switch is installed. To control a chandelier with a remote control, it is necessary that the chandelier is always energized. Therefore, switches are not used together with the control panel.
You can connect the wires between the junction box and the switch directly, or leave the keys as they are. But then you will have to constantly use the switch to supply voltage and only then take the control panel or keep the switch on all the time.
Sometimes a fan is included with the remote control. For separate use of a chandelier and a fan, different switch keys are used. The control and wiring diagram will be like this.

Wiring diagram for a chandelier with a fan
Connection. Video
The video below will tell you how to connect the chandelier to the switch yourself and what is required for this.
Thus, the same algorithm is used to install a chandelier with 3 horns. First, the purpose of each wire is determined, then the premises are de-energized, a lighting device is connected and a switch is installed. All these operations are carried out with strict observance of safety regulations.
Very often when moving to new apartment or after repairs old apartment a household operation such as replacing or installing a chandelier is required. However, if this is done for the first time, practical difficulties arise. Not every home master knows how to connect a chandelier, especially if this lamp has several lamps, or is a device equipped with a controller and remote control remote control.
Practical luminaire connection
Before starting work, you need to prepare the tool:
- Straight and Phillips screwdrivers
- Side cutters (nippers)
- pliers
- Screwdriver - phase indicator, or multimeter tester
In addition, you will need devices for connecting wires. These can be blocks where the wires are clamped under the screw, PPE connecting insulating clamps, or Wago spring clamps. The chandelier connection scheme depends on the number of light sources and the type of switch. So, we have a ceiling hole with three wires coming out, a ceiling hook for hanging a chandelier and a lamp that can have a different number of lamps.
How to connect a chandelier to a switch
First of all, you need to deal with the ceiling wiring. Unlike the European standard, where the color and purpose of the wire is strictly regulated, our craftsmen often use the installation wire that is available, so we first determine the purpose of each wire. Of the three wires, one is necessarily zero, and the other two wires supply the phase through the switch keys.
Sequence of work:
- We turn off the automatic power supply and the two-gang switch
- We spread three pieces of ceiling wire on the sides to avoid a short circuit
- We remove the insulation from each wire, about 1 cm
- We turn on the power machine and the switch
- Touching the phase indicator to each of the three wires, by the glow of the indicator we find two phase wires and determine the zero one (there is no voltage on it, and the indicator is off)
- Turning off the switch keys one by one, we fix the correspondence of the presence of the phase to the switch keys
Such a chandelier connection scheme provides three lighting brightness modes and involves connecting the chandelier to a two-gang switch:
- One group of lamps included
- Another group of lamps switched on
- All lamps connected at the same time
This is the answer to the question of how to connect a two-key chandelier.
Various types of connections
The next stage of work is the definition electrical connections the chandelier itself, but it should be borne in mind that they may not be. Most of the manufactured chandeliers have a three-wire circuit, and in order to understand how to connect a 3-wire chandelier, it is enough to look at the product passport. There is a lamp grouping scheme, for example, if a chandelier has 5 lamps, then they are combined into two groups with a different number of light sources.
The diagram shows a common wire that will be connected to the neutral wire coming out of the ceiling, and the two remaining wires are connected to the two phase wires coming from the switch. Therefore, the question of how to connect a chandelier to a switch is not too difficult. Just like connecting a chandelier 3 wires. If there is no diagram, then the common wire always has a different color than the two phase wires.
To connect the wires to each other, use the devices indicated above. In extreme cases, you can use the usual twisting of wires using electrical tape, but this method is the least reliable.
How to connect a chandelier if it does not have internal installation, and all connections must be made by the user himself, as it is convenient for him. For example, we have a chandelier with 6 lamps, and 12 wires come out of it, usually in two colors. This means that each lamp is brought out separately and the chandelier has no internal connections. Connecting such a chandelier is not difficult, in addition, chandeliers of this type are designed for use in modern lighting systems involving the use of a special controller that allows you to turn on any number of lamps, as well as the use of a remote control.
If such a chandelier is connected without a controller, then 6 wires of the same color must be connected to each other - this will be zero, and the remaining 6 wires of a different color should be combined into two groups, for example, equally, that is, three wires in a group. As a result, we get a classic circuit that is connected to a two-gang switch using the method described above.
How to connect two chandeliers from one two-gang switch
This is easy to do if a decorative false ceiling is installed, for example, in the bathroom and toilet. Then, behind the ceiling, you can build up wires and control the lighting in these two rooms with a single switch. Also, all electrical work can be carried out for stretch ceilings in living rooms.
In order to get a complete picture of how to connect a chandelier, you should watch the corresponding video, and then solving the question of how to connect a chandelier will seem like a very simple matter.
How to connect a chandelier with a remote control
by the most modern version household lighting systems are fixtures using a controller and a remote control. LED arrays are usually used as light sources.
The controller allows you to turn on a large number of light sources, in any configuration, and additional programs allow you to use such a system as a design element that performs the function of a color and music installation. In order to understand how to connect a chandelier with a remote control, you must carefully read the instructions.
Such a system consists of a base unit and a remote control. The controller is usually placed in the decorative housing of the chandelier-plafond. A phase is connected to the “L” terminal of the controller, and zero is connected to the “N” terminal. A group of luminaire lamps is connected by one side (wires) and connected to zero, and free wires are connected to the corresponding controller outputs. The manual describes in detail the programming of the lighting system using the remote control.
Often a situation arises when it is necessary that the bulbs in one of the rooms turn on from different places. On the flights of stairs for such cases, there are pass-through switches that are difficult to install, so it is usually impractical to install such switches in apartments.
It is much easier to ensure that several light bulbs are turned on from one conventional switch. How to connect two light bulbs to one switch will be discussed in this article.

Switch device
The main element of the switch is the working part, mounted in the socket. It is a metal structure with an attached drive. With the help of the drive, the device is turned on and off. The drive is a movable contact that closes and opens the electrical circuit between two static contacts.
The first contact is called incoming: it is connected to a phase from the mains. The second contact (outgoing) is connected to the phase conductor coming from lighting device. When the switch is correctly positioned, both fixed contacts are initially in the open state. When you press the button of the device, the movable contact provokes the closure of both fixed ones. As a result, current is supplied to the light bulb through a closed circuit of their electrical network, and it lights up.
To ensure safety, the working part of the switch is in a housing made of dielectric material. Cases are made of plastic or porcelain.
The other components of the switch are the bezel and the keys. These items are usually made from plastic. The keys are fixed on the drive of the working part. Moving as a result of pressing, the key changes the position of the contact, which leads to turning on or off the light.

The frame is designed to prevent a person from accidentally touching the switch contacts. In other words, the frame acts as a barrier between live elements and the person. The frame is fixed with screws or latches made of plastic.
The only difference between a two-key device and a single-key one is the presence of a pair of outgoing contacts. Each contact is connected to a phase conductor of one of the lamps.
Ordinary switch for one lamp
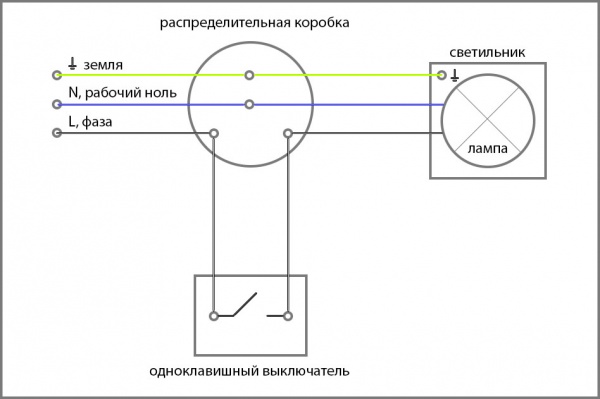
The figure below shows a diagram of connecting a light bulb to a conventional light switch.

The switch is installed in a phase break. Zero is directed to the lighting device. If you set the switch to zero, the contacts will soon burn out. The reason is the increased load during the passage of electricity at the zero contact.
Another reason for breaking a phase conductor is the need to quickly turn off the voltage from the consumer in the event of an emergency. Zero does not allow to de-energize the system, but only opens the circuit.
Note! Electrical installation work must only be carried out in a de-energized electrical network. In the absence of the possibility of determining the phase conductor according to the color scheme, the current supply is allowed to carry out the "ringing". Before checking, you need to make sure that there are no short circuits in the bare wiring.
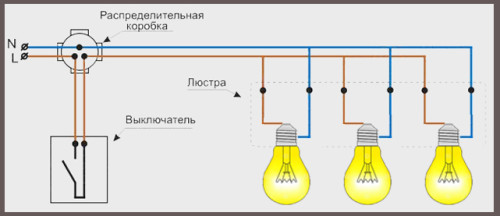
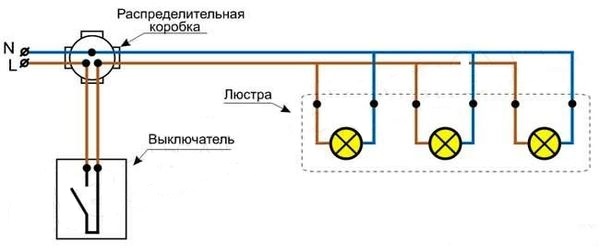
Two lamps per switch
The scheme for connecting two lamps to one switch is similar to the rules for connecting one lamp. The neutral conductor is sequentially directed from the junction box through all light sources. The phase wire going through the switch is connected to the second contacts of the light bulbs.
Contacts must be connected as securely as possible. The use of terminal blocks is recommended. Connections are made with screws or Wago blocks (the conductor is pressed with a spring).
Note! It is unacceptable to twist from wires of different metals (copper and aluminum). Otherwise, the result of such actions will be an oxidative process, which will lead to loosening of the contact and overheating.
The diagram below shows the connection of two light bulbs to a single-gang switch.

On each of the light sources there is a marking where the load limit is indicated. This information must be kept in mind when calculating the total power of the connected lighting fixtures.
Two-gang switch
Two-gang switches are used in rooms with separate lighting, when you need to connect a chandelier with several horns. Such switches are used in separate nodes (installed between the doors to the bathroom and toilet).
A two-gang switch is more compact than two single-gang switches, so its installation is justified in all cases where you need to save space on the wall.
Separate lighting
A similar scheme is often used in office buildings, where it is necessary to separately illuminate many local areas. The separate lighting scheme is not particularly complicated, although it requires special knowledge.

The switch is placed in a phase break. The devices are equipped with one input and two output voltage contacts. Phase wires after the switch go to the lighting fixtures. The neutral conductor will be common to all light sources in the room.
As a result, pressing one of the keys turns on only the devices connected to a particular phase. Other light sources are not switched on.
Chandelier with multiple arms
To connect a multi-track lighting fixture using a two-gang switch, you need a three-wire conductor. One core is shortened so as to lead it into the junction box, and a couple of other cores should reach the switch.
A phase wire is sent to the interrupter. The outgoing conductors are fixed in the terminal blocks of the switch. The set of the lighting device has a conclusion of three wires: zero and two phase. Zero from the distribution box is sent to the zero contact, and the outgoing wires from the switch are connected to the phases of the multi-track chandelier.
The connection diagram for a chandelier with five horns is shown in the figure below.

The result is a connection where pressing a single key only turns on a pair of lamps. Another key controls three lamps. If you want to turn on all the lights, press both keys. Ultimately, such a scheme provides a choice of three light intensity options: with two, three or five bulbs.
In retail chains there are switches with three keys. Their connection scheme is a little more complicated, but in general it is similar to those given earlier.
Connection from a socket
In some cases, you need to connect an additional lighting fixture with a dedicated switch. In such a situation, connecting from an existing outlet is suitable.

When installing a single-gang switch, you will need a two-wire wire and a switching device. For a voltage breaker installed above the socket, zero and phase are removed from it. The phase wire is interrupted inside the switch, and the neutral conductor is left intact. Other lighting fixtures in the circuit are supplied with power in the same way as the circuits above.
For electrical work, you will need three cores (zero and two phases). For a three-gang switch, one more phase conductor is required.
Connecting lamps with a converter
To organize lighting by point consumers, you can use 220 Volt networks or 12-volt converters. The latter create a turn-on delay of several seconds, after which they smoothly transfer current to electrical appliances.
The circuit allows you to take care of incandescent lamps or halogen light sources, as it protects them from voltage surges.
The connection diagram is shown in the figure below.

In the case of using a converter, the switch is installed before it. There are two important technological reasons for this:
- Reduced voltage is associated with a significant current strength. Breakers are not designed for this mode of operation, as a result of which burnout of contacts is possible.
- The converter allows you to smoothly turn on the lamp. If you put a breaker after the converter, you will not be able to ensure a soft start, and the electricity will come in leaps after pressing the key.
If a switch with two keys is to be installed, a second converter will be required. Its power supply will come from the second line. The neutral conductor will be common.
Electrical installations require special attention to safety. Work should only be started after the mains is switched off. If there is no self-confidence and at least basic knowledge in electrical engineering, it is better to seek help from a qualified electrician.
How to connect a chandelier for 2, 3, 4, 5 or 6 lamps, and also remake ceiling lamp from a single switch to a double one? In fact, everything is very simple, but easy for someone who knows how to do it.
In fact, connecting 2, 3, 4, 5, 6 or even 8 lamp lighting devices to a two-gang switch, there is no difference in connection. It differs only in the number of wires in the chandelier.
Let's make sure that you have everything ready to install and connect the chandelier and switch:
- you have a chandelier for 2 - 6 lamps;
- a 3- or 4-wire wire hangs from the ceiling;
- to connect the switch, a two or three-wire wire is laid along the wall.
Let's prepare the tool for this work:
- screwdrivers;
- marker or pencil;
- pliers;
- screwdriver;
- screwdriver indicator (90 to 500 V);
- stationery knife;
- perforator.
You also need to prepare the following material:
- plastic dowel for concrete;
- self-tapping screws;
- WAGO clamps.

Before connecting the lighting device, the plate with the ceiling mount must be screwed. If the lamp must be put on a hook, then in this case we need the hook itself.
Crochet is very easy. You just need to insert this hook into the hole and fix it with a nut. Then hang a chandelier.
Before you connect the wires on the ceiling to the chandelier, you need to determine their purpose. Which of them are phase, which wire is the common “zero”, and which is the protective conductor “grounding”.
Attention! I want to draw attention to the fact that according to the rules of the PUE, wires or cables with an additional protective "ground" wire should be laid on the lamps.
Therefore, it is assumed that for chandeliers with separate switching on of lamps, using 2 key switches, lay a 4-core cable, and with the simultaneous inclusion of all lamps, a 3-core cable.
For this, we check that circuit breaker disconnected and no voltage is applied to the tested wire.

After the insulation has been removed, we turn on the circuit breaker again, thereby applying voltage to the wire under test.
Do not forget that the one-gang or two-gang switch must be turned on.
Using a screwdriver indicator (capacitive indicator), we check the presence of voltage on all wires.
Of the three wires, two should have voltage. These are phase wires. Such wires are marked with the letter "L".
This means that the wire on which there is no voltage is the common “zero”. Marked with the letter "N".
Grounding is marked "PE".
If the wiring in your house (apartment) is made in accordance with all the rules of electrical installation, then the neutral wire should be blue.
But you always need to check with an indicator, because woe electricians can connect a neutral wire of a different color.
Connecting a 3-wire chandelier to a two-gang (double) switch
Now let's take a look at the chandelier.
For example, take a 5-light chandelier. You take the one you have. I repeat. There is no connection difference. The only difference is the number of wires.
The ceiling lamp uses 2 wires of different colors for each bulb.
Remove the insulation from all wires no longer than 2 cm.
Since there are 5 light bulbs in the chandelier, we will divide them into two parts. One has 3 and the other has 2 bulbs.
Connect all the wires of 3 selected bulbs of the same color together. Do the same with two light bulbs. You got 2 twists of phase wires.
Then you need to take all 5 remaining wires of a different color and twist them together. You have made the third common twist of the neutral wires.
Wiring diagram of a chandelier to a double switch:

You will get 3 twists. There are 3 wires on the ceiling.
If you need to connect wires, then for ease of installation, I recommend using these WAGO connectors:

The convenience is that when you stand on the stairs, you do not need to turn the screws in the terminal block with a screwdriver. It is enough just to lower the lever and the wire will be fixed. Just make sure that the wire insulation is hidden deeper.
For stranded wires professional electricians use soldering tips or a soldering iron, but in our case tips are fine. For their crimping, it is desirable to use a special tool "pliers".
But if not, you can press it with wire cutters.
Of course, you can not use the WAGO terminal block, but use an ordinary twist and wrap it with electrical tape, but WAGO is more relevant today.
So. We connect the WAGO terminal block to the wires of the chandelier. In order not to get confused, it is best to connect the neutral wires to the middle terminal, and the phase wires at the edges.
When everything is ready, connect the wires coming from the ceiling to the chandelier through the WAGO terminal block, knowing in advance where to connect the neutral wire and where the phase wires.
Attach the chandelier to the ceiling by carefully tucking all the wires into the chandelier's decorative glass.
Everything is ready.
How to properly connect a chandelier with 2, 3 wires to a single-gang (single) switch
The process of connecting a chandelier according to the scheme with a single-key switch is the same as with a two-key switch, as described above, only a little easier.
3 wires are used. One wire is a common phase for all lamps, the second is zero, the same is common for all chandelier lamps. The third is used as a protective conductor "grounding", from human defeat electric shock. I advise you not to ignore it, but connect it to the lamp body.
Scheme for connecting a chandelier to a single switch:
That's all. It's actually not that difficult. You already know theoretically how to connect a chandelier. It remains only to take and do. Dare!
The chandelier is a ceiling lamp that should provide shadowless lighting in the room. Light is evenly distributed by spotlights located at a certain distance from each other. Light sources today are incandescent, fluorescent and LED.
Purchasing a chandelier is a pleasant moment when you finish furnishing your home and after buying a new piece of furniture, it remains to connect it. Assembly time depends on the complexity of the design and the type of fastening. Moreover, you can cope with this task quickly and easily, just follow the instructions and have simple installation tools in your arsenal, and in order to connect it, you also need to understand the electrics.

A multi-lamp lamp is available in all apartments and houses. For even distribution of light, it is usually located in the center of the ceiling. Let's see what knowledge is required to connect the chandelier with your own hands.

Where to begin?
First you need to figure out how many cords come out of the ceiling. Usually there are two or three. If there are two of them, then the design provides for the simultaneous inclusion of all the bulbs and there will be no difficulties with connecting the chandelier. And the presence of three cords makes it possible to turn on the bulbs individually and group them to change the level of illumination. As a result, the difficulty arises in the fact that you need to understand which wires to connect to each other. In order for the chandelier to work properly, it is important to connect everything correctly. Before starting work, be sure to familiarize yourself with the cable arrangement. So, let's proceed in order.
Observe safety precautions
The main requirement during the connection of the chandelier is the de-energization of the entire section of the electrical wiring. Simply turning off the light in this case is not enough, you need to completely turn off the machines in the shield.
Then you need to prepare the cables for testing. They should be opened to prevent further contact with each other.
According to the marking, cables are designated in Latin letters:

It should be noted that the marking is not always present, because it began to be applied not so long ago. In this case, you should use the machine located in the shield and turn the switch to the "ON" position. Then, with an indicator screwdriver, you need to touch the bare ends in turn - if the LED lights up inside during the process - the cable is energized and is a phase. After determining the types of wires, turn off the power again and proceed to connection work.
There are two ways to connect cables to each other:

Chandelier mounting options can be found by clicking on the link:
The following parameters can affect the way the chandelier is connected:
- the number of cords in the chandelier;
- the number of wires in the ceiling;
- number of keys on the switch.
Scheme one. Two cords on the chandelier and two wires on the ceiling
This method of connecting a chandelier is the easiest, because it does not require much effort. In this case, it is necessary to simply connect the cables to each other using a twist or terminal block, having previously determined where the phase is and where it is zero. Moreover, the connection order can be any.

The neutral cable (blue in the diagram) should be connected from the junction box directly to the neutral wire coming from the lighting device. And the orange cable, with a phase, should be connected to both the chandelier and the switch.
When connecting a chandelier with a large number of light bulbs to a switch with one key, you must first connect all the neutral wires of the chandelier, and then connect them to the neutral cable from the junction box. Then combine them with the phase and lead to the switch.
It is important to know! According to the requirements of the electrical installation rules (PUE), the phase must be connected to the central contact in the electrical cartridge, and the phase wire must be opened by a switch. Compliance with these rules will increase the safety of the operation of lighting devices.
Scheme two. Two cords on the chandelier and three wires on the ceiling
Today, in the construction of houses in electrical wiring, three-core cables with wires of different colors are used. It is logical to assume that three wires will need to be connected to the lighting fixture. How to connect a chandelier in this situation, if it has only two cables?
To begin with, using the indicator, you need to deal with the types of wires that come out of the ceiling. Two of them will be phase, and the third will be a conductor. Two phases in this case imply a switch with two keys. However, given the fact that the chandelier has only two cables, a switch with one key will suffice.
It is important to know! Before connecting, it is necessary to carry out insulation, having previously turned off the voltage.
Scheme three. Three or more cords on the chandelier and two wires on the ceiling
In the case when only two cables come out of the ceiling, all the lamps in the lighting fixture will burn at the same time. To connect, you need to combine the neutral wires, and then lead them to the zero ceiling cable. Next, it is worth repeating the procedure with phase.
Scheme four. Three or more wires on the chandelier and three on the ceiling
This connection option can provide a more reasonable use of lamps. It will be possible to combine their work or turn them on in turn. In this case, a two-gang switch will be used.
Ceiling wire marking is as follows: phase - L1 (orange), phase - L2 ( yellow color) and zero - N (blue). Due to the fact that manufacturers of cable products do not always indicate designations, and electricians may not adhere to color scheme standards when installing wiring, it is better to double-check their purpose with an indicator screwdriver before connecting them.
It is important to know! Do not forget that phase cables are always laid to the switch, and zero cables to the lighting fixture.
Connecting a chandelier with several cords is carried out with a certain sequence of actions. First, the wires from the light bulbs must be divided into two groups. All sections are individually connected to only one wire, to which the phase leads, and then the sections are combined with zero.

With this setting, one group of light bulbs will light up with the first key, and another group with the second. This connection option allows you to connect one, two or three bulbs together using only one switch button.
The second way to connect a chandelier, for example, with six horns - the first key turns on 5 light bulbs together, and the second - the sixth.

With a large number of horns in the lighting device, the installation will proceed in an identical way. It remains to decide which combination of lamps you want to use in lighting this room.
Scheme five. Three or more wires on the chandelier and four on the ceiling
If it is necessary to connect a chandelier in a new building or a private house, most likely, a cord with a protection function will come out of the ceiling. As a rule, this cable is yellow-green and is marked in Latin letters PE, which literally means a grounding conductor. As a result, from the side of the ceiling there will be wires with phases L1 and L2, a neutral wire and a fourth pinching wire - PE.
In no case will such a cord interfere with the connection - just connect it to the yellow-green wire from the side of the chandelier. If the lighting device does not provide for the presence of this wire, then the cable is insulated from the ceiling side.
Installation of several chandeliers on one switch
This connection case is very relevant for lighting control in several rooms, large living rooms or in a room with false ceiling with a group of LED lamps.

In this situation, all lighting fixtures must be connected in parallel.
Moreover, each chandelier can have its own junction box.

Mounting three chandeliers on a three-gang switch
This connection method is used in kitchen, toilet and bathroom lighting, and the three-button switch is very convenient here.

Also, a switch with three keys is used in the corridor to control the light in different areas.
Installation of a chandelier with a fan
Connecting such a model is a fairly rational solution, especially in hot weather. Before installing this type of lighting device, you just need to read the instructions, which will detail the connection diagram.
To make it clearer: the fan in this case acts as another lamp, which is connected in parallel.

At your request, you can also make a separate switch key for it.
As you can see, connecting a lighting fixture is a simple task if you know how to do it right. Follow the diagrams, follow the installation rules, and you can easily cope with the connection without outside help.