Willow whistle toy. Whistle made of wood Homemade whistle
DIY whistle
Manufacturing difficulty: ★☆☆☆☆Production time: Less than 10 minutes
Materials at hand: ██████████ 100%
I want to introduce you to the simplest homemade- whistle. Making such a whistle with your own hands is a little more difficult than whistling into it, as you will see later.
- Tin can or any other thin sheet metal
- Paper
- Scissors. Ordinary scissors will also cope with a tin can.
- Writing instrument (pen, pencil, marker, nail)
- Pliers
Step 5. Bend the cylindrical part
We bend the rest of the ring. Use some kind of cylindrical object.
If the metal of your whistle is thick, I advise you to sharpen the edge.
To whistle, tightly hold the whistle with your thumb and forefinger, and blow.
By the way, such a homemade whistle is not the easiest way to whistle loudly! It is much easier to whistle using your fingers. You can learn more about this from the videoResults of the work and advice
- Making a whistle with your own hands is very, very simple, the materials are as affordable as possible.
- You can make a whistle of any tone, even ultrasonic.
- It whistles very loudly, not like plastic toys.
- If you throw a couple of balls inside, you get a typical football turbo whistle. Only the balls will fall out if you do not hold the whistle in your hands =)
DIY whistle
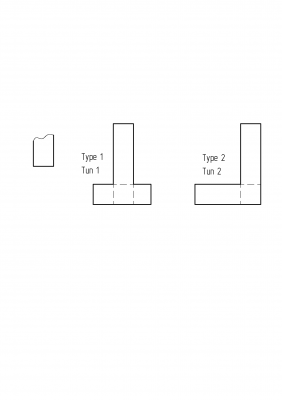
Step 1. Drawings and design selection
You can make such a whistle in two different ways. They practically do not differ, so you can do as you like, more details about the differences will be written a little further. Blueprints


If you don’t feel like drawing, just print the following drawing, it is made in the right scale.
Step 2. Material selection
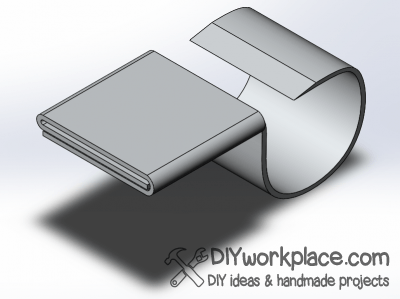
About the material: make a whistle the best thing from thin sheet metal, slightly thicker than a tin can. If there is none, then we take directly tin can. Cans of beer and soda will also work, but they are made of too thin metal, and the whistle will turn out to be very fragile, and the whistle will be extremely unstable. It is possible to make a whistle from a sheet of galvanized steel, but it is rather difficult. But at the same time, I succeeded (the first photo of the article).

Step 3. Transferring the drawing
We draw the selected whistle pattern on the metal and cut it out (tin cans are cut without problems with ordinary scissors).
If you have printed a drawing, just cut it out and circle it with a nail or pencil on the metal

Step 4. Bend
Here is the fundamental difference between the two types of whistle, just in the design of the front:
First type


Second type

As you can see, the difference is only in the variant of the bending of the petals. To form a gap through which air will flow, put a strip of metal as in the photo below (it is shaded) and bend the petals onto it according to the selected type and drawing. I do the first type.


Here it is important to press the edge hard enough with pliers so that the gap has the most even rectangular shape.

Now we remove the strip of metal from the gap

If your metal is too thin, fold the strip in half

As a result, we get such a rectangular slot

A homemade whistle is a fun toy with funny sonorous trills, which you can make from paper, tree branches, cans, plastic stoppers. We have collected the most interesting and proven ways to make a whistle - choose the material and follow our advice.
How to make a wood whistle
For the whistling mechanism, a freshly cut, even sprig of willow or hazel, 15 cm long, 2 cm in diameter, is suitable. You will also need a sharp knife and some free time.
- Cut vertically one tip of the twig, and on the second - make a circular notch.
- On one side of the stick, closer to the edge, cut the bark in the form of an English letter - D. Tap the blank with a knife so that the bark comes off, then press it with your fingers, and it will move off the base itself.


- From the bare rod, cut off a small rectangle at the place of the annular basting and cut off part of the wood from it - a gap for the whistle.


- Insert the resulting part into a case of bark cut up. Insert the remaining piece of the twig into the bottom of the whistle.


- Blow into the upper hole of the tube, and alternately raise and lower the stick-sleeve with your hand, adjusting the sound range. When the tone suits you, shorten the craft.

Tip: when the bark dries, the whistle stops whistling. Soak it for half an hour in water and it will work again.
Did your child like your gift so much that he whistles all day long? Build a pipe according to the same principle, doubling the length of the product and cutting several round holes, and listening to the music going on will be much more pleasant.


How to make a paper whistle
Even a kindergartner will make a paper whistle. True, the little thing will come out short-lived, but it will whistle strongly.
- Take a sheet of office paper and cut off one third of it horizontally.
- Set aside 1.5 cm to the right and left of the wide part, draw lines and wash them.
- Fold the figure in half so that the strips bent on the sides go to the outside. Cut out two triangles in the center of the fold.
- Place your lips on one triangle and blow into it, then blow into the second hole. Of course, the outgoing sounds bear little resemblance to a whistle, rather - it looks like the purring of a cartoon mammoth who was looking for his mother, but the kids will like it, that's for sure.

How to make a mini whistle
A whistle resembling a hunting decoy can be cut out of a tin coffee or beer can. Prepare: scissors, pliers, electrical tape, nails. See the drawing of the craft below.


- Cut out a piece of tin from a can, and from it - two rectangles, 20 x 40 mm in size. Mark them with a nail and make according to the template.


- Bend the wings on the first blank on both sides using a folding rule or fingers to make a 0.5 mm hole for air to pass through.

- Insert the second plate, assembled from tin, into the slot. Crimp the structure with pliers and tighten with electrical tape.


- Bend the tongue with a round pin.

- Close the sides of the tongue with your fingers and whistle. Do you think the whistle is too small? Adjust the model to the desired size by increasing its parameters proportionally.

In conclusion: all the whistles in our selection make piercingly loud sounds, so it's better to practice whistling in nature, and not in a city apartment.
We will now try to make with you the most simple homemade wooden whistle. With our own hands, in the presence of the child, and even let him take a little part in the process. Believe me, for him to watch the process of the birth of a toy will be a real miracle!
materials
So, we need a knife and an even willow rod, 7-10 millimeters thick. Why willow? Because it is very easy to remove the bark from a willow wand without damaging it. And this, as we will see later, is very important for us.
Willow is a plant with brittle branches, which means that you do not have to spoil a living plant. It is enough just to take a walk under a willow tree after a fresh breeze to collect a bunch of branches, just the ones we need.
Step 1. Cutting a suitable rod
We select a branch with intact and even bark (this is a very important condition), if possible, without knots. Now we need to find on this branch flat area 4-7 centimeters long. There may be buds in this area (this is common with willow), but in no case should there be any knots.
Now we cut the branch along the border of a flat area. At the other end of the section, we make an annular incision. The incision should be deep enough and slightly (precisely slightly) cling to the wood. To make sure that the entire layer of bark is really cut through, you can remove a ring 1-2 millimeters thick.

Step 2. "Rolling" the branch
After that, we begin to lightly “tap” the bark with a small hammer in a circle in all places. Instead of a hammer, you can use the handle of a knife. Instead of tapping, you can also “roll” a branch. This is done with the aim that the bark subsequently peels off the wood more easily.

Step 3. Removing the bark
We make a cut on the branch. After that, gently, with rotational movements, we try to remove the bark from the branch without damaging it. You should not hurry, if the bark is not removed, you need to knock on it again and try again. In the end, she will definitely come off.


Step 4 Preparing the Parts
Now, carefully cut off the “round” with a knife from the branch left without bark just along the line of our cutout.

Then we cut off the round barrel.

Do not try to cut it absolutely straight, it will not work anyway. Yes, we don't really need it. If the cut turns out to be wedge-shaped, as in our drawing - this is only for the better - it will be easier to adjust the sound.
Step 5 Assemble the Whistle
We insert the cut circle into its original place, with the cut up. If the cut turned out to be oblique, then we put it to the hole as a bottleneck.

Step 6Setting up the sound
Now, attention. We clamp the open end of the resulting tube and blow it strongly enough from the side of the round. The result will be a distinct whistle. True, its timbre may not be very beautiful.
Don't worry, we'll fix it now.
We cut off the remaining end of the stick, insert it into the open end of the tube and, moving the stick back and forth, select the most pleasant timbre of the whistle. Then we cut off the protruding part of the branch and the whistle is ready!


Attention! Our whistle gives a rather loud whistle. Therefore, the most the best place for exercises - cottage or Vacation home but not a city apartment.
The whistle has many varieties. There are: small, large, high pitch, low pitch, wooden, metal, plastic, steam and whistles. The whistle is used by referees during sports games, police, scouts and children who want to piss off their parents with loud noises. Would you like to make yourself such a whistle? Here's how to make a wooden whistle.
To make a whistle you need
- Wooden block measuring 7.6 cm x 2 cm x 2 cm
- Dowel with a diameter of eight millimeters and a length of five centimeters
- Hand saw
- Drill with a drill of eight millimeters
- Wood carving knife
- Sanding paper (medium grit)
- wood glue
The whistle refers to woodwind instruments from which the sound is extracted by force.
wooden whistle
- Drilled a hole with a diameter of eight centimeters in the center. Make it 5.9 cm deep. Then slowly draw with a special wood drill to clean the walls of the hole for the future whistle.
- Cut out the wedge as shown in the picture. It should be 1 cm deep and 1.3 cm long.
- Use sandpaper or a file to file one side of the dowel so that it becomes flat. The flat side should be about one quarter to one third of the diameter of the dowel. You won't need the entire length of the dowel, but when it's long it's easier to handle.
- dowels in a hole in the bar. The end of the dowel should be near the intersection of the hole and the wedge.
- Try the whistle by blowing it. Position the dowel for the best sound, then cut off the excess length of the dowel (when it is in the block of wood)
- Take out the dowel, apply a thin layer of wood glue to its rounded part and put it back into the hole.
- With a knife, give the whistle a rounded shape. (Or you can put it in a vise and use a rasp.) Careful with this action... it's not your intention to rip off your finger. Treat the outer surface of the whistle with sandpaper to make it smooth.
- Start blowing the whistle.


Experiment with different whistles
You can make whistles of different tones by changing the length of the hole. The notch remains the same, only the length wooden block and hole length change. The longer the piece of wood and the hole in it, the lower the tone. Did you know that Japanese bird whistles use several small balls and they are half filled with water in order to play.
homemade whistle
We will now try to make with you the most simple homemade wooden whistle. With our own hands, in the presence of the child, and even let him take a little part in the process. Believe me, for him to watch the process of the birth of a toy will be a real miracle!
So, we need an even willow rod, 7-10 millimeters thick. Why willow? Because it is very easy to remove the bark from a willow wand without damaging it. And this, as we will see later, is very important for us.
In addition, willow is a plant with brittle branches, which means that you do not have to spoil a living plant. It is enough just to take a walk under a willow tree after a fresh breeze to collect a bunch of branches, just the ones we need.
We select a branch with intact and even bark (this is a very important condition), if possible, without knots. Now we need to find on this branch a flat area 4-7 centimeters long. There may be buds in this area (this is common with willow), but in no case should there be any knots.
How to make a whistle out of wood with your own hands, what you need to know and be able to.
Material selection:
For this product, a vegetable hollow cane trunk is suitable,

Reeds or a tube made of wood (you can use food-grade plastic).
Detailing:
. a tube
. inlet cylinder
. tone control knob
A TUBE

Made from wood. The outer diameter is twelve millimeters. The wall thickness is two millimeters. Length - one hundred and twenty. From the side of the input channel, at an angle of thirty degrees, there is a cut. A groove was made at the top for air to escape. The surface is decorated.
CYLINDER

Made from wood. Its diameter is eight millimeters.
On top there is a cut at an angle of five degrees towards the tube inlet. Below there is a cut identical to the cut in the tube.
PLUG

Made from wood. Its diameter is eight millimeters. Length - eighty.
Assembly order
1. We coat the cylinder with glue and insert it into the tube from the side of the cut.
2. Insert the plug into the tube from the back.
3. By the depth of the position of the plug, select the tone of the sound (the deeper, the thinner the sound)
4. Cut off the excess part of the plug.
5. We coat the rest of the plug with glue and insert it into the tube.

Reference: if the length of the tube is increased to 280 (mm); make six holes in turn on the surface of the groove, from the edge of the product (each of which has its own tone - the wider and farther from the groove, the higher the note) with a step of 20 (mm); make one hole on the reverse side of the groove surface, from the edge of the product, at a distance of 140 (mm); we get - a pipe.
And finally, one piece of advice. If you manage to find a willow twig with a fairly long section of even bark, 10-15 centimeters, then instead of a whistle you can make a simple home-made flute. It is made in the same way as a whistle, but instead of choosing the timbre of the sound, just plug the open end with a wooden cork, and in the remaining space, make 3-4 holes in the bark so that they can be plugged with your fingers at the same time. By opening one or another hole in turn, we can reproduce the simplest melodies. Of course, our notes will not correspond to the natural scale, but we do not need it. The main thing is that the melody is pleasant. Well, now you can please the child with a homemade whistle.
We suggest you watch the video clip: "How to make a whistle out of wood", which presents a product of a different design.
In our opinion, the model is interesting.