World boats: from gondola to junk. Do-it-yourself boat "Dugout" using old-fashioned technology The tool needed to make a dugout boat
Before starting the construction of a wooden boat, you need to take care of its most important parts in advance - sides. For this, long, wide, not thick, preferably without knots, pine or spruce boards are selected. They must lie for at least one year in a dry place, on a flat surface with a slight oppression from above in order to avoid their curvature.
Once again we examine the prepared boards for defects - cracks, falling knots, etc. Then we measure the desired length (here and further, the specific dimensions of the parts of the boat will not be given, because all this is at your discretion) with a small margin and file each of them at an angle of 45 degrees - this will be the bow.

Next, they need to be planed, and the chamfered ends must be chamfered so that the boards pressed against each other in the bow do not have a gap.
These areas, and in the future all the others that will be inaccessible for painting after the assembly of the structure, are impregnated with a protective layer of antiseptic.

After that, we proceed to the manufacture of the base of the nose - a triangular bar. Its length should exceed approximately 1.5 times the width of the sides of the boat. The bar is also planed and covered with a protective layer.

Do not forget to leave a margin at the top and bottom, then after assembly, all the excess will be cut off.

Having prepared these elements, we proceed directly to the assembly. We start from the bow, we firmly connect both sides and the triangular bar with self-tapping screws or nails.

We cut the protruding parts from above and below flush with the sides.

It must be exactly the same height as shown in the photo, otherwise the boards may burst during bending. The angle of the strut should also not be made too large.

Having installed the spacer, we begin to bend the sides, here you need a couple of assistants or a rope. Having bent to the required distance, we apply the “back” and determine where and how much the chamfer needs to be chamfered so that the sides adjoin it without gaps.
So, gradually removing, we adjust it until we achieve the desired result.

Having achieved it, we nail the sides and cut off the protruding parts from below, and from above as you wish. It is better to do in the form of a triangle.

Then we proceed to the installation of permanent struts and seats. Their number and location is up to you. When fixing them (yes, in general, and in other places), be sure to first make a hole with a small drill in order to avoid cracks.

We complete a very important initial stage by chamfering the lower part of the sides, spacers and applying a protective coating on them.

After the impregnation and wood glue have dried, you can start making its bottom. To do this, we need a smooth galvanized sheet. It is desirable that its length corresponds to the length of the vessel. True, it’s not easy to pick one up, the fact is that construction stores sell mainly small sheets (1.2x2m, 1.5x2), and they are very reluctant to cut off large rolls. If you can't reach an agreement, take what you have. The bottom can be made from two sheets, just get a little more difficult.
From the purchased galvanization, we cut out a piece corresponding to the size of the bottom with scissors for metal. To make it easier to determine the length and width, we put the boat on a sheet and circle it with a marker, with a small margin of 1.2-2 cm, just in case.

Next, we need to prepare the lower parts of the sides. We apply with a pistol sanitary silicone sealant a small layer in the form of a continuous winding thread. After that, we lay a special cord directly on it in two rows. All this in the future will reliably protect the bottom of the boat from leakage.
If there is no sealant, we replace it with ordinary paint, if there is no thread, we put tow.

Having completed this, carefully place the cut out piece of tin on the boat, align it and begin to fasten it.
For fastening, you can use galvanized self-tapping screws with a press washer or nails. In this case, we fasten with a method proven over the years - i.e. nails (1.8x32). We start work from the middle and move to the edges. The work is monotonous and tedious, but one should not rush - protruding nails will not add beauty.
How often you need to beat them is shown in the photo.

Those places in which the tin protrudes beyond the edges by more than 5 mm are cut off. The rest is tapped with a hammer, bending on board.

The nose of the boat needs protection, we cover it with the same tin. We measure and cut the desired piece in the form of a rectangle.
On that part of the sides that will be closed with galvanization, previously impregnated with antiseptics (in general, by this time the boat needs to be covered with at least one layer of impregnation), we apply a sealant with a thread. After that, we apply a sheet as shown in the photo and pin it.
The edges of the tin should not go beyond the triangle nose, otherwise the nails will come out.

We lay the galvanized top and bottom on top of each other, cutting off the excess and also fasten it with nails. The result is a great nose, only very sharp. Therefore, we crush or cut off its tip, so as not to damage the swamps or fishing tackle about it later.

A new boat on a pond will definitely attract attention, in order to somehow protect it from encroachment or so that it is not carried away by the current, we make a chain mount in the bow. To do this, we need a long bolt or stud. We drill a hole in the sides exactly along the diameter of the stud, fixing it, sawing off the excess with a hacksaw for metal.

The boat is almost ready. We cover it with an additional 2 more layers of impregnation and leave to dry in the shade.
If you wish, you can immediately take care of protecting the bottom of the boat by covering it with paint. Galvanization on the outside, in contact with water, is destroyed over time without additional coating.

In order to make it comfortable to walk along the bottom of the tin and it does not rattle, it is necessary to provide a wooden flooring. It can be of the most varied design. For example like this.

Now we can confidently say that the boat is ready! A boat with a galvanized bottom is much lighter than with a wooden one, and during operation it will be easier to prepare it after wintering for the next season. In terms of strength, it is in no way inferior to others. For example, in my previous old boat, after 10 years of use, the sides rotted, and at least something to the bottom.
Yes, and one more thing - do not spare the antiseptic, it is him, and not the paint, that he resists the destruction of the tree much better.
If in the end you get something similar or even better, you can congratulate you on a successful business.
Here are some final photos of different people:


Source: grossoxota.ru
DIY boat making video tutorials
Plywood boat
Boat made of iron sheet
In our opinion, another type of small vessel has been undeservedly forgotten. It's about about a dugout boat. Behind its seeming simplicity and "absurdity" are hidden both the rationality of the design and excellent driving performance. The absence of scarce materials and the minimum set of required tools make it possible to manufacture such dugout boat directly on the shore, away from settlements, in places of hunting or fishing.
For many decades, the secrets of master boatmen were passed down by word of mouth, from father to son, without drawings or calculations. And since a limited number of people were engaged in this trade, today it is very difficult to find a specialist who can competently, according to all the rules, make a real dugout. This is aggravated by the fact that now, in the era modern materials and technologies, there are practically no masters of the younger generation, and the old ones, unfortunately, take their experience and skill with them: their art dies with them. Therefore, we decided to introduce homemade people to dugout boat manufacturing process. Perhaps some of them will be interested in this topic. We hope that the traditions of folk craft with their help will be preserved and continued, bringing benefits.
When describing the procedure for working on a boat, we proceed from the capabilities of a single master, without the use of machine tools and any lifting mechanisms. However, in any case, both the manufacturing process itself and the boat itself will bring you real pleasure.
Before getting started, there are a few things to keep in mind:
1. Do not immediately take on the manufacture of a large boat. An unprepared person may not be able to do this. It would be more correct to try a variant with a length of 3-4 meters.
3. The proposed technology and terminology takes place in our places, in the Krasnoyarsk Territory. Of course, it may differ in other areas. Keep this in mind to avoid confusion.
4. Do not forget about the accumulated experience in amateur shipbuilding. It is very useful for work, especially if a beginner undertakes it, various additional literature.
The choice of material and dimensions of dugout boats
Homemade solid wood dugout boat can be made from pine, cedar, larch, aspen or poplar. In our area, aspen and poplar are preferred, as their wood is durable and easy to process. The time of year for felling a tree does not really matter; it can be both winter and summer. It is important that this is done on a full moon. According to the experience of the old masters, if you cut a tree “for a young month”, then the made boat will be very difficult to breed, and during operation it will quickly fail. Perhaps this will seem like prejudice to some, but such advice has come down to us from antiquity.
The length of the boat is selected based on the required carrying capacity (usually about half a ton), the state of the reservoir where it will be used, and the availability of wood. right size. The following dimensions are commonly used: 4.5 m, 7 m and 9 m. The longer the boat, the more laborious it is, of course, to manufacture, but it is better on the go. A suitable trunk diameter is selected as follows: they clasp the tree with both hands, and if the fingers do not converge by 30–40 cm, this is what you need (the circumference is about 180–200 cm).
Tool needed to make a dugout boat
To make a boat, you will need the following tools: an ax; tesla - straight and lateral (made from an ax with subsequent hardening); plumb; a brace or drill with a drill with a diameter of 10 mm; two-handed planer (a regular, one-handed one is also suitable, but it is more difficult for them to work); crosscut saw or chainsaw.
Preparation of the bottom of the dugout boat
Having laid the felled trunk of the selected dimensions on two thick poles (it will be more convenient to work alone), they begin to prepare the bottom of the future boat. To do this, they examine the workpiece along the length and find a section that is even along the entire length, without visible dips and distortions in the middle - this will be the bottom. The selected place is skinned with a width slightly larger than the width of the ax blade, and then a line is beaten off on the resulting strip with the help of a plumb line and a cord. Now, along the line, carefully remove a layer of wood, making sure that there are no humps and depressions.
Turning the trunk over on the poles and fixing it so that the bottom plane is horizontal, we determine the middle of the log. For this, a plumb line and a ruler are used. Having broken through the middle with a cord, we retreat to the right and left of this line by about 40-45 mm (two fingers) and draw two more side lines.
Preparing the bow and stern of the boat
When starting to mark the bow and stern, you need to remember that the butt of the workpiece will be the bow, and the top will be the stern, that is, the bow should be larger in size than the stern. This factor is associated with the features of operation, for example - with outboard motors.
After completing all of the above from the side of the bow and stern, along the plumb line, we beat off the lines, which are, as it were, a continuation of the middle and side lines of the bottom. Stepping back from the lower edge of the log by 120-150 mm, perpendicular to the vertical lines, we draw the lower edges of the bow and stern.
 |
Now we need to determine the length of the bow and stern. When making a boat of the recommended dimensions, they are approximately 500–600 mm and 400–500 mm, respectively. In the general case, they depend on the diameter of the trunk and can change in one direction or another. But for any value, the length of the bow should be 100–120 mm longer than the length of the stern. In order not to subsequently “lose” the necessary points (the intersections of the lines of the lower edge with vertical markings at the ends and the side lines of horizontal markings with limiters for the lengths of the stern and bow), select them with a bright pencil or charcoal.
Cutting the bow and stern is done with an ax. It is important here not to rush and not to kill for the marked points. The slope of the cheeks should not be too steep and not too flat. In this case, any other recommendations are hardly appropriate: you just need to feel the tree and, when choosing sizes, rely first on intuition, and then on experience. So, with a sharpened ax we give the cheek the shape shown in the figure. In the same way, we process the workpiece on the other side. Then we connect the reference points and remove the excess so that we get a narrow inclined surface.
Having processed both ends in the described way and without turning the workpiece over, we sand it over the entire visible surface. From the extreme horizontal marking lines, we remove the wood with ribbons so that the trunk takes an ovoid shape in cross section. This usually requires going through 4-5 ribbons. Of course, we must not forget about the symmetry of the sides, and also avoid visible dips and bulges. The exit of the tape to the nose and norm should be smooth. This work is not difficult, but requires accuracy and does not tolerate haste. In conclusion, we turn the workpiece over and finally sand it.
Ya. Solomennikov, I. Solomennikov, p. Karatuz, Krasnoyarsk Territory.
We build a plywood boat from seven parts.

A short article about the dinghy "Jack Sprat", (), attracted the attention of our team of yachtsmen. I really liked the boat for its compactness (2.3x1.3 m), rather large capacity - in the photograph there were four adults and two children in it, and the simplicity of manufacturing technology.
We took as a basis the results given in the article dimensions tuzika and within a week made a similar plywood boat.
For the construction of the boat, sheets of ordinary construction plywood 4 mm thick, glued (a mustache joint was used) to a length of 2400 mm, were used. Of these, in accordance with the sketches given, they cut out the blanks of the skin.
General view of the boat (a), cutting of the transoms (b), section along the midship frame (c) and sketch of the oar (d)

Cut sheets of outer skin.

enlarge, 1303х993, 120 KB
The body assembly looked like this. Having laid the blank of the bottom on the floor and the blanks of the zygomatic belts with the corresponding edges to it, they connected them together. First, the blanks are connected approximately in the middle of the length of the boat with copper wire clips with a diameter of 1.5 mm. Then, gradually bringing the edges closer, the same paper clips are successively placed in the bow and stern along the entire length of the cheekbone. At the ends, the shape of the hull is determined by the bow and stern transoms.
Holes with a diameter of 2 mm for staples must be drilled in advance with a step of 100-120 mm along a line beaten off at a distance of 8-10 mm from the edge of the workpiece processed to a clean size. It is better to twist the ends of the wire from the outside of the body, as shown in the sketch.
The sequence of making connections in the grooves of the skin:
a - setting wire clips and crimping them; b - the groove is ready for lining the internal fiberglass tapes; c - the layout of the tapes in the connection

In a similar way, blanks for the sides were attached to the zygomatic belts of the skin. Staples were also used to connect the skin to the transoms.
Then all joints were glued in two or three layers from the inside with fiberglass tapes. After curing the epoxy and removing the ends of the staples, the same strips of fiberglass were applied to the grooves on the outside of the case. When the transverse banks and the bow bracket (120X120) were inserted, and the fenders were glued along the upper edges of the sides, the hull acquired the necessary rigidity. The bottom was reinforced with thin pine planks glued to the plywood from the inside.
As it turned out, for the convenience of assembling the case in a similar way, it is best to use plywood of the same thickness everywhere, as provided by Jack Holt, the author of the tuzik. To increase the moisture resistance and durability of the plywood body, we glued it on the outside with two layers of thin fiberglass on epoxy resin. A “false keel” with a section of 50x6 was glued to the bottom. A small fin was placed in the stern to increase stability on the course. Styrofoam blocks were fixed under the banks. The total weight of the boat turned out to be 35 kg.
The four-year operation of the boat as an onboard dinghy on the Vityaz yacht confirmed its high performance. Quite successfully it was also used under the Salyut.
We think that by slightly reducing the height of the side, and, consequently, reducing the weight (this will be especially noticeable if waterproof plywood is used), a boat of this type can also be recommended to motorists for transportation on the top trunk of a minicar.
A. K. Kartsev, "Boats and yachts", 1979, No. 01 (077).
======================================================================
Sail on the "Chizhik".

A mast with a sail installed on an ordinary rowing boat does not yet turn it into a real sailboat. In addition to the sail and spars with rigging, which allow you to set the sail and control it, you need a rudder with an increased pen area and, of course, a daggerboard or daggerboards that keep the boat from excessive lateral drift (drift) at lateral and, especially, steep courses to the wind - at an angle up to 40-50° towards the wind.
The placement of the crew, and therefore the arrangement of cans, on a sailing boat is always different from that on a rowing or motor boat: the crew must tilt the boat, counteracting the heeling wind pressure, and for this people need to be placed along the side. In addition, the dimensions and shape of the hull of the boat must correspond to the conditions of sailing, i.e., be designed for movement at a relatively low speed.
"Chizhik" (see "KYa" No. 24) was designed as a rowing boat with the possibility of using a low-power outboard motor: naturally, the design of the boat was designed specifically for these use cases. So, on the "Chizhik" a longitudinal middle bank was arranged for the rower; thanks to this, it is possible to give the boat an optimal trim depending on the number of passengers, it remains free space for passage along the boat, on the sides of this jar, you can sleep on elans. However, the same bank is not needed at all on the "Chizhik" - a dinghy.
Basic data of the boat "Chizhik"
Maximum length 3.47m
Width overall 1.47m
Board height 0.5m
Load capacity 300kg
Power up to 5 PM, l. with.
To turn the "Chizhik" into a sailing boat, appropriate changes in the design of its hull are necessary, therefore, readers of the collection who are interested in this issue are offered two options:
Option 1 - most fully takes into account the requirements for a sailing and rowing boat, but provides for significant changes in the original project. This option is better to implement for those who are just going to build "Chizhik";
Option 2 is a compromise solution that provides for a minimum of changes to an already finished boat built according to the original drawings.
In option 1, equipment for a centerboard well, a transverse and two side cans in the cockpit and fastening of removable parts - a mast and a rudder are required. The hull of the boat is being built according to the original project, but the side stringer is brought to sp. 1. Instead of a longitudinal bank, a centerboard well is installed, which is a narrow box, open only from below, fixed with screws on glue above the slot for the centerboard in the keel. The well is unfastened by a transverse can resting on an onboard stringer.
The walls of the well and the flooring of the can are cut out of waterproof plywood 6 mm thick. final assembly the well is made after fastening from the inside of the vertical racks to sp. 2. It is the well closed from above that is convenient on the Chizhik - through the open well (involuntarily it would have to be made low), with any significant excitement, water would splash into the boat.


Alyosha "- the first dinghy based on the "Chizhik", built in the city of Gus-Khrustalny by V. Zhirnov.
The hull is made exactly according to the drawings given in No. 24 "KYa". A rigid can is placed across the hull, which unfastens the centerboard well. The stern fin is made higher - up to 120 mm on the transom. The dinghy is armed with a sloop with a sail area of about 6 m2. The total height of the mast, fixed with a headstay (st. cable diameter 3) and shrouds with screw lanyards, is about 8 m from the step. The mast and boom (2.0 m) are glued from pine laths and have a lip groove. The cable epaulette of the boom-sheet is hung on the transom. A block with a diameter of 25 mm slides along the shoulder strap - the sheet is passed through a block approximately in the middle of the boom and a foot block fixed on the bottom.
In connection with the tourist purpose of the boat, it is necessary to use a rotary centerboard; simpler fixed ones - “sticking” skewers cause hard blows when colliding with underwater obstacles and are inconvenient, and sometimes even dangerous when swimming in an unfamiliar area.
The daggerboard rotates on an axle, the cheeks of which are fastened with screws outside the keel to avoid drilling holes in the bottom of the daggerboard well. The dagger is rotated using a rod made of a metal bar or a thick-walled tube with a diameter of 20 mm riveted to its rear edge (do not forget to put a plug in the tube!). The rod must be very carefully bent around a circle with a radius of 250 mm (on the axis). At its exit from the centerboard well, a seal made of microporous rubber about 10 mm thick is installed, pressed by a metal plate. The hole in the rubber should be smaller in diameter than the rod. The centerboard is raised and lowered by a pusher made of a 4X30 metal strip, hinged to the rod with an M8 screw. At the aft end of the pusher, it is desirable to install a handle in the form of a wooden ball (the idea of \u200b\u200bthis design is borrowed from one old sailing dinghy).
The front and rear edges of the centerboard must be sharpened, and along the leading edge it is desirable to fix a protective fitting made of brass strip 1 mm thick. The most convenient to use are removable side cans, based on the side stringer, a thrust bar on the bulkhead of the aft locker and a strip of plywood under the transverse can. They are held in place by swivel latches, the same as the polik latches. Under the longitudinal banks, foam blocks of buoyancy must be securely attached to the hull of the boat.
The steering wheel consists of a steering block and a lifting pen. The block is assembled on glue and bolts with a diameter of 5-6 mm from three layers of bakelized plywood. The middle part, 12 mm thick, has a sector cutout for the rudder blade. The side cheeks are 8 mm thick. The tiller is attached to the block with a metal clip bent from a sheet. The steering hinges are sawn out of a square with a wall thickness of at least 4 mm or bent from a strip and attached to the block with screws with a diameter of 6 mm. The pins (from M8 bolts with cut heads) are screwed into the threads of the hinge holes and riveted. The lower pin must be about 20 mm longer than the upper pin, otherwise the steering wheel will be difficult to install in place. The details of the steering loops, attached to the transom, are also sawn out of a square and installed on the Mb through bolts.
The rudder blade is cut out of bakelized plywood with a thickness of 12 mm and, like the daggerboard, is sharpened along the edges and protected by forging. The axis of the pen is an M8 bolt, the tightening of which is adjusted so that the raised pen is held by friction against the cheeks of the block. The upper part of the rudder blade should be sanded so that it freely enters the slot of the block. The feather is lowered into the water directly by hand; for this, a lever with a handle is provided on its rear edge. For insurance against jumping out of the loops, the steering wheel is fixed with a flat spring, fixed above the lower steering loop.
On the transom of the boat on the starboard side at a distance of 400 mm from the DP, a second pair of steering loops is installed, on which the steering wheel is hung when oaring. This is very convenient for the helmsman, as the tiller moves freely under right hand, and does not rest against the back; rudder shift practically does not affect the controllability of the boat.

Equipment "Chizhik" daggerboard and steering gear
1 - forging from a strip 1X30; 2-feather steering wheel, bacfaner 6 = 12; 3 - handle for lifting the pen; 4- steering block; 5 - tiller, 40X40; 6 - boom sheet; 7 - boom clip, 6 = 2 mm; 8- duck for a halyard; 9- clip from the strip 3X40, fasten to the beam with through bolts M 6; 10 - step overlay, 6 = 2 mm with a rectangular hole for the mast spur; 11- sealing holes for traction 12; 12 - thrust from a tube 0 20 mm; 13 - centerboard axis - pin 0 12 mm; 14 - daggerboard, bacfaner 6 = 12; 15-cheeks of the centerboard axis, 6 = 2.5mm; 16 - well wall; plywood 6=6; 17 - stand (key) of the well 25X60; 18 - gunwale-plug of the well 25X30; 19- tiller clip, 6 = 2; 20 - side cheeks of the block, bacfaner 6=8; 21 - steering loop; 22- plywood gasket 6 = 6; 23 - daggerboard thrust; 24-board seats-banks; 25 - the position of the steering wheel when rowing.
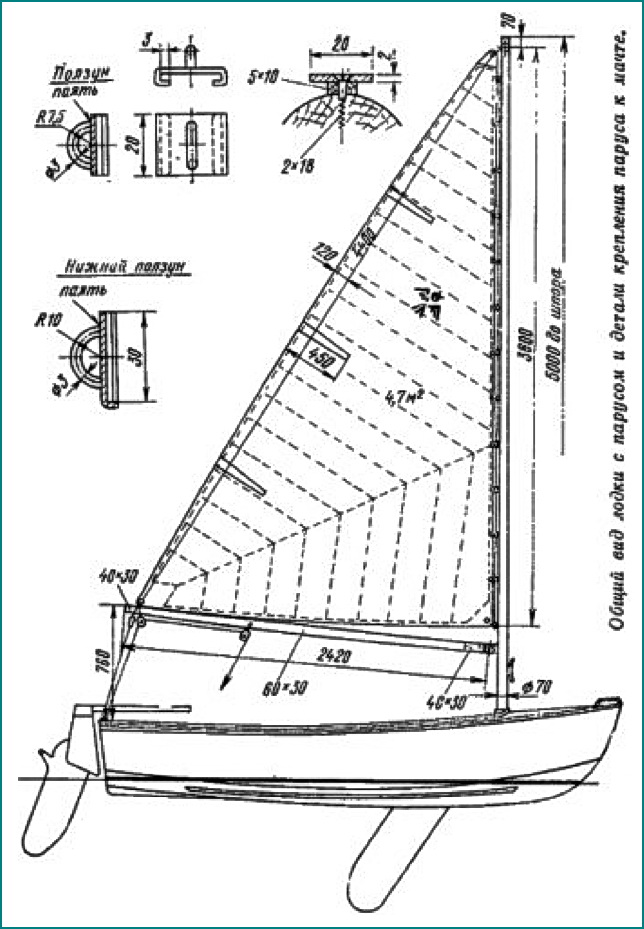
The mast blank is glued from three to four pine bars of the desired length. The cross section of the mast is above the cockpit coaming and up to about half the height - a circle with a diameter of 70 /l/l. Above this level, the front and side edges are smoothly chipped to a section on the top 40X50, below - to a section at the spur 30X50 ( larger size in both cases along the DP).

Option with screws
1 - fitting 20X2; 2 - keel 25X80; 3 - the base of the well 20 X 60; 4 - cutout for the pusher of the centerboard; 5 - well stand 20X60; 6 - gunwale of the well 25X30; 7 - from the well, 6 \u003d 6; 8 - stiffener of the transverse can 20X30; 9 - can flooring, 6=6; 10 - coaming, plywood 4X50; 11 -carleigs, 20X 25; 12 - fender, 18X30; 13 - can support bar, 18X30; 14 - toptimbers 6 = 20; 15 - cheekbone stringer, 18X30; 16 - sheathing, 6=4; 17-floortimbers 6 = 20; 18-bottom skid 20X30.

The simplest boom swivel.
1 - boom; 2- M5 screw, 2 pcs; 3 - strip b = 6 cut into the boom; 4.6 - M8 bolts; 5 - washer 8; 7 - bracket, fastened to the mast with two screws 5X32; 8 - clip b = 2.

A variant of a boat with screws.
1-forging the screw, X40, brass; 2-shverts, bakfaner 6=15/16; 3-sorlin; 4-bearing; 5-cage made of steel diameter 3; 6-support bar; 7-longitudinal seat; 8 - transverse bank 6=6; 9-pine lining; 10 check; 11 - bent axle; 12- retaining ring.
AT upper part the mast cuts into a pulley for a halyard; the swivel of the boom and the weft of the halyard are attached below. On the trailing edge of the mast, a 5X10 rail for mainsail sliders is fastened with screws through a 5X10 rail - a carefully aligned 2X20 metal strip.
The mast spur enters a 25 mm deep step socket, cut out in the rear part of the stem, and reinforced with a 2 mm thick metal bracket superimposed on top with a rectangular hole sawn into it for the spur passage. The finished mast, like all parts of the spars, is covered with a colorless varnish (oil or pentaphthalic). There is no standing rigging - shrouds and stay are not needed; the mast, along with the boom and sail, is easy to remove from the boat. If necessary, you can make the mast collapsible. In this case, the upper and lower parts of the mast are connected by a coupling made of metal pipe with a wall thickness of about 2 mm. The 400mm long sleeve is attached with screws or through bolts to the top of the mast; in order to fix the correct position of the connected parts of the mast, a screw with a diameter of MB is screwed into the lower part, and a slot about 20 mm deep is made in the coupling. In the area of the coupling, the rail for the mainsail sliders is mounted on short M4 screws screwed into the threaded holes.
A boom with a section of 30 X 60 is best glued in thickness from two pine bars. Towards the ends, the boom is cut along the lower edge to a height of 40 mm.
When equipped according to the second option, the boat is no longer equipped with a centerboard, but with hinged screws. On both sides in the area of sp. 2 on the inside of the skin, a support bar for the transverse bank is installed (cut on the frame), and on the outside, a bar for the stop of the screws. The transverse bank is attached to these support bars at the side and to the longitudinal bank. Below deck on both sides of the beam sp. 2 pillows are installed for the bearings of the screws.
The screws are cut out of bakelized plywood with a thickness of 15-16 mm, their vertical edges are sharpened, and protective fittings are placed along them. The upper part of the shverts is put on an axis made of a steel bar with a diameter of 16 mm, bent at a right angle. In the holder of the screw, the axis is fixed with a stopper in the form of a Mb screw without a head, screwed into the axis and going through the slots of the holder. The pivot pin is inserted into the deck bearing and fixed in it with a swivel pin. The transverse movement of the axle in the bearing is limited by a piece of tube riveted to it, from which the cage bushing was made. Shvertsy are raised by sorlins, which are laid on ducks inside the boat.
The design of the mast, boom and rudder is the same as in option 1, but it is recommended to reduce the sail area by 1 m2, taking into account the fact that the area of \u200b\u200bthe shverts is smaller than the centerboard, and the possibilities for tilting the boat due to a different arrangement of cans are somewhat worse.
Making a sailing rig is a rather complicated and time-consuming task, but the pleasure of sailing, no doubt, will more than pay for this work. However, it should be noted that the management sailboat, even as small as the "Chizhik", requires special training of the helmsman. The best way to learn sailing is at a yacht club.
When self-studying the art of sailing, you should strictly follow the basic safety rules:
Do not overload the boat; do not take on board people who cannot swim and small children;
When sailing, the crew must always wear life jackets;
Keep a close eye on the weather; in case of danger of a squall, immediately remove the sail and sit down at the oars;
You can’t sail with a wind stronger than 4 points, and at the beginning, with insufficient experience, no more than 3 points;
Never lay sheets on a duck; always keep the halyard bay clean - ready to lower the sail;
When sailing, check if you forgot to take the oars;
Until you have gained confidence in your abilities, do not leave the area where you can be provided
immediate assistance in the event of a rollover.