Do-it-yourself installation of a lock in an interior door
At the final stage of apartment renovation, its owner installs interior doors.
The appearance of the doors brings its own, special flavor to the interior of the room.
In addition, interior doors fulfill their main purpose - they separate one room from another, creating the illusion of privacy for a family member or a couple in love.
The door leaf will not be able to perform this function if the structure is not equipped with an additional accessory. This accessory is called a locking device, but simply a lock on an interior door.
The installation of a lock on the door can be carried out by the manufacturer, or by a specialist whom you will hire to perform this work. In our case, the installation of locks will be carried out by you personally, with your own hands.
How to install a lock on a door
Installing a lock on an interior door is not a very complicated procedure. After reading this text, you will finally believe in yourself and inserting a lock into an interior door will not be difficult for you.
Step 1, choosing a lock
I devoted a separate publication to the issue of choosing a locking device, so it makes no sense to expand the topic especially. I can only say one thing, the lock, or rather its visible part, the handles, must correspond to the general style of the interior.
Too pretentious products can only spoil the overall look.
Step 2, markup
Before inserting the lock into the door, mark the location of the locking mechanism, for this you need to decide in what position your sash will be at the time of work.
Experts believe that the installation of locks in interior doors should be done in a horizontal position. This is due to the fact that professional installers work with a professional tool, and specifically, for example, with a manual router. To put the lock on the door using this power tool with the vertical position of the sash, to put it mildly, is inconvenient.
By and large, the coasters used by specialists are easy to make with your own hands. It is enough to attach two bars in a vertical position to a wooden bar, at least 400 mm long, located horizontally, with a distance between them slightly exceeding the thickness of the door leaf, and achieve their fixed fixation.
By inserting the canvas into such stands, you will get room for work, in a horizontal position.
As for the markup. In the package of the lock you bought, you will definitely find a drawing of the product. Using the dimensions indicated in the passport, we proceed directly to their transfer to the canvas.
The standard position of the lock on the sash is 900–1000 mm. from the bottom cut. This distance can vary based on your preferences, but lately, to save wood, manufacturers have been inserting additional bars into the door frame, only on one side and at a certain height, thereby determining the location of the locking mechanism.
Attach the lock with the mounting plate to the side end of the blade. Circle the bar around the perimeter with a pencil, leaving a contour on the material of the canvas. Along the way, make marks along the boundaries of the location of the lock body. Now, having measured the thickness of the body of the locking mechanism, transfer its size to the canvas, so that the notch for the lock is exactly in the center.
Focusing on the contour of the mounting plate and pressing the mechanism to the side of the canvas, mark the location of the handles and the key hole. The mounting plate at the time of transferring the labels must be flush with the side edge of the sash.
Step 3, making a notch for the lock
Based on the design features of the locking mechanism, make holes in the places where you left marks for the handles and the key.
If the latch design requires a large diameter hole, use a hole saw. If a hole with a diameter of up to 10 mm is enough, use a drill of the appropriate size. Installing a lock in a wooden door requires making a niche in the door leaf. The niche for the body of the locking mechanism is made using a conventional wood drill or a pen drill. According to the previously drawn contour, make several holes. Make these holes as close together as the drill will allow.
In order not to spoil the door, by passing the drill into a decorative finish, for example, use a stopper. Making a limiter is easy. Measure the length of the lock body and mark this dimension on the drill. Add 2-3 mm. and wrap the drill with ordinary electrical tape.
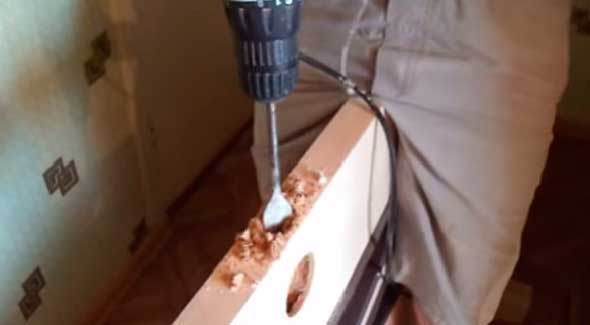
Holes have been made in the end of the canvas, but the lock still does not fit into the recess. Excess door leaf material must be removed with a chisel and a hammer.
At the final stage of the production of the recess, you need to select the material of the web along the contour for the mounting plate of the lock. This can be done with a manual router, but since we are not inclined to spend money on tools for one-time use, we will perform this operation using the same hammer and chisel.
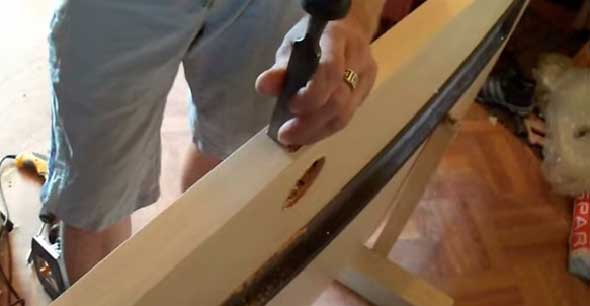
With gentle movements and gentle blows of the hammer on the end of the chisel, we pass along the perimeter of the contour. Then, also carefully or even more carefully, we select the excess, according to the thickness of the plank.
Step 4, fastening the locking mechanism
It's time to install the lock on the interior door. Insert it into the recess, check if the holes for the handles and the key match the corresponding holes on the device body. If all the parameters match, fix the mounting plate to the end of the canvas with the screws included in the delivery.
Mount the door handles and, if required by the design, a key hole. For each type of locking device, this will be its own, individual procedure.
The insertion of the lock into the door is almost complete. If you carried out the work by setting the canvas in a horizontal position, it's time to hang it again on the hinges. It remains only to complete the final stage and the installation of the lock in the interior door will be completed.
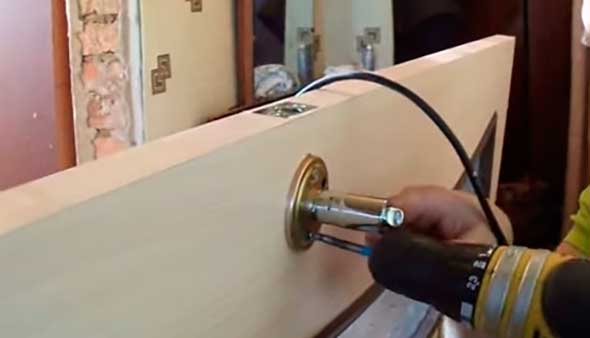
Step 5 Installing the striker
The installation of the striker plate is very simple. Take the chalk and cover it (thicker) with the end of the bolt lock or latch. Turn the handle to the open position so that the latch and bolt are inside the lock body.
Close the door leaf tightly. Holding the sash in the extreme position, turn the handle several times so that the latch touches the door frame beam.
Do the same with the built-in bolt lock, turn the key several times so that it touches the box.
When the mechanism touches the bar of the box, the chalk will be imprinted on it, this will be the installation site of the reciprocal bar.
Installing a lock on a door makes a noticeable difference in its appearance. Your interior door, and the entire room as a whole, has acquired a new interior detail. Let's hope that the lock will work properly for a long time, and the door handles will delight your eyes, and the question of how to insert a lock into an interior door will no longer be a mystery to you.