Lesson 39 - Installation (additive) of furniture hinges.
Or, as they are also called, cup hinges are by far the most common fittings for hanging hinged facades. Due to the variety of their shapes and modifications, you can install any facade exactly the way you want.
In this article, we will analyze the installation process of a simple cup hinge (complex ones with closers, etc. are installed in almost the same way).
From the tool for work, we need a screwdriver, a pencil with a ruler or square and a drill with a diameter of 35 mm. It is worth mentioning that there are also loops with a bore diameter of 26 mm. I have not seen cutters of this diameter, so I drill for such loops with a simple 25 mm cutter, shaking it around the circumference, so the missing millimeter is selected.
Do not make too wide and heavy doors, the width should not exceed 500 mm, otherwise, the load on the hinges will be too large. The above diagram will allow you to figure out how many loops to put on one facade, depending on its size. It is better to make high doors with a width of 300 mm
We mark the hole for the cup on the facade. To do this, at the desired height, stepping back from the edge of 21-22 mm  (our markup will help) we drill a blind hole with a Forstner cutter. At least 70 mm must be retreated from the upper and lower edges, otherwise, you can screw the loop opposite the lower or upper horizons of the box, which is unacceptable. It should be strictly perpendicular to the plane of the facade and have a depth of 11-12 mm. Then we drill a blind hole.
It is necessary to drill on a solid, even substrate so that the thorn of the cutter does not push the facade from the face. The drill needs to make small rocking-circular movements (this way it is much easier to drill).
I would also draw your attention to the fact that most budget cutters are made with a centering spike 3 mm long, so there is a high risk of drilling through the part. For prevention, you should either shorten the spike on the emery or grinder (observing the centering), or simply fill your hand, practicing on scraps.
Pay attention to the black pipe lying near the cutter - this is a vacuum cleaner. It collects fine dust and part of large sawdust, which favorably affects the cleanliness of the workplace.
We insert a loop into the resulting hole, aligning it perpendicular to the edge, mark the holes for the screws with a pencil,  deepen the markup with a thin drill or awl.

We put the loops in place and fix each loop with two self-tapping screws with a countersunk head.

We apply the facade to the rack, align it with respect to vertical dimensions

Mark the attachment points with a pencil. 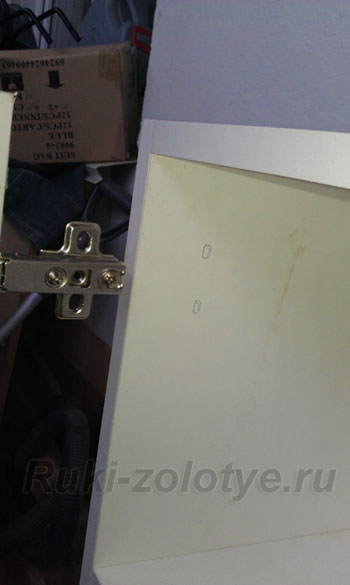 In order for all the hinges to stand exactly, you can use this method: support them with a long ruler, an even bar, or the same facade.
Now we apply the finished door to the body in the open form and mark the holes for the fasteners with a pencil.
It is desirable to do this when the box lies on the floor "on its back" - it is much easier this way.
We drill them with a thin drill. If the cabinet is already standing, and the facade is too large and it is inconvenient to apply it vertically, then we mark and drill the holes on the case for the overhead plank, according to the drilling map. In our case, a bar without euro screws is used. We mark the axis of the hinge, along it we mark 37 mm deep (in the case of an overlay facade) and 37 + 16 mm (in the case of an inset and 16 mm on both sides of the axis.
We fix the reciprocal bar with self-tapping screws.
We install the facade itself, for this we insert the groove of the shoulder under the fixing screw of the bar, while making sure that the notch on the adjusting screw takes its place in the groove on the striker plate.
Tighten all screws.
You can start adjusting the facade.