Proper installation of the door frame with your own hands
Usually, factory-made door frames are sold already assembled. In this case, assembly of the door frame is not required. Only installation is carried out. If the product is purchased in parts, then the assembly takes some time and requires some professional skills, as well as a tool. But in this case, it is easier to properly fit it to the existing opening.
Do-it-yourself installation of a door frame is not possible for everyone, but subject to the technology and careful implementation of the basic rules and requirements, it is quite possible. And how to assemble the door frame is correctly described below.
The main stages of installation
Now about how to install the door frame. The entire installation process comes down to a whole range of works, the main ones being:
- Taking measurements.
- Assembly.
- Installing loops.
- Mounting, fixing and alignment of the block.
- Checking the functionality and finishing of the door.
To do everything as it should be, you cannot do without the appropriate tool. You will need:
- Drill or perforator with a drill bit.
- Roulette.
- Level, square.
- Hacksaw or jigsaw.
- Hammer, screwdriver, mallet, chisel, nails, dowels and screws.
- Pencil.
You will also need wooden blocks, wedges and polyurethane foam. Wedges can be made from any available material. Most often used wooden or trimming MDF boards.
It is correct to start installation after dismantling the old loot, clearing and strengthening the opening. This must be done thoroughly in order to avoid the subsequent need for additional strengthening of the opening.
measurements
To make measurements of the opening accurately and correctly, you need a good tape measure. Specialists often use laser, which eliminates the possibility of errors associated with the human factor.
First of all, the height and width of the opening are measured. Very often, its geometry is not ideal, especially in old houses. Therefore, dimensions are measured at several points.
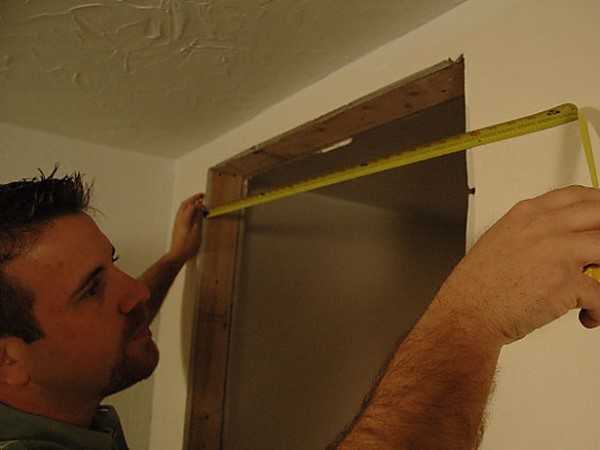
The highest values are selected for the sample - they are used to select the box. At the same time, it is taken into account that the box should be 5-6 cm smaller than the opening in all respects. Only in this case it is possible to make a reliable installation to the wall - gaps are needed to install wedges and mounting foam.
When the opening is significantly larger than the door, a metal frame can be made in the wall, followed by plasterboard or MDF lining. Various types of extensions are used from a variety of materials, the most common of which is the same MDF.
Structural parts
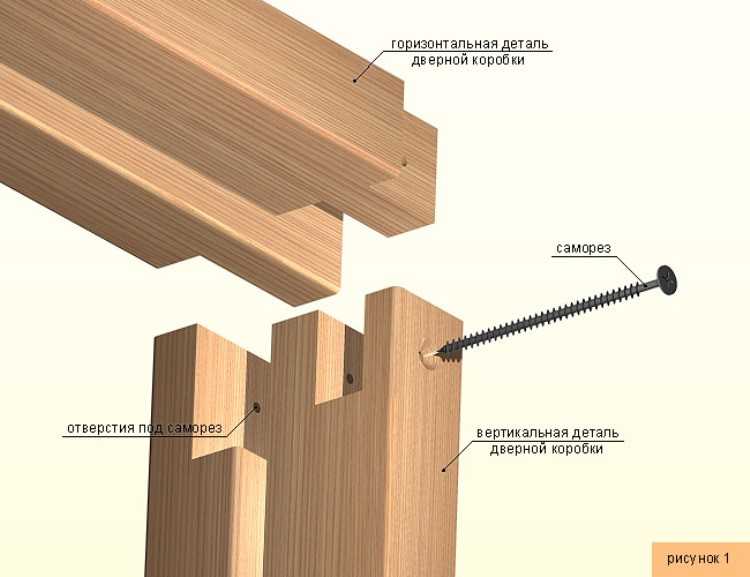
The door frame consists of the following parts:
- Canvas. Most often, in home-made structures, an array, chipboard or MDF is used.
- Vertical bars - 2 pieces.
- Horizontal bars - 1 or 2 pieces. All bars are made exclusively from good natural boards. The lower one is not used more often and is replaced by a threshold.
- Platbands - 3 pieces. These elements are usually made of MDF.
It is not difficult to install the assembled product in the opening and fix it. The most important thing is to keep the plane. The structure is inserted into the opening and fixed with wedges, after which the evenness is checked along all axes. This problem is solved with the help of a level and a plumb line. Position correction is carried out by the same wedges. Further installation is carried out in the order described below.

Assembly
No matter how difficult this operation may seem, the assembly of the door frame is carried out in the following order:
- Structural elements are laid out on the floor and carefully inspected. Factory-made bars must have the grooves necessary to connect the parts together.
- The ends of the bars are sawn at an angle of 45 degrees. You can not do this, but then the design will look rough.
- The components are joined groove to groove, after which the structure is knocked down with a mallet and twisted with self-tapping screws. If there are no grooves, the structural parts are connected with nails or screws. The bottom bar is practically not used, so it is not necessary to fix it. Threshold beating is performed after the door is installed.
If the lintel and posts are connected at an angle of 90 degrees, then the upper horizontal beam is superimposed on the posts of the required size, and then screwed or nailed to them with a corner control. Excess pieces are cut off with a hacksaw.
When using a spiked joint, spikes are made in adjacent bars, the thickness of which should be equal to the thickness of the bars. It is these "hooks" that connect the horizontal and vertical strips to each other.
Loops should be placed at a height of at least 20 cm from the edge of the canvas. If the design has a solid mass, then three hinges will be needed, for example, for a solid door. For an MDF product, two will be enough.
At this stage, you need to do the following:
- The box is laid on the floor and marked under the hinges.
- Then a selection is made for the loops. For this, a milling cutter or chisel is used. You should not try to make the entire selection with one blow of the hammer on the chisel - this can ruin the material.
The standard fit depth should be approximately 2mm. In the folded state, the loops should leave a gap between the web and the loot no more than 4 mm. The calculation of the depth of the cut must take into account the thickness of the loops and this parameter. To form the required gap, it is recommended to put cardboard between the web and the sliver at the assembly stage.
- The loops on the loot are installed with the pins up.
- Next, the canvas is applied and the positions of the loops are marked on its end.
- The same selection is made on the canvas as on the racks. Although experts recommend making a selection for the loops first on the canvas.
- The hinges on the canvas and the box are screwed to the seats. It is important to consider that on the canvas, the loops should look with the pins down. The holes for the screws are pre-drilled.
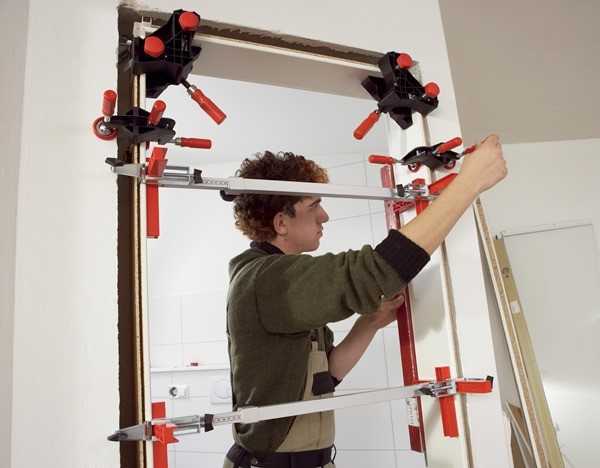
Mounting
After finishing all the preparations, you can proceed. Do-it-yourself installation of the door frame in the opening is carried out with an assistant. The design is quite heavy and its installation requires a lot of physical strength. The box assembled from MDF can be put alone.
The door frame is fastened only to a rigid base.
- A hole in which holes are pre-drilled is inserted into the opening without a canvas and fixed around the perimeter with wooden wedges. It is recommended to use more - up to 15 pieces. There should be 7-8 holes in the side posts, and at least three in the lintel.
- In the lower part, a spacer bar is installed, equal in size to the lintel.
- Further, by changing the position of the wedges with the control of the plane by the plumb line and level, the alignment along the axes is performed. This is the most important stage of work. If the box collapses a couple of millimeters, it will be visible. Moreover, the sash can cling to the floor.
- Marks are made for future recesses in the wall for dowels.
- Holes are drilled in the wall into which anchor bolts or dowels are inserted. The former are used when installed in concrete, and the latter - in an opening made of brick, shell rock or other relatively fragile and soft materials.
- The voids are filled with mounting foam. So that it does not fall on the visible parts of the structure, they are covered with masking tape. It must be remembered that the foam expands by half when in contact with air.
You must work carefully so as not to damage the wooden elements. As a rule, a third of the gap space is filled first. Experts recommend leaving the wedges in the opening until the foam is completely dry. That is, they can be removed in a day. The protruding remnants of dried foam are removed with a paint knife.
On the video you can see the installation of the interior door frame:
- At the last stage, the canvas is hung and the platbands are installed. Platbands are fastened with self-tapping screws or planted on glue. Equipping the structure with a beautiful decorative threshold significantly increases its attractiveness. It is also screwed with screws or glued to the floor.
As you can see, nothing supernatural or supercomplex. Of course, you need an eye, accuracy, patience and a good tool, but most of all - a strong desire. If something is missing, you should not take on the installation. At best, you'll be wasting your time. At worst, you will have to correct errors at your own expense. Installation of a door frame is often included in its cost, and specialists will cope with this work in any case faster and better. Remember, competent installation is the key to long-term and reliable operation of the door structure.