Detailed recommendations: how to embed a lock in an interior door
After installation, the question inevitably arises of how to insert a lock into an interior door. The door should be tightly closed, easy to open and securely fixed in the opening. All these tasks are easily handled by a lock or a latch with a latch.
If possible, it is better to purchase doors with locks and handles already installed. Otherwise, this issue will have to be resolved by inviting the master or installing locks with your own hands.
Castle selection
As well as fittings, the castle should be in harmony with the interior, combined with the texture and color scheme of the furnishings. To a greater extent, it depends on the design of the lining and handles.
As for functionality, two types of mechanisms are suitable for interior doors:
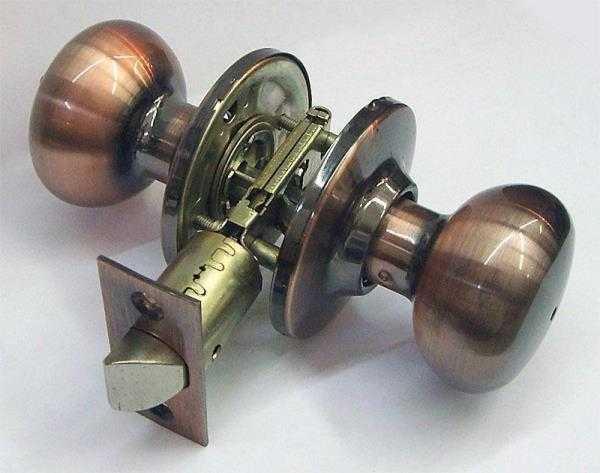
- Mortise lock with or without separately mounted handle.
- Latch lock. As a rule, it is located in the handle itself and has a rounded shape.
Recently, the installation of a magnetic door lock has become popular. Such a device often eliminates the need to install push or turn type handles.
Using a magnetic mechanism is simple, and installing a magnetic lock with your own hands does not require the use of a special tool. The installation of a magnetic device is resorted to in cases where it is necessary to ensure noiseless operation and the complete absence of the risk of being scratched on the tongue or crossbars.
However, the installation of a lock in an interior door, depending on its type, has its own characteristics.
The thickness of the embedded door device should be no more than a third of the width of the end. It is recommended to work with exceptionally well-sharpened tools. The lock is not recommended to be mounted at the junction of the door bars.
Required Tools
To properly insert the lock into the door with your own hands, you should prepare the appropriate tool:
- Drill and a set of drill bits for wood.
- Milling cutter, chisel and carpenter's knife.
- A hammer.
- File.
- Screwdriver.
- Ruler or tape measure, pencil or chalk.
Insert Features
Door material can be very different. Solid wood products are the easiest to work with. The canvas is homogeneous, it is impossible to assemble the structure yourself and it is impossible to make a mistake with the insertion point. The tree is more difficult to drill, but the likelihood of errors and flaws when working with your own hands is greatly reduced.
MDF doors are the most problematic in this matter. This is due to the fact that it is very important to hit the power bar, which is located by default at a height of one meter from the floor. It's easy to remove the old one and install the new one.
Do-it-yourself installation of a mortise lock in PVC doors is not recommended. Without good skills and a professional tool, it is unlikely to succeed. The fact is that mistakes are almost impossible to correct.
For this, the same tools are used plus carbon paper or plasticine. With their help, crossbar marks are made on the jamb in the fully closed position of the door.
Lock installation
For do-it-yourself installation, there is a special algorithm or work technology. To do everything right, you need to do the work in the following order:
- The first step is to remove the door. You need to remove cash. You will also have to remove the old lock.
- Then the interior door should be removed from the hinges and put on the edge of the floor with the hinges down.
- Then you need to measure the height, thickness and width of the lock body.
- 100 cm are measured from the bottom end of the canvas and a mark is applied. The second is planned from it at a distance equal to the height of the castle.
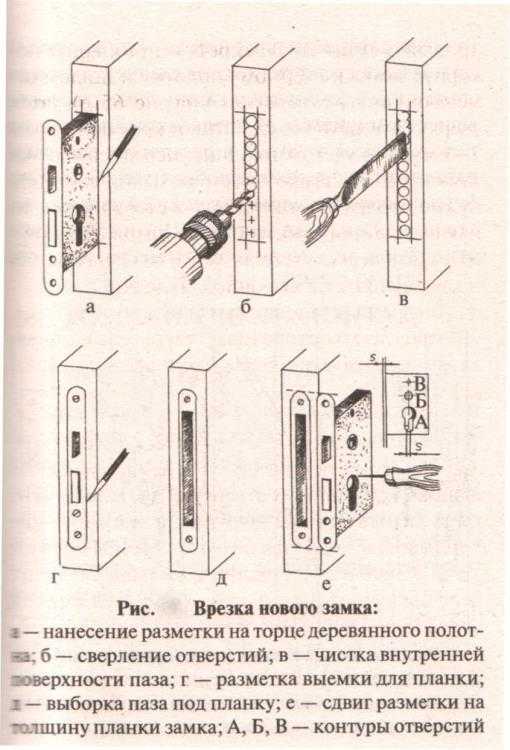
- Further, between the marks, two parallel lines are applied in the middle of the end of the leaf, spaced from each other by the thickness of the locking product. As a result, at the end of the door you should get a rectangle exactly under the lock body.
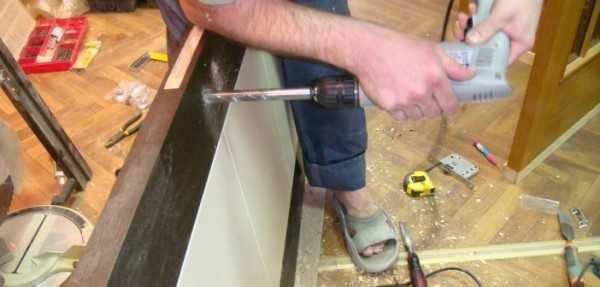
- Now holes are drilled inside our rectangle. The drill should be equal to or slightly smaller in diameter than the thickness of the lock body. The first hole is made in the center, and then above and below. The depth of the hole should correspond to the width of the lock, but first holes are made one cm deep, and then deepened to the desired size.
- Then the chisel comes into play. With its help, the correct cutout for the lock is formed. In the same way, a separate cutout is made under the handle.
- Now a cutout is made for the handle and the lock from the side of the canvas. The body of the lock is applied to the canvas and the position point of the axis of the mechanism is marked. At this point, a cutout is made for a cylinder or keyhole.
- When all cutouts are ready, the process of direct installation begins. The lock is inserted inside and, after checking the functionality, is fastened with self-tapping screws to the door. The lining on the end is screwed with self-tapping screws, also included in the kit.
- Handles are inserted and pads are screwed on.
- The door rises and hangs again on its hinges.
- Then markup is made for the answer on the jamb. The door is closed and the position of the tongue is marked. An overlay is applied and its extreme positions are marked.
- Cutouts are made in the same way, after which the overlay is screwed with self-tapping screws.
Latch Installation
First, the insertion point is marked. This is done using the paper template supplied with the kit. As a rule, the latch is placed at the intersection of the following lines:
- A horizontal floor held at a height of one meter.
- Vertical, drawn 6-7 cm from the edge of the canvas. This dimension depends on the depth of the latch latch.
On the video you can see the installation:
Then the handle mechanism is inserted and the size of the sample under the lock bar is marked with a pencil. The sample can be made with a chisel. The handle is attached with screws.
After that, the parts of the knob are connected with screws and a decorative ring is mounted. Then the door is closed, and the position of the striker is marked on the jamb. On the box, a selection is made for the tongue. A sample of 2 mm is made under the porch bar. Everything is fixed with screws.
As you can see, there is nothing supernatural. It is quite possible to put a lock with your own hands, if everything is done slowly and carefully. After installation, it makes sense to check the strength of the fasteners, the fixation of the linings, the handle and the lock body. If all is well, the castle will last a long time.