How to assemble an interior door frame
Photo from shooterstore.ru
The frame of the interior opening is an important part of the design that provides you and your home with security. Now in stores you can find a large number of variations of such products, but not all of them can fit into the opening and fully meet the expectations of the owner.
In this article, we will talk about how to properly assemble and install a do-it-yourself door frame for an interior door, provide step-by-step instructions and videos that will help you understand this difficult process in more detail.
Entrance door frame: structural features
This design is the main and fixed part on which the hinges and the canvas are located. It is mounted in the opening itself and fits snugly against the wall of the house or apartment.
The design is a frame structure and can be made of various materials.
Such as:
- Plastic.
- Metal.
- Wood.
- Steel or composite profiles.
- Pressed sawdust of inexpensive wood.
As for the shape, it is basically the same everywhere - rectangular. In addition to it, the arched variety is also popular.
The functional purpose of the system is that it is a kind of frame that limits the opening. In addition, there is also a feature, the design serves a decorative purpose.
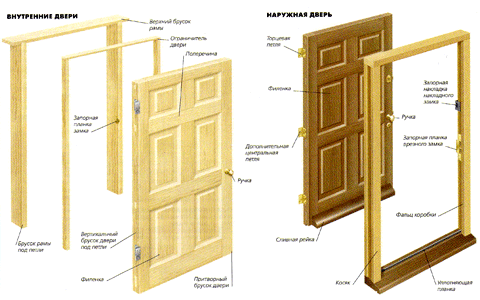
Photo from shooterstore.ru
The box consists of the following parts:
- Frame. It has a U-shape and includes two side posts and horizontal lintels that are tightly attached to each other from different angles. This part is made of box profile bars, which have a special longitudinal recess for inserting the canvas.
- Platband. It is necessary to hide the gap formed between the wall by the box itself. It is made from a special plank.
- Porozhek. It is a special bar that completes the design.
- Sealant. Necessary for soundproofing.
Basic technical requirements for a door frame
In order for the installation to be distinguished by its strength and excellent performance of the necessary functions, it must meet certain requirements. Here are some of the most important conditions that distinguish a quality design:
- It should fit perfectly into the dimensions of the opening. A slight deviation from the specified parameters by 20-30 mm is allowed. Racks that are located on the sides must be smooth and vertical, in a horizontal crossbar - located at the required level from the floor.
- As for the thickness of the structure, it should be such that the casing can freely lie on one of its side faces and not warp in any of the sides. An addition can help to correct this parameter.
- The average height is no more than 207 cm, and the width is 80 cm, in the bathroom the latter figure is 10 cm less.
- You should also remember about strength, so it is best to give preference to high-quality materials.
- The height of the thresholds in the bathroom should not exceed 2 cm, and in the kitchen you can do without them at all.
We stock up on the necessary tools

Photo from shooterstore.ru
Before starting work, prepare the following equipment.
You can't do without:
- grinders;
- perforator;
- electric drills;
- screwdriver;
- hacksaws;
- chisels;
- pliers;
- screwdrivers;
- level;
- plumb;
- file;
- sanding skin;
- roulettes;
- planer;
- spatula;
- paint brushes;
- hammer.
These tools are needed for various purposes, but they are all a minimal installation kit that is easy for anyone, even a novice master, to assemble.
How to make a door frame yourself: we figure it out together
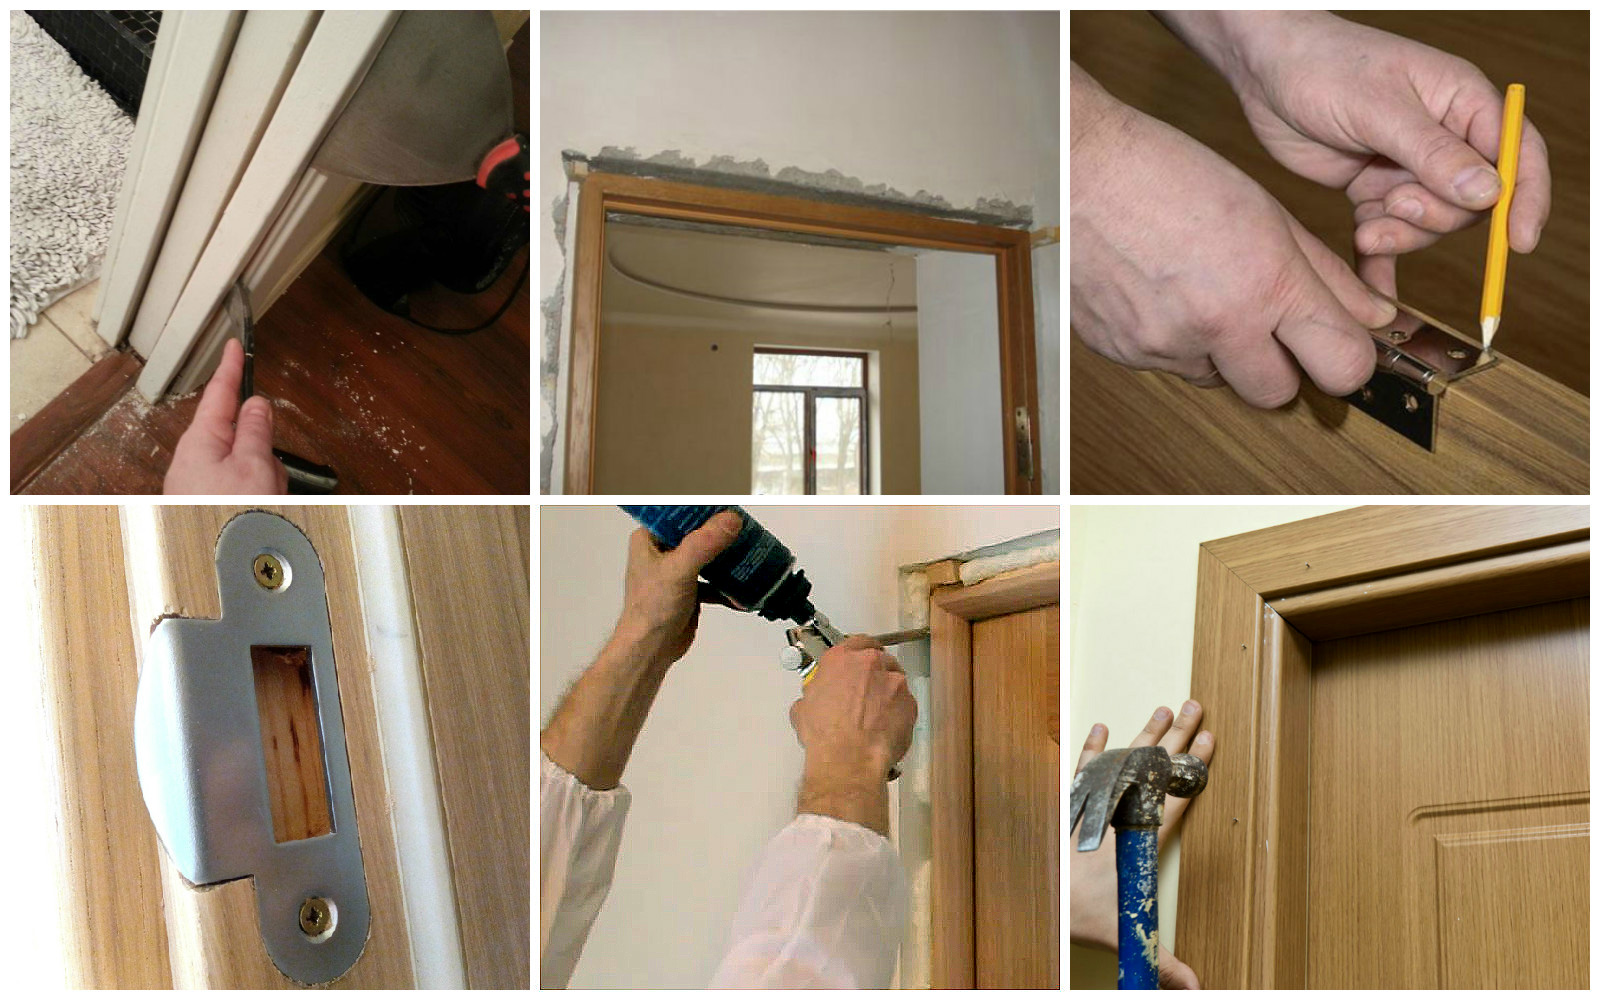
Photo from shooterstore.ru
To make the necessary construction yourself, you will need a standard wooden profile.
First mark the required height and width for the opening. Subtract about 30 mm from the height indicator. Measure and cut a pair of side rails. Prepare the top bar in the same way.
Take a special tool - a miter box. And connect with it the tops of the side racks and the ends of the crossbars, and then cut all the parts at an angle of 45º.
The peculiarity of the miter box is that it plays a big role in the formation of a cut of the required angle.
Remember that the crossbar on its smaller side, even after you cut the corner, should not be narrower than the width of the canvas, but, on the contrary, should exceed it by about 7 mm.
Join the upright and the crossbar so that their media are perpendicular to each other. Between them, you can pre-lay a connecting soft gasket, about 4 mm thick. Squeeze the bars and secure them with clamps.
Two holes are drilled in a long element perpendicular to the cut plane with a diameter of 4 mm. Through the holes, the joint is tightened with screws. It is advisable to coat the joint planes with carpentry glue.
Similarly, the second corner of the frame is pulled together. For temporary strengthening of the structure, it is recommended to install a removable jumper at the bottom.
To make the joint more durable, you can install a special dowel. To do this, drill a small hole and hammer a piece of wood into it. Before that, thoroughly grease both the part and the hole with special wood glue.
How to install the box on your own: some useful tips
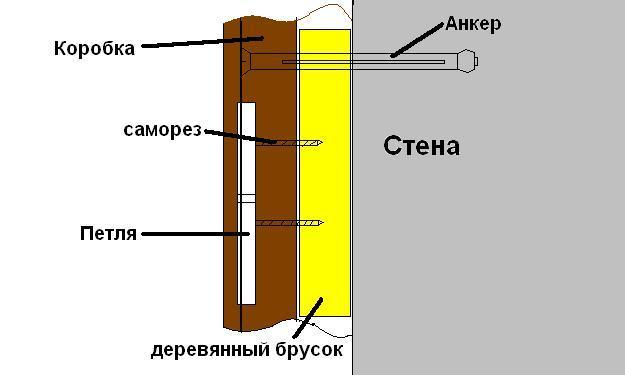
Photo from shooterstore.ru
So, when the system is assembled, it's time to start installing it.
- First of all, dismantle the threshold.
- Then fix a wooden plank which is approximately 20 tmm thick and the width is identical to the door frame. Fasten it firmly with dowels.
- Round the plank at the top and drive two dowels into the floor. Fasten the threshold. Make sure that its length is exactly the same as the width of the opening.
- After that, start fixing the system itself. Drill three holes into the uprights on the sides, retreating about 10 cm from the edge and center. Make exactly the same recesses in the crossbar. It is important that the distance between them is the same.
- Insert the box into the opening. Use the holes to make markings in the wall. Take a hammer drill and drill holes for the dowels. Fasten the last piece with screws.
- Check that the uprights and crossbeam are set vertically and horizontally. If something is wrong, then you can slightly adjust their positions with gaskets, wedges or specially twisted screws. If you decide to use the latter, be sure to pay attention to how much their hats stick out, push them deeper into the box.
- In some cases, the thickness of the structure itself may not be enough. In this situation, extras will save you. They must be fastened in the same way as the bars.
The extension should have exactly the same thickness as the timber, it should not be higher than the surface of the box.
- Do not forget to put a special sealant in the grooves over the entire area of \u200b\u200bthe structure. If there are no special recesses for this purpose, then simply glue the sealant to the surface of the bars.
You can learn more about how to assemble and install the door frame of an interior door in this video.
Final step: finishing
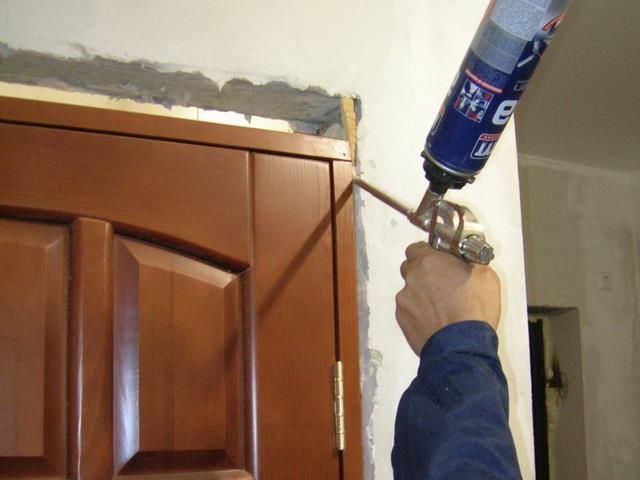
Photo from shooterstore.ru
After you have finished with the installation, you can proceed to the last, cosmetic stage of work.
- The gap in the area of \u200b\u200bthe wall and the opening must be well sealed with mounting foam. Do not save on this useful material. The strength of the structure and its throughput depend on how well you cope with this stage.
- When the foam hardens, you can move on to the next step. Cut off the excess and carefully sand the surface.
- Proceed to the installation of platbands. Cut off the strips in the amount of three pieces. Two of them will need to be placed on the racks on the side, and the rest - placed on the crossbar. Make sure the tops of the planks are cut at a 45º angle. Fasten the parts so that the side cut coincides with the end of the structure and the other cut is located along the wall. The platbands must be well attached with screws, the heads of which are best hidden in the wood.
In the course of work, you may have gaps: in the area of the platband and the general system, the extension and the beam, between the beams and the platbands. You should not panic and consider yourself a would-be master, everything can be fixed.
Fill these gaps with a special wood putty. This material is applied in dense layers, two will be enough for you. First, close the gap well, and then level the mixture and apply a little more composition for the fortress. When the treated surface is dry, use sandpaper and sand the area well. At the very end, you need to install the loops on which the canvas will hold. Use a chisel to make indentations in the right places and secure the parts with screws and an electric drill.
Instead of a conclusion
Now you know that it’s quite simple to install, mount and even make a box in your house or apartment on your own, you have the skills to assemble and install interior doors that you got from the video. Follow our tips and tricks and you'll be fine.