How to make a gate from a profile pipe
Fencing a garden plot requires an entrance (gate) and an entrance (). These elements must be provided for at the stage of construction of the fence itself. In most cases, it is the arrangement of the gate that causes problems for inexperienced manufacturers. The optimal and least expensive solution is the construction of a gate from various shaped pipes and the subsequent sheathing of the frame with a profiled sheet. A gate from a profile pipe is made on the basis of a drawing and a little knowledge of the master.
Drawing development
The initial stage of manufacturing a gate is design, that is, the development of a drawing that contributes to the preparation of the necessary materials.
If the correct drawing is developed, the gate from the profile pipe will be strong and beautiful. An incorrect drawing will lead to the need to make changes at the stage of manufacturing the structure.
To design a gate you will need:
- select materials for the manufacture of structures;
- determine its dimensions.
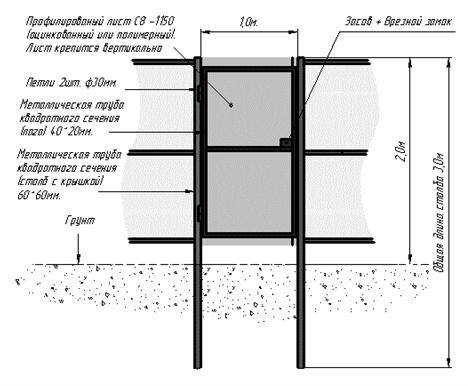
The height of the gate should be equal to the height of the fence. A slight downward deviation is allowed. The optimal width of the structure is 0.9-1.2 m.
The frame of the gate from a profile pipe will be more durable if it is made from pipes with a cross section of at least 40 * 20 mm. For decorative elements, smaller pipes can be used.
Selection and preparation of materials
In the process of preparing for the manufacture of the gate, it is required:
- select and purchase all materials and additional elements;
- prepare tools that may be required in the process.
Before you make a gate from a profile pipe, you need to prepare a set of necessary materials. For the manufacture of the structure you will need:
- shaped pipes that will make up the frame of the product;
- sheathing material. Can be applied: metal sheets, wooden boards and so on. The choice of material for sheathing should be based on the type of material from which it is made, or the desire of the manufacturer;
- self-tapping screws for attaching the skin to the frame. If a profile sheet is used for sheathing, then the color of the screws is recommended to be selected according to the color of the material;
- pipes for poles required when installing the structure. Support pipes must be strong. It is more expedient to choose supports with a size of at least 60 * 60 mm;
- door hinges for attaching the gate to the support pipes;
- doorhandle;
- lock.
To install the gate, you will need a concrete-cement mixture.
When acquiring the necessary materials, it is important to create a minimum stock of approximately 10%. This will allow timely correction of the design in case of possible errors.
To assemble and install the gate, you need to prepare the tools:
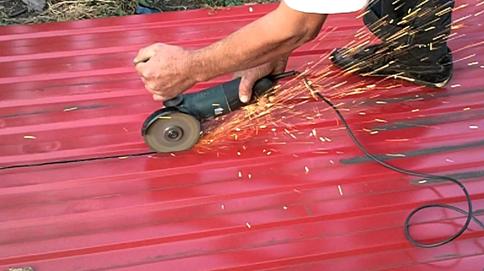
- grinder for cutting profile pipes to size;
- welding machine, electrodes;
- measuring instruments, including building level;
- screwdriver;
- shovel for earthworks.
Manufacturing and installation
Now let's figure out how to weld a gate from a profile pipe and install the structure. All work is carried out in several stages:
- manufacture of the wicket frame;
- sheathing the frame with the selected material;
- installation of the finished product.
Frame welding
Before assembling the structure, a number of procedures are performed:
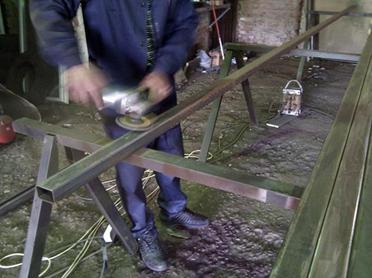
- pipes intended for the manufacture of the frame are cut to size, according to the developed drawing. When carrying out work, it is recommended to protect the eyes and hands of the master from the possible ingress of metal chips;

- welding points are protected from rust and metal burrs left after cutting. This can be done with the help of a grinder, to which a grinding wheel is attached;
- pre-assembly of the future frame is in progress.
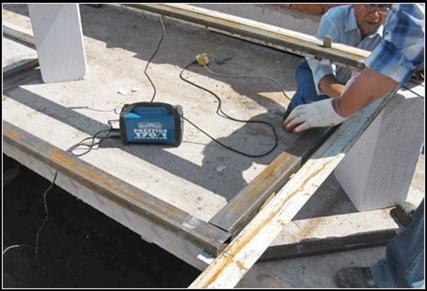
For the convenience of welding, preliminary assembly of the wicket frame is carried out on a special welding table or any flat surface.
If you do not know how to properly weld a gate from a profile pipe, you should learn the basics of electric arc welding, because it is its use that most professionals recommend. The welding process looks like this:
- pipe ends are welded in several places;
- the perpendicularity of the pipes and the correctness of the design are checked. For this, a corner and a nylon thread are used;
- the final welding of the frame is carried out. When welding, it is important to monitor the parts to be joined, since under the influence of high temperature, the profile pipes can be deformed or simply move;
- door hinges are welded to the frame and support pillars;
- welded seams are polished to give the frame an aesthetic appearance.
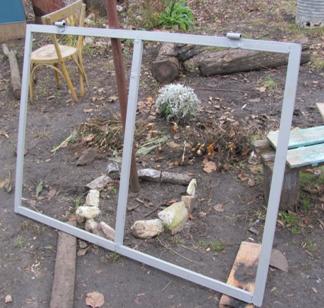
The finished structure must be treated with an anti-corrosion compound and painted. After sheathing the frame, this stage will be much more difficult to carry out.
You can watch a video about the process of making a gate frame with your own hands.
sheathing
The finished frame needs to be sheathed:
- the material intended for sheathing is cut to size;
- the sheathing is fastened to the frame using a screwdriver and self-tapping screws.
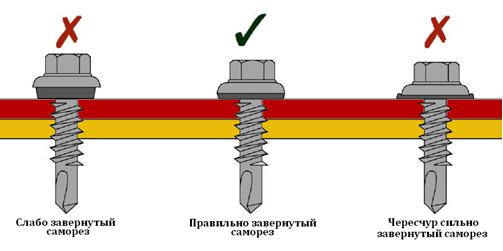
When fastening the profiled sheet, it is important to monitor the correct tightening of the screws. A weak fastening will contribute to vibration, and a too strong fastening will damage the material.
Do-it-yourself gate from a profile pipe is ready. You can begin to install the structure in place and equipment with additional devices.
Installation
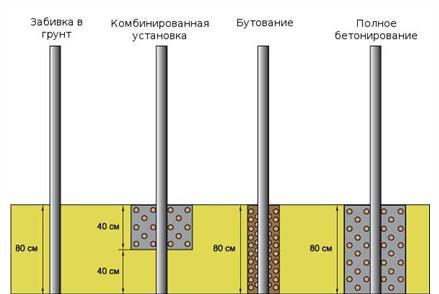
Installation of the gate begins with the installation of support pillars. For this:
- a hole is dug at the location of the pillar. The depth of the pit should be approximately 1/3 of the height of the post;
- the pole is installed in the pit and the building level is aligned vertically;
- the pit is concreted.
Other ways to install support pillars are also acceptable.
It takes at least 3 days for the concrete to completely harden. During this time, the column is not recommended to be moved.
When the concrete hardens, you can proceed to the final stage:
- the gate is hung on previously prepared hinges;
- door handle and lock installed;
- decoration if necessary.
Making a fence gate yourself is relatively easy. The main rule is to correctly measure and cut the material so that you do not have to make significant adjustments later.