How to make a door from boards with your own hands
Doors are divided into interior, street and balcony. But even such different doors can be made in the same way, except for the thickness, because the thickness matters on the input leaf. Canvases can be hollow and filled, made of natural wood or glued material. But these are all trifles, but in fact, the doors are divided into: tongue-and-groove, paneled and panel doors. All these canvases can be made with your own hands, but I will tell you how to do it further.
How to make a door with your own hands
Before making a door, you should take care of the board. It should be dry, if this is the case, but you doubt it, then it is better to play it safe and dry it properly, for this, lay a lining after each board so that they do not touch each other, and so that the air “walks” freely everywhere. Indoors, maintain +25 degrees, and constantly ventilate, and dry for two months. In such conditions, the board will “give up” excess moisture and will be completely ready for work. If you stack a board on top of each other without lining, and it turns out to be not completely dried, then mold will soon form.
If the temperature is above the norm, as it is mistakenly thought that at high temperatures the board will dry faster, but not at high temperatures (if the tree is coniferous), resin forms on the surface, thereby reducing the strength of the board.
Grooved board doors
Let's proceed directly to the manufacture of the door. A canvas made of grooved boards can be installed in an apartment, and if it is made in 2 or 3 layers, it can also be installed at the entrance. For rooms, such as a bathhouse, doors can also be made from ordinary non-grooved boards, in one or two rows.
When making a canvas, we need a lot of tools, and, of course, a grooved board, which differs in a groove and a spike from a regular board. We lay the boards with a shield, make sure that the annual rings are all directed in one direction. We collect the shield on a flat area, best of all on a workbench (special table). Next, we measure the size of the door we need, mark it and cut it off, the remaining groove, and carefully cut and grind the spike. If you yourself cut a spike and a groove in the boards, then most likely you will complete the first and last board without a groove on one side and a spike on the second board, so as not to cut them off in the future. Then we disassemble the structure, and begin to glue between the joints, and assemble it again, but already glued. We fix in clamps and wait for drying.
After drying, we work with a milling cutter for an even and smooth state of the canvas. If you want to make a thick door, you will have to choose either a thick board or use the material in several layers. To glue the door in several layers, you need to know that the board is laid perpendicularly, the joints are glued and dried, just like in the first case, only then the second shield is glued to the first, clamped with clamps and dried in the same way, and the third is glued in the same way layer, of course, if necessary.
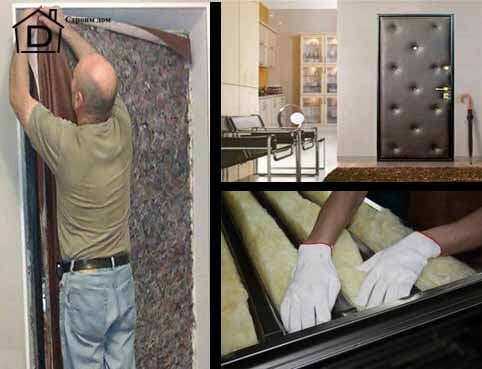
For complete fastening and reliability, crossbars are attached to the canvas. There may be two or more. The crossbar is made of a bar with a thickness equal to the thickness of the door, and its length will be equal to the width of the door. The bar must be made trapezoidal, and the dimensions for cutting must be applied to the canvas. The depth can be made as ⅓ or ½ of the thickness of the board. Along the lines of the mark, we cut out recesses with a milling machine, if necessary, setting the desired length and width in it. You can also cut it manually, for this you need to make cuts, and then slowly make indentations with a chisel. For both types, after cutting the recess, it is necessary to clean it with sandpaper. Next, we lubricate this groove with glue and drive a bar into it, you can use a mallet to drive it in.
If you are going to carve wood, then you need to apply it to the boards with a pencil, and only then cut it out. But for this painstaking work it will take a lot of effort, patience and time.
Treat the finished canvas with an antiseptic, you can use a special water-repellent agent, as well as a pest repellent.
It remains to give the door a beautiful look, you can decorate it in different ways, I will return to this issue a little later.
We insert the door handle, the door lock and weigh the doors on the hinges. A suitable place is marked for the beginning for the lock and the handle, a notch for the mechanism is cut out for the lock from the end, all this work must be done carefully, and exactly according to the markings. We also make a hole for the handles that they require and install and fix all this.
Panel door manufacturing
In my opinion, this is an easy version of the canvas. For it, you need to purchase laminated fiberboard sheets or veneered plywood, as well as 3x12cm strapping bars (suitable). For strapping, it is necessary to cut a notch at the ends of the bars to connect the bars, this is also called “to the tree floor”. The notch is made square, it is necessary to cut out half of the thickness of the beam, such notches are made on all the beams, and then they are folded in cut parts and glued. Carefully check the corners with a construction square, then fix it in clamps and wait for it to dry. 
After tying into the grooves, the surface should be flat. Next, in the corners, we drill a hole of 8-10 mm and drive in “pins” coated with glue. One side of the canvas can be sheathed, for this a sheet of plywood or fiberboard is suitable, it is measured in size, cut off. We lay the frame on a sheet, then we smear this place with glue and glue it. For strong bonding, you need to put weight.
Now let's deal with the filler, inside you can glue any wood waste that is not useful in work, or the material you like (MDF cuts, timber, poor quality wood), the filler will serve as the strength of the canvas. In some cases, transverse bars are glued, 2-3 pieces can be.
After the glue dries, we proceed to complete the work. We glue the canvas with sheathing material. We cut off the desired size, smear with glue and apply to the canvas. Then we lay down under the press and wait for drying. It can also be glued in two layers, the first will be ordinary fiberboard, and the second layer will be laminated or veneered plywood.
After drying, we process the ends with a milling cutter, and the latch door handle is installed.
Such a door can be made in several ways, one of which I have described in detail. The second is when all parts are assembled separately. Then the shield is inserted into the frame and fastened. The third way is when the shield is assembled, and the strapping is already being done on it.
panel door manufacturing
A very complex design, it is worth leaving such work to the masters. In this design, the strapping is also made, and the crossbars (the larger, the stronger), and the panels are made separately, and then inserted into the place left for them. The panels are fixed with dowels, and before they used spikes.
Most often, such doors are made from boards, but manufacturing from glued bars is not excluded, these are separate parts glued together to give thickness, they are called lamellas. 
The panels are made from thin boards, preferably from MDF, and at the end they are veneered with plastic, most often these materials are used with an imitation board pattern, the thickness of this design is ⅓ part of the bar.
The bars are veneered, if the work done is of high quality, then the buyer can confuse it with a solid door.
Framed panels are fixed with natural or veneered glazing bead. The finished structure can cost more than solid wood doors, and such a door is in no way inferior in terms of durability. This is explained by what types of wood were used in the manufacture and what the price of the sheathing material was, a lot depends on how well this canvas is made.
Paneled doors can be with glass inserts, that is, glass can be inserted into the left window instead of a panel. You can also make doors only from natural wood.
So, let's get to work. To work, you need to draw a drawing of the future door, and the dimensions of the parts. During the manufacture of the frame, do not forget to cut a groove in the structure, and a spike on the crossbars, because it is with them that we will fasten the entire structure into one. After the frame, we make panels from plywood, boards or fiberboard, you can also replace it with glass, then glazing beads for fastening will come in handy.
Panels can be both flat and figured or with patterns. The patterns are made with a milling cutter, and all sides are grinded with it, so that they fit into the previously cut groove.
Well, now all the parts are done, you can start assembling the door, it is assembled like a mosaic, one part is inserted into the other, the seams are pre-lubricated with glue. But before final assembly and gluing, it is recommended to assemble without glue and see if everything is in order.
The choice of material for making a door with your own hands
When choosing, you should pay attention to the condition and quality of drying the board, it should also be even and not rotten. Let's look at some types of wood that are great for making doors, and which are not.
A board made of beech tolerates mechanical stress very well, but is sensitive to moisture, so before manufacturing it is worth treating it with a special anti-moisture agent. This rule applies in general to all types of wood. But a walnut board tolerates changes in moisture very well, and it is very easy to work with it. These criteria also include a larch board, moreover, it has a beautiful structure and is resistant to decay. A maple board is great for making canvases, it has such qualities as strength, moisture resistance.
Such species as: alder, birch, pine are not ideal, they have their drawbacks, but doors can also be made from them, only the quality leaves much to be desired.
Do-it-yourself door insulation
Making a wooden box for a door
The box can be made from wood, metal or MDF. But most often preference is given to wood, for such work you can take any breed. 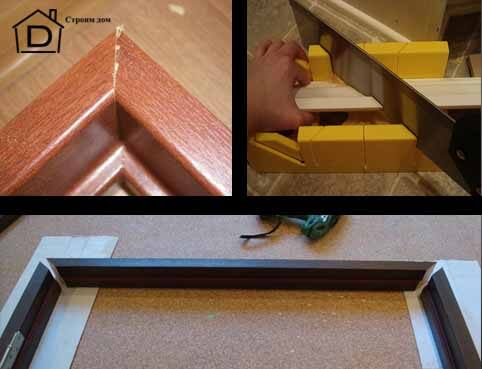
Everyone knows that the box is made first, and then the canvas. So we measure our opening and add 5 cm on each side, you can measure it using the old box, but it's best to remove the old box. Measure the thickness of the opening, and determine the width of the box, the wider the doorway, the wider the box. According to the dimensions taken, prepare the bars for manufacturing, and lay them on the floor in the way they will be attached. The easiest option for fastening the corners of the box is to cut them out at 45 °, and then glue and fix them with screws. For even sawing off the corner, it is better to use a miter box.
A reliable fastening method is a grooved one, but it is difficult to cut it out, in this case you can purchase a board with already existing fasteners or use the first simpler method. It must be ensured that the internal angle is always 90 °.
On one of the sides where the hinges will be attached, we mark the size we need for the hinges and make recesses so that the hinge sits flush with the frame.
Now we assemble the box into a single whole and install it in the opening, level it horizontally and vertically. We insert wedges between the box and the wall and jam the box. You can put spacers horizontally, just in case. Then we foam the gap between the frame and the wall. After the foam has seized, remove the wedges and foam the voids from them. After drying, cut off the excess foam and remove the spacers, then install the door leaf.
This concludes my article, successful repair and see you on my blog.