How to properly assemble and install a door frame: basic diagrams and workflow
When buying doors in a store, we obviously get a door block that is not fully prepared for installation, but a scaled-up likeness of a children's designer for "skillful hands". It is quite understandable why hinges are not hung and locks are not embedded, because it is not known which side the door will open. Manufacturers do not assemble boxes, because they do not know exactly the dimensions and features of the opening to be equipped. Therefore, the owners have to hire craftsmen or independently build this important part of the door block. And for this, you need to clearly know how it is possible and necessary to cut a bar, how to assemble a door frame for the long-term service of an interior or entrance structure.
What is the root "hitch"?
The complexity of a number of operations for the assembly of the base frame for hanging the door lies in the specifics of the production of cuts and in the connection of the components. Simple in the eyes of an inexperienced layman, the work is hampered by the presence of a feigned recess on the profiled jambs and crossbars of the future box.
Two schemes for building a box
You can dock them by doing the cuts:
- at an angle of 45º, for which you need a good miter box with an award, but it is much better if you can saw off the excess beautifully with a miter saw;
- at an angle of 90º, the implementation of which will require not only a fine-toothed saw and the accuracy of the performer, but also knowledge of the technological subtleties of essentially not too complicated work.
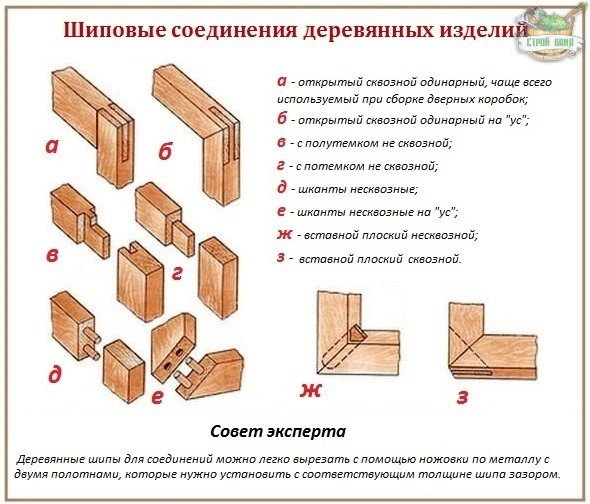
To perform a strong docking of components, galvanized self-tapping screws or “nailless” spiked joints are used. Spikes can be formed at both of the above angles. However, they are milled mainly perpendicular to the full thickness of the box beam, which must be taken into account when calculating and marking the length and width of the door frame-box.
It doesn't matter if the spikes of the transverse bars of the box will fit into the grooves of the horizontal ones or vice versa. If only the connections were strong and unshakable, for which they are sometimes reinforced with additional nailing with zinc coating.
The shape and dimensions of the structure
The geometric parameters of the base box under construction determine two conditions:
- the width and length of the door leaf itself, for the coverage and support of which this frame is intended;
- purpose and category of the equipped premises.
Therefore, even before the starting stage of work, it is necessary to clearly define where and how to install the door frame the owner of the door and opening in his personal property wants to install.
Depending on the purpose of the premises, the requirements for ventilation or insulation, which the door must provide, change. The entrance door to the bathhouse and the door to the steam room should not let the cold in and release the fertile warm air out. The washing department, on the other hand, needs additional ventilation so that the excess of vaporization is spontaneously unloaded and the building materials do not rot. Additional ventilation is required in the boiler room, especially if gas equipment is installed there. What can be done:
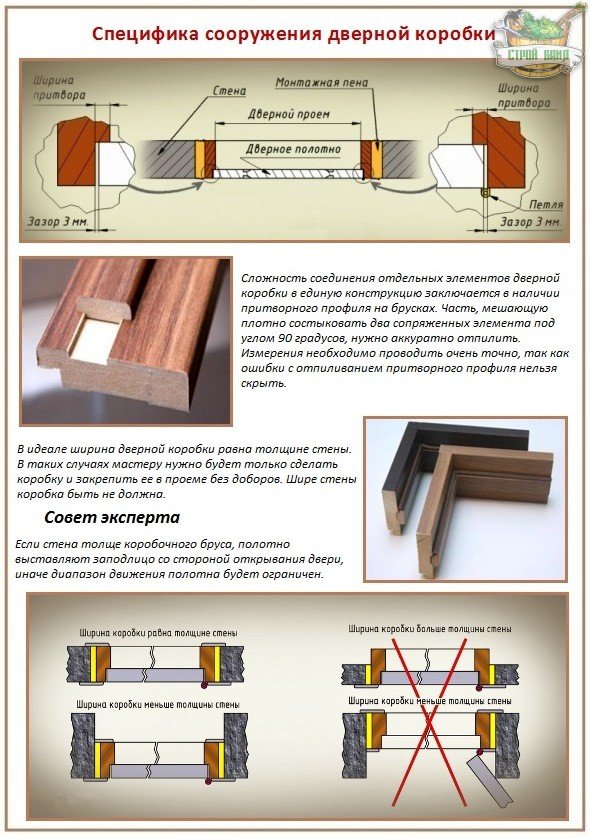
- If it is necessary to provide a barrier against heat leakage, the construction of the door frame will require four bars, which, after connection, will turn into a closed rectangular frame. The door frame will consist of a feigned and hinged vertical bar, a lintel - an upper crossbar and a threshold connecting two vertical elements in the zone of their junction with the floor surface. A 3 mm technological gap must be maintained between the box beam and the door leaf along the entire perimeter for the free movement of the door.
- If it is required to ensure a natural outflow of steam and polluted air, the box is assembled only from three parts, since instead of a threshold that prevents aerodynamic processes, a gap of 15.0 - 20.0 mm must be made. In such cases, the door base resembles the letter P. The 3 mm gap laid down by the technology passes only along the vertical pillars and the lintel.
Between the threshold and the newly laid floor covering, a gap of 2-3 mm should be left in case of thermal movements.
A closed box, of course, is higher than an open analog, as it is increased due to the thickness of the nut. This nuance must be taken into account in the calculations so that the door leaf does not have to be "shortened", which is especially undesirable if it is covered with veneer.
Important. If you do have to cut on a veneered surface, start on the finished side and work your way to the unfinished side. So the veneer will suffer the least, the chips will be insignificant.
The sequence of the simplest assembly scheme
There are not too many people who want to mill or painstakingly choose spikes with grooves without experience, and not everyone stocked up on equipment for perfect sawing diagonally. Therefore, most home craftsmen stop at the simplest scheme with the joining of elements at a right angle.
Now let's find out how to properly assemble the door frame. It is more convenient to work by laying out all the components at the same level horizontally. Most often this happens on a floor covered with cardboard or other soft material, less often on two tables moved together, four stools can be adjusted.
When buying a timber separately from the canvas, please note that the base for fixing the door in the opening should not be narrower than the canvas, and wider than the wall.
Work order:
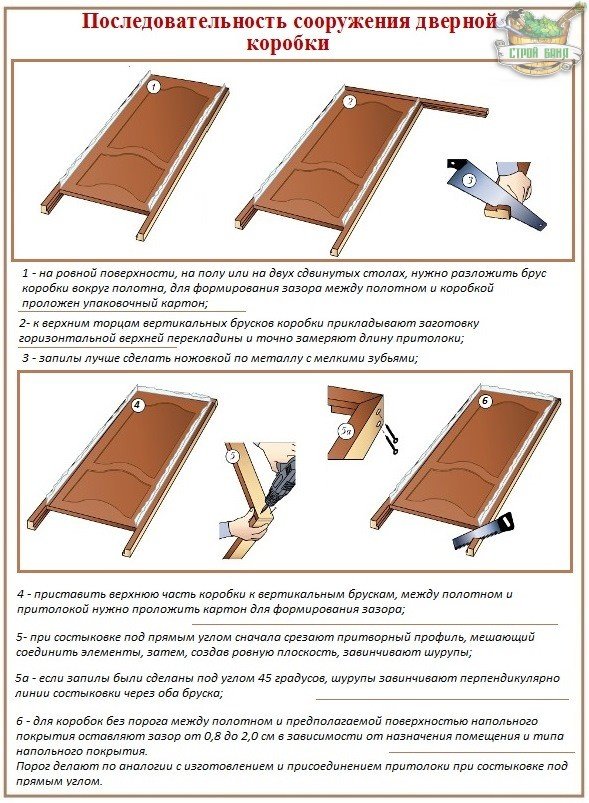
- On the site equipped for work, we lay out the box beam with the front side up, that is, outward with the porches. If the beam is wider than the canvas, we bring the plane of the door to the same level with the future box, placing paperback books under the canvas. According to any of the selected schemes, first three standard elements are involved in the work: a feigned and looped jamb and an upper crossbar.
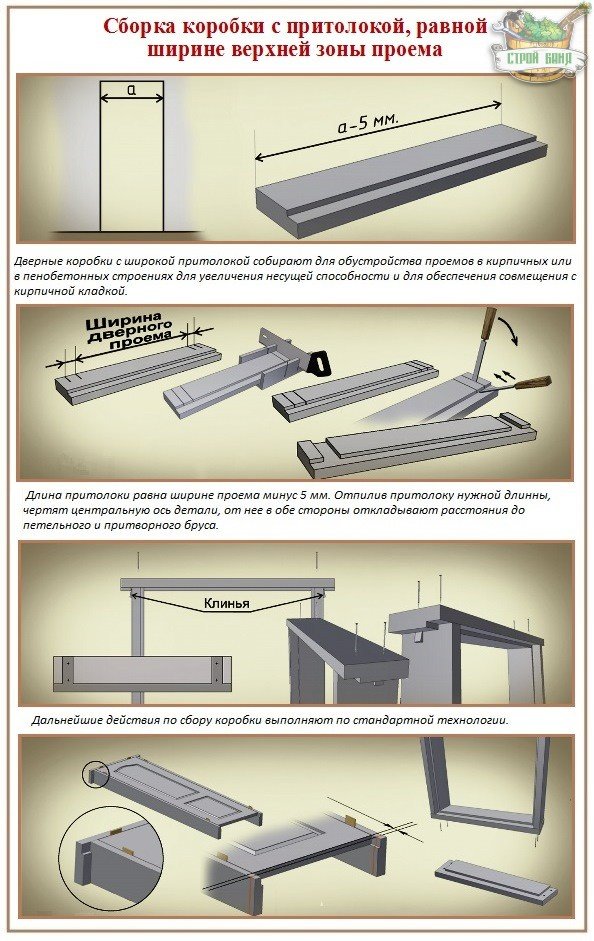
- The upper crossbar of the door frame, installed in a brick or foam concrete opening, is recommended to be made wider than the box to increase the bearing capacity. Usually it is 0.5 cm narrower than the opening. To search for attachment points for vertical bars to it, first find the center of the lintel, then set aside equal distances in both directions.
- To form an equal gap around the entire perimeter between the canvas and the boxed beam, cardboard or old linoleum cut into pieces is laid.
- Having marked the gaps, we outline the cutting points without scratching the surface. It is better to press lightly with your fingernail. A pencil, especially a poorly sharpened one, is not recommended for marking by experienced craftsmen. It will not provide accuracy.
- We saw off the crossbar according to the chosen scheme.
- It is desirable to mark with an awl or a sharp scalpel a part of the feigned profile, which must be removed so that a plane forms at the junction. Then we “cut off” the marked area neatly with a chisel or saw it off. This is one of the most significant stages in the assembly of the box, which does not tolerate inattention and mistakes. A slight shortage in the length of the box bars will still be covered by the platband, and poorly cut with a chisel or sawn off ledges of the vestibule will be visible. Have you decided to drink? Take a hacksaw and cut so as not to accidentally tear off the veneer from the underlying plane. For insurance, it is better to cover it with cardboard. After we have done washed down to the depth of the protrusion, we clean off the excess with a chisel.
- We lay out the sawn-down bars back around the canvas with cardboard in the gap. With maximum accuracy, we note the location of the loops. The standard is an indentation for installing hinges of 20 cm from the top and bottom of the canvas. Without forgetting about the upper gap, we set aside a point on the hinge bar at a distance of 20.03 cm from the intersection of the lintel and the jamb.
- We put on two screws a loop map to the hinge bar and mark with a scalpel or awl the shape of the nest and the points of the holes for the screws. Slowly, scrupulously remove the veneer or array to a depth equal to the thickness of the card.
- We put the flags of the loops in the nests and fix them there with self-tapping screws. The lock striker on the box is installed only after the box is fixed in the opening and the canvas is hung, as there may be discrepancies.
- We return the loop bar to its place. We carefully verify the perpendicularity of the elements to each other. We fasten the crossbar and racks, distributing two self-tapping screws per connection.
The threshold is made in the same way as the lintel.
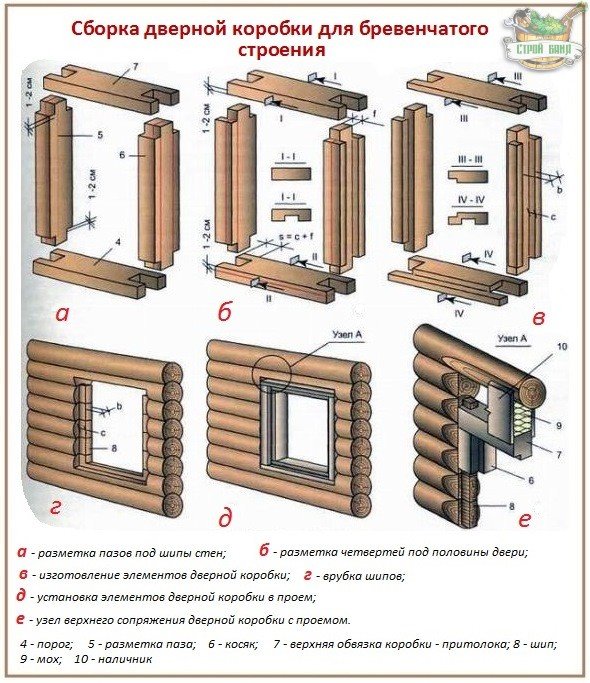
Features of assembling a box for wooden baths
Wood is an excellent building material, which differs from others in the ability to settle after construction, which is not too pleasing to the owners. Openings in baths and houses made of logs or timber should not be equipped at all in the next couple of years after the construction of the crowns. Moreover, it is necessary to find out how to properly install the door frame in a timber or log opening.
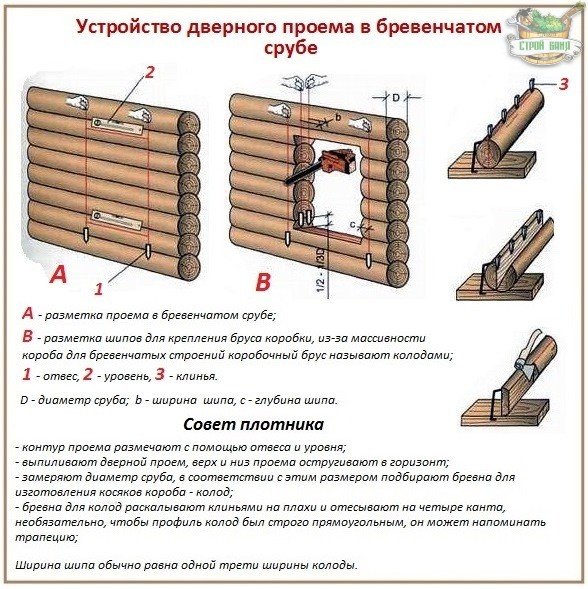
There are 2 options here:
- If the width of the opening formed during the construction process corresponds to the design solution, a groove is cut in the end right in the middle and then a beam is hammered into it. It is to this beam that the box can be nailed, it is impossible directly to the walls, because even after shrinkage they continue to “settle” a little.
- If the opening is not formed, you need to cut a hole for the passage with a width less than the design one by two thicknesses of a kind of ridge. Box timber in such cases is made with a groove.
In both versions, the elements of the box at the same time serve as a connector for the crowns. A gap is always left above the opening to protect it from deformation during the shrinkage period.