How to make crepe paper flowers. How to make DIY crepe paper flowers. Flowers from individual petals
Flowers are a necessary element of every holiday. They are a versatile gift and decoration. In this article we will look at: how to make do-it-yourself crepe paper flowers.
You will need: pink, white and green corrugated paper, scissors, wire, green teip tape.
Master Class

Corrugated paper peonies are ready! I recommend watching this video!
Realistic lilies
You will need: lilac, green and yellow corrugated paper, scissors, paints, brush, wire, glue gun, ruler, semolina, pencil.
Master Class
- Prepare a 7 cm strip of lilac paper.
- Cut it into 6 equal pieces.

- Cut out 6 petals from the blanks.
- Stretch the edges of the petals, then twist with a pencil, giving a realistic shape.
- Mix brown and purple paint, then paint the spots on the petals with a nearly dry brush.

- Wrap the wire with a strip of green paper and fix with glue.
- Prepare a square of yellow paper, then make 5 cuts and twist the stamens.

- Put a drop of glue on the tip of each filament, dip it in semolina and dye it brown.
- Prepare strips of green paper, cut the leaves and stretch them slightly.

- Glue the stamens to the pistil.
- Glue the petals around.
- Glue green paper at the base of the bud, forming a receptacle.

- Glue the leaves to the flower.
- Make the right amount of lilies in the same way.
Corrugated paper lilies are ready! I recommend watching this video!
huge rose
You will need: thick cardboard, corrugated paper, a simple pencil, scissors, thick wire, green floral tape, adhesive tape, glue.
Master Class
- Draw or print templates and transfer them to thick cardboard.

- Cut out 15 heart-shaped petals and 5 droplets from crepe paper (for one flower).
- Shape the petals: hearts - stretch a little to the sides, and twist the droplets using a pencil.

- Take 2 pieces of thick wire and wrap with floral tape.
- Glue a piece of crepe paper to the stem as a core.
- Form a bud: glue drops, then hearts, fix with adhesive tape.

- Cut out a sepal from green crepe paper as shown in the picture.
- Secure the sepal at the base of the flower using duct tape.

- Cut out the leaves and glue them to the stem.
bright poppies
You will need: red, green and black corrugated paper, scissors, black thread, paints, brush, green tape, paper, wire, glue gun.
Master Class

Bulk flower
You will need: 7 sheets of corrugated paper measuring 50x75cm, 7 clips, scissors, ruler, wire.
Master Class
- Fold each sheet of paper like an accordion, fold width 7 cm.
- Fix the clip in the center of each sheet.
- Lay out the sheets in the desired sequence of colors.

- Make each next strip shorter than the previous one by 5 cm.
- Give the ends of the strips a rounded or sharp petal shape by moving the clips to the center.

- Make cuts in the folds, leaving the paper under the clip uncut.
- Arrange the strips so that the longest is on the bottom and the shortest is on top. It is worth noting that the center of all stripes should be on the same line.

- Fold the accordion and secure with wire.
- Fan out the folds.

- Carefully fold back the layers of paper one petal at a time, trim the edges with scissors if necessary.
A voluminous flower made of corrugated paper is ready!
Corrugated paper cornflowers
You will need: blue and green corrugated paper, scissors, black thread, wire, semolina, glue gun.
Master Class
- Wind the thread around 3 fingers in 50 turns, then tie the skein in the center to make a bow.
- Cut the bow on both sides to get the filaments.
- Prepare a piece of wire measuring 25 cm.

- Wrap the wire with green paper and glue the filaments.
- Apply glue to the threads, then dip them in semolina.

- Prepare a strip of blue paper 25 cm long, 3 cm wide.
- Fold the strip 4 times and make cuts.
- Unfold the strip, then twist around the threads, forming inner petals, fix with glue.

- Prepare a strip of blue paper 50 cm long, 7 cm wide.
- Fold the strip 6 times and make cuts in the shape of teeth.
- Unfold the strip, then fold it like an accordion.
- Twist the strip around the inner petals and secure with string.
- Take a strip of green paper and glue it to form a receptacle.

- Cut out oblong leaves from green paper, then glue them to the stem.
- Make the desired number of cornflowers in the same way.
Corrugated paper cornflowers are ready! I recommend watching this video!
You will need: white and green corrugated paper, cotton wool, scissors, corn grits, glue gun, wire, foam plastic.
Master Class

Corrugated paper snowdrops are ready! I recommend watching this video!
original bell
You will need: white-blue and green corrugated paper, thick and thin wire, glue gun, scissors, pencil, ruler, flower pot and pebbles.
Master Class
- Prepare a rectangle of white and blue paper measuring 18x23cm.
- Fold it 5 times with an accordion and cut the top edge in a semicircle.
- Unfold and slightly stretch each semi-circular tip.
- Fold the paper into a cylinder and secure with glue.
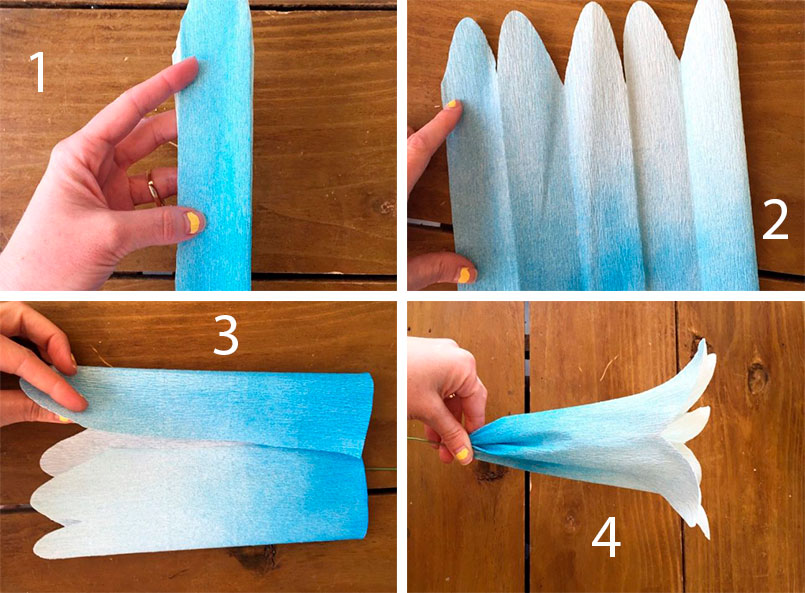
- Gather the smooth edge of the cylinder into a bundle, insert a piece of thin wire 10 cm long, fix it well with glue and wait until it dries completely.
- Form a bell shape with your hand from the inside of the flower.
- Cut out a strip of green paper, wrap the stem around and secure with glue.
- Make 4 more bells with small stems in the same way.

- Prepare a piece of thick wire 70 cm long and make a curved shape.
- Wrap the stem with a strip of green paper, fixing it with glue.
- Glue 5 bells to the stem, mask the attachment points with green paper.
- Cut out 2 large oblong pieces of green paper and glue them to the bottom of the stem.
- Insert the flower into the pot of stones.
Corrugated paper bell is ready! I recommend watching this video!
Tender rose
You will need: pink and green corrugated paper, green adhesive tape, stick or wire for the stem, scissors.
Master Class

Tulips from corrugated paper and sweets
You will need: corrugated paper of your favorite colors for buds, green corrugated paper for leaves, Raffaello sweets, double-sided thin tape, green teip tape, satin ribbon, packaging material for the bouquet, scissors, wire, pliers, wooden stick, if desired, to create dew - transparent beads , glue gun, tweezers.
Master Class
- Prepare the wire by making the desired number of stems of the same length.

- Cut long strips of corrugated paper, cut the long strip of corrugated into 2 pieces, then cut into 4 pieces. You should get 8 strips, 6 of them will be needed for the tulip bud.
- Turn each strip around the center, bend in such a way that the front sides of the strip are directed in one direction.
Home decor is a constant and non-stop job. In the process, new techniques and types of work are mastered. In this article we will talk about how to make flowers from corrugated paper. This paper can be found in flower shops. But in a larger assortment, it is in specialized establishments that sell everything for needlework. You will also need wire or thin sticks (bamboo skewers are also suitable), glue and scissors.
General principles and rules
Despite the fact that crepe paper flowers are made differently, the principles of work are the same. Here are briefly general rules that will help you make paper flowers with your own hands, very similar to real ones.
Here, in fact, are all the rules. And one more thing: the stem is prepared first. For it, wire or sticks of different thicknesses are used, which are wrapped in a long thin strip of green corrugated paper. The tape can be coated with glue, and then wound onto the base. You can twist it dry, and fix the edge with a drop of glue. One more thing: if you are going to assemble a composition from flowers, leave the lower 1/3 of the stem unfinished - it will be easier to make a bouquet.
poppies
Making crepe paper poppies is very easy. It is important to find the right shade of scarlet. You will also need a small piece of black - for the core. But, if it is not there, you can use any dark one, then painting it black.
We do poppy from corrugated paper like this:
- From paper napkins of any color, we fold a small square. We wrap it with black corrugated paper. If there is no black, take any dark one, then paint it.

- We cut out two or three petals of different sizes from scarlet paper: small, medium and large.
- We collect the petals all together (do not put in a neat pile) and crush into a ball.
- We disassemble the ball into petals.

- We take the core, wrap the first small petal around it from left to right.
- The second small petal partially overlaps the first one, followed by the middle one, also overlapping.

- The second middle and two large petals form the second row. They are located so that their central part overlaps the junction of the previous row.

- Having gathered everything together, we insert the wire into the base, wrap the base with a thread, glue it. Wrapped in green paper.

Poppy is one of the easiest colors to make from crepe paper. He looks very good, though. You can use them in a campaign with other flowers, or make a bouquet of poppies only.
Even such a simple flower can be made in different ways. First of all, you can change the middle. In the master class described above, the core of the flower is very simple. It can be made more natural. Using the same technology, we make the middle, but from white paper. And from black (can be painted), we cut out a strip about 1 cm wide and 4-5 cm long. On the one hand, we cut it into thin stripes (a couple of millimeters wide). We twist the resulting "noodles", getting thin stamens. We wrap the stamens around the core, and then we follow the same algorithm.
How to make paper and candy crocuses
An unusual gift can be made using candy as the core of flowers. It turns out an original sweet gift. Such a core can be made in flowers with a large bud hollow inside - a tulip or a crocus, for example. Moreover, crocuses made of corrugated paper are very simple to make. Everything will take 5-10 minutes. Not more.

Bouquet of corrugated paper with sweets - a good surprise
- From paper cut out a square with a side of 15 cm.
- We divide it into three parts, making a cut to a depth of 7.5 cm. Three petals are obtained.

- Each petal, having measured 5 cm from the top, scrolls around its axis and bends the upper part down.
- Give them a concave shape with your fingers.

- We take the formed petals, wrap them around the stem so that each petal takes its place - about 1/3 of the entire diameter. To do this, the bottom edge will have to be well crushed.

- We make leaves from green paper. Cut out a rectangle with sides 5 * 8 cm.
- We divide it into three parts, making cuts to a depth of 8 cm.
- Stepping back from the edge of 3 cm, we twist a strip of paper around its axis, bend the upper part down, straighten it and give it a rounded shape.

- Wrap the leaves around the bud. They should fall on the junction of the petals.

- We take a narrow strip of green paper, twisting it around the wire, we make out the stem.
That's all, the crepe paper and candy crocus is ready. Having made 7-9 pieces of such flowers, they can be put in the basket. For more variety, you can make some small flowers.
Chrysanthemum
Using the technology described above, you can make chrysanthemums. The difference is that there will be many petals and they will be narrow. And the principle is the same: we twist the upper part of the petal, lower it down. Only in the case of chrysanthemums, it is necessary to give the entire petal a curved shape.

For these paper chrysanthemums, sweets are also used as a core. These crepe paper flowers are best made from a material that is not too bright. Tones are more gentle, soft. Muted greens are also chosen for foliage. For more believability, take paper of two similar shades and make petals of two shades.
So, do-it-yourself chrysanthemum from corrugated paper:

This version of chrysanthemum looks good. But for greater credibility, you can make petals of different sizes. We need at least three gradations: small, medium and large. They will differ more in length than in width. Such a flower will look more magnificent, look richer in a bouquet. Try.
Asters - simple and original
If you need to make simple but spectacular crepe paper flowers, try making asters. They are made from corrugations of bright and pastel shades. They look best in a bouquet, and the colors can be different.

Corrugated paper asters can also be made from petals of different sizes - shorter ones closer to the center of the flower (there should be fewer of them), and longer ones on the periphery (there are more of them). You can bend them in one direction, but you can - in the opposite direction. As you like.
Corrugated paper roses: a step-by-step manufacturing algorithm (2 ways)
Corrugated paper flowers are good because they can be made in different ways. The material is very plastic, easily changes shape because there are several ways. Someone wants to achieve greater "naturalness", while someone is important speed.
1 way (natural look)
For corrugated paper roses, it is better to choose paper of two or three very close shades. So the look of the flower will be more natural. For example, white and crepe paper was used for the flower in the photo. The number of petals of different shades is arbitrary, as is their placement in the bud.

The production order is:

As a result, we get a beautiful rose from corrugated paper. In this performance, it looks like a real flower. There is an easier and faster way (pictured below).
2 way (simple and fast)
We cut out a strip of paper 7-8 cm wide. You can make it uneven - narrower on one side, wider on the other. We fold it starting from the narrow edge with an "accordion". The width of the "accordion" is 3.5 -4.5 cm. Cut out the petals from the resulting stack by 2/3 of the height.
We wind the petals onto the wire (you can not wrap it with green tape yet), starting from the narrow edge. As we wind, we give them a shape with our fingers - stretch on one side, crush at the stem. Having installed all the petals, we fix them with a thread (just by winding a certain number of turns). We correct the petals, forming a bud.

From green paper, folding it like an accordion, cut out long and narrow petals. Keep in mind that their ends will need to be twisted, so they should not be so narrow (noticeably 1 cm). We wrap the cut petals from below, under the petals, twist the leaves with our fingers, and then we make out the stem.
Corrugated paper peonies (with patterns)
For peonies, you need yellow corrugated paper - for the core, green - for foliage, pink, cream, raspberry - for the flower itself. For the stem, a wire or a thin stick is suitable. You will also need PVA glue.

Corrugated paper peony is a rather difficult flower to make. It has many different petal shapes. You can't do without a pattern here. But there are many varieties of peonies, so there are several patterns. We present two options. The first one can be printed, cut out and used as a template - it is given in a full-size image. The second option can be drawn with your own hands in the cells.
Step by step manufacturing process with photo:
- Cut out a strip of yellow paper 4-5 cm wide and 10-12 cm long. Fold several times, cut into thin “noodles”, leaving about 1 cm of uncut edge.
- We roll the resulting tape into a tight roll, using the whole edge for this. We grease it with glue, and twist it. It turns out a shaggy yellow core, around which the petals will be attached. We fix this center on a stick / wire, which will be the stem.

- Cut out petals from paper. The minimum quantity is 20 pieces (of all types), but the more, the more fluffy the flower will turn out. On the second pattern, the number of petals is indicated on each, on the first, explanations are needed. There are also numbers. This is the required number of petals.
- Stretch each petal in the middle, without touching the edges, giving them a convex shape. Don't try to make them the same. This is not required. In the process, it will still be possible to stretch or tighten a little.
- We begin to fold the petals from the smallest. We place them around the already existing middle. We place the first small petals only slightly overlapping their edges. We coat the base with glue.

- Next, take the middle petals. We lay them with a slight approach to one on top of the other.
- Then we lay the large and last - very large leaves. We coat each layer with a small amount of glue at the base.
- You will also need leaves. We cut them out of green paper. On the one hand, we compress them, forming a petiole, on the other, we straighten them in the middle, giving a curved shape (similar to a boat).

- We fasten the leaves under the bud, bend them down.
- You can also make leaves, like a peony, but this will also require a thin wire and a few cut out curly leaves. Veins on corrugated paper cannot be made, but they can be marked with paint.

- We glue each leaf to the wire, wrap the petiole with a thin strip, then attach it to the stem.

The assembly process is a creative activity
- We take a long narrow strip of green corrugated paper (about 1 cm wide, 20-30 cm long - depends on the length of the stem). We wrap the base of the flower, then smoothly move to the stem. At the end, we fix the edge of the paper with a drop of glue.
Peony from corrugated paper is ready. Usually they make up a bouquet. When you do the next ones, don't try to make them exactly the same. All flowers in nature are unique. Yours should be different too.

You can play with the size and number of petals, mixing petals of different shades, similar in color. You can try to make the petals at the base darker with paint. In general, there are a lot of options.
Corrugated paper flowers: photo ideas, patterns
Using the techniques described above, you can make any flower. The main snag is in the shape, number and size of the petals. The most important thing is the form. It is characteristic of each petal. Dimensions are arbitrary. Not only do flowers come in different sizes in nature, it has recently become fashionable to decorate the interior with giant growth flowers. Decoration is original, but specific. It is necessary to increase the basic patterns many times over, it is difficult to work with large scales. It's best to practice on normal-sized flowers first, and then move on to larger ones.

A little about patterns. They can not only be found. If it happens in the summer, take the desired flower, disassemble it into petals. From the whole pile, select the most characteristic, attach to a sheet of paper, circle. Then the shape must be corrected, taking into account the fact that these are still paper flowers. The final pattern will take shape after a few trial and error. We will post several patterns and master classes in the photo in this section.
cornflowers
The simpler the flower, the more ways to make it. Corrugated paper cornflower can be made using different techniques. Examples are in the photo.


If you want to make it very similar to the real one (A - a pattern for a blossoming flower, B - for a bud)
Iris
Making iris out of paper requires some imagination. A very unusual flower. The photo shows several techniques that allow you to achieve a different effect. Some flowers just resemble the original, some are very similar to it.


Anything-Miscellaneous


Lilies… Beautiful, but several techniques are used


Pansies - a pattern for making corrugated paper


For the "advanced". A very beautiful flower
The easiest way to feel the approach of any holiday is to start making home decor for the celebration. This time I decided to figure out how to make crepe paper flowers - realistic and stylized. Let's figure out together how to make flowers from corrugated paper and what you need for this.
There are many handicraft techniques in the world that allow you to make beautiful flowers with your own hands - today flowers are made from beads and fabric, plain paper (quilling, origami, appliqué, and so on), they are knitted and felted, but still one of the most popular manufacturing methods remains assembly of flowers from corrugations. How good are these flowers?
- they can be both photorealistic and fantasy;
- they are easy to make in a few minutes (unlike felting or beading);
- easily disposed of (relevant for those who want to decorate a large hall with flowers for the holiday);
- very affordable materials - corrugated paper costs a penny, especially if you buy in rolls rather than sheets;
- no special training required;
- there is no need to use some complicated tool;
- it is easy to get an acceptable result without experience (for example, paper flowers can be made with sweets - even small bouquets look very presentable);
- products are bright and expressive (which is very important for children).
Getting ready for work
What you will need in order to make do-it-yourself crepe paper flowers:
- several rolls of paper (it is better to choose matching colors and green for leaves and stems);
- wire, floral sleeve or any other devices for stems;
- cardboard for blanks;
- glue;
- sharp scissors;
- mock knife;
- threads and fishing line.
It is most convenient to work at a table with good lighting. If you plan to make large flowers (more than 15 centimeters in diameter), then you can sit on the floor (of course, after sending your children, husbands, cats and your beloved dog for a walk).
Making flowers
The easiest option:
So, the manufacture of flowers from corrugated paper of more complex options almost always follows the same scenario. I will describe it so as not to rewrite one by one:
- first you need to make a petal template;
- cut out 15-20 petals for each flower (if you want to make a realistic flower, then make petals of different sizes - for example, five small, five medium, five large);
- cut the petals (when cutting, follow the direction of the corrugation);
- collect the central part of the bud (5-7 petals are twisted together, tying at the bottom and gluing);
- then the petals need to be slightly stretched and bent so that they take the most natural form for the plant;
- glue the prepared petals to the bud;
- fix the flower head on the prepared stem.
How to make a stem:
- we take a piece of wire, a floristic sleeve, an ordinary branch - at our discretion, measure the desired length;
- cut off;
- decorate with green corrugation, or cloth, or paper;
- we imitate leaves, processes and thorns;
- cut again on both sides.
Making realistic roses
After we have made the blank, we need to stretch the petals - this will give the desired volume and we will be able to imitate the natural bend of the rose petal:
Let's start assembling. We need wire and thread. First, bend the wire as shown in the photo and wind our blank around the wire, forming a bud:
The outer petals need not only to be stretched, but also to slightly smooth out the corrugation - this will give the effect of a wavy edge, and the flower will look lush.
From green paper, make a sepal according to the photo instructions:
Build some leaves for the stem and fix them.
Spray the finished flower with hairspray - this will give it a little shine.
And this is the easiest way to create a rose:
A similar version of twisting a rose flower, but with explanations from the author:
Realistic peonies
A peony is a big flower in itself, so it's best not to try to make small flowers, but to collect some really big and beautiful peonies. To make a large corrugated paper flower, you will need about twenty minutes.
By the way, if you want to achieve a more natural color, then you can take white paper and tint it with food coloring - delicate pink and orange flowers will really look like real ones.

The paper needs to be cut into rectangles, each rectangle rounded.
- Peony is a rather disheveled flower, so the petals can be cut in some places and even gently torn.
- You will need a lot of petals - more than 25.
- For sepals, use green paper, cut out 8-10 green leaves from it.
- To get voluminous flowers, you can put a candy in the center or form a ball of foil.
- Trim a few petals at random - the less neatness, the more natural your flowers will be.
Or a more difficult option:
Decorative and stylized flowers
And how to make simple flowers from corrugated paper? Step-by-step instructions for making different colors and different ways.
Realistic lilies. Photo creation step by step:
We make large flowers from corrugated paper - roses.

Such graceful and simple flowers made of corrugated paper can be useful for photo shoots or interior decoration, and they can also be used to create various decorative compositions on the street (just keep in mind that the flowers are quite light and can be blown away by a gust of wind). In general, growth flowers are often used for decoration, but making them according to the same principle as small flowers is not too laborious.
Huge poppies:
Step by step photo: stylized poppies, but already in miniature.
In order to make lush artificial poppies, you will need three colors of paper (black, red, green), wire, thread, glue or a stapler, and of course scissors.
- From a roll of black paper, you need to cut a cylinder about ten centimeters long.
- Tie tightly with a thread and cut into a fringe along one edge - this will be the middle of our flower.
- You can also make a box in the middle - for this you need to take the scraps and wrap them in black paper to make a ball. The ball is fixed with a thread or a stapler staple, and attached to the center of the fringe.
- A roll of red paper must be unfolded and cut into six parts, each part folded into an accordion.
- Lay all the accordions one on top of the other and fasten them well with a thread.
- The corners of the accordions need to be rounded with scissors.
- All petals need to be well deployed (we straighten each accordion, and we get a petal).
- Use dense wire or wooden slats as stems - they need to be wrapped with green corrugation, cut out large leaves and attached to the stems.
- Attach the poppy heads to the stems and spread the petals.
Or a slightly different option on how to make a poppy flower step by step From and To:
Now you know how to make more crepe paper flowers. If you want to make giant flowers, then for beginners it will not be very difficult, however, it is worth considering some points:
- use high-quality paper - of course, even a master can make something beautiful from junk paper, but for beginners it is better to rely on good materials;
- huge flowers must have weights, otherwise they will simply fall (or fix them with fishing line on the wall);
- do not smooth the petals completely, leave a light corrugation;
- many petals are better than few (large rosettes of four petals look very pathetic);
- for a field composition, use several shades of green paper - then ordinary herbs and plants will look natural;
- if a child is engaged in the manufacture of three-dimensional flowers with you, make sure that he does not cut himself with paper, scissors, fishing line or thread;
- for decoration, use the made flowers of two or three shades - more colors may look awkward.
More ideas and inspiration
Have you already wanted to make beautiful flowers from corrugated paper with your own hands? Great, so you liked the ideas I proposed and mk. I'll tell you a little more about what you can do with your own hands from corrugated paper.
Cute Daisies:
See how crepe paper crafts are made - gorgeous roses that look better than real ones!
And in this master class you can learn how to do sweet crepe paper flowers with your own hands. And so, corrugated paper flowers with sweets, decorated in the shape of a heart:
By the way, sweet bouquets with corrugated paper flowers are a great find for any holiday. Such bouquets usually attract more attention than a traditional flower basket and are remembered for a long time.
And this is how you can make a Christmas flower - Poinsettia from corrugated paper:
Make paper flowers with your own hands from corrugated colored paper, or make a bouquet of flowers for holiday decoration, or maybe you want to make paper flower garlands to decorate the hall? There is nothing easier - learn how to make crepe paper roses step by step, and you can give a master class on any kind of flowers.
Try to make ruffled flowers at least once, and then it will not be difficult for you to make a new product - watch different step-by-step videos and make chic bouquets with your own hands!
You always want to decorate the most significant day somehow in a special way. Finished decorations are quite expensive, and if you decorate a large hall with them, it will cost a pretty penny. Today, a fairly large number of ways of needlework. Flowers can be made using quilling, beading, cold porcelain and even wool felting.
I would like to recommend you the most an exquisite Dutch rose shop wherebuy roses Almaty as easy as pie. Because it's so convenient. You can go to the site and use the clear interface of the online store. Choose and order the number of chic flowers you need and a huge selection of bouquets. We are waiting for you!
Further, continuing the topic: all these options are laborious and require certain skills in the technique. Original do-it-yourself corrugated paper flowers can be made in just 30 minutes. It always looks fresh and creative, plus easy recycling can be added to this.
In such decorations there are several important advantages that knock them out to the leaders:
- the minimum amount of cash costs for the necessary materials;
- flowers can be made so realistic that it is almost impossible to distinguish them from living ones;
- material can be bought at almost any stationery or needlework store;
- extraordinary beauty can be obtained without specialized tools and the construction of complex schemes;
- quick disposal is especially relevant when decorating large halls or rooms;
- will be a great gift or decor element for any celebration;
- even a child can make this kind of jewelry.
Even with all the abundance of DIY methods, corrugated paper flowers have been and will be at the peak of popularity. A wonderful way for self-expression and the embodiment of the most daring fantasies.

Preparatory work
Before proceeding to the sacrament of flower production, you must first of all supply yourself with all the necessary arsenal in advance. Corrugated paper is best purchased in rolls rather than sheets. The roll has a large enough footage, which is enough for a whole heap of buds, flowers and petals.
Paper is recommended to select more natural shades, unless, of course, as planned, the final work should look natural and natural. For buds, leaves and stems, you should take several colors, in this case, you can play with the shadows. Then the flowers will look more "alive".

For the stem, you need to take a thin pliable wire, a floral sleeve or any other materials.
You will also need thick cardboard for cutting blanks, glue and sharp scissors. Not necessarily, but you can prepare a fishing line or strong silk threads and a breadboard knife.
Work best with good lighting, it can be both natural light and fluorescent incandescent lamps.
If there are small children or animals in the house, it is safer to work on a high table than on the floor.

flower making process
At the initial stage, many needlewomen are faced with the question: how to make flowers from corrugated paper and where, in fact, you need to start. Of course, each craftswoman has already developed her own technology and some little secrets. However, nothing is impossible for those who want to reach the heights of professionalism.
The most complex technologies always come down to the simplest steps:
- First, you need to draw the desired patterns on cardboard. For a more realistic flower, you should prepare several templates of different sizes and slightly different shapes.
- The more paper petals there are, the better. In this case, we can recall the beautiful rose flower, which consists of a huge variety of petals of various sizes.
- After the cardboard blanks are ready, you can start cutting them out of paper.
- Once all the petals are prepared, you can start creating the flower itself. To do this, you need to take 5-7 of the smallest petals and tie them tightly at the bottom. Thus, a tight bud is formed. For strength, you can glue the bottom part with glue.
- After the bud is ready, you should attach each petal separately with gentle movements, slightly stretching the upper edges. By performing these actions, the petal is given a natural wavy shape.
- After all the petals have been collected into a finished flower, it can be safely "planted" on the stem.

The stem, like the flower, should look like a natural one. This can be easily achieved with ordinary wire and green paper. It is necessary to measure the desired piece of wire or floral sleeve and decorate it with prepared corrugated paper, fabric, or even paint with acrylic paints. Then attach the leaves and thorns, if the flower implies their presence. The finished flower "sits down" on the stem with glue. Since the wire and floral sleeve are movable, they can be given absolutely any shape and bend.

How to make realistic peonies.Bystep instruction
Peony is a magical flower that is traditionally a symbol of purity and love. A cute bouquet can be a great gift for a wedding or for the birthday of a beloved friend. Peony flowers in nature are quite large in size. For a bouquet of flowers, you do not need to make a large number of heads, 7 pieces will be enough.
If you want to achieve a shade close to the natural color, you can take snow-white or milky paper and give a few strokes of pink, orange or peach acrylic. You can make delicate peony flowers from corrugated paper with your own hands in just 20-30 minutes.
At the first stage, the rectangles should be carefully cut out according to the template and slightly rounded, thereby giving a natural roundness to the petal.
To make one peony, you need to prepare 10 strips for small petals, 10 strips of wider paper for large petals, and several strips of different sizes of green paper for making leaves. To give a realistic shape to the peony, it is necessary to cut the petals into a slightly oval shape with a small stem, and the leaves are slightly pointed towards the top.

After all the shapes are cut out, with gentle movements, the petals need to be slightly stretched in width and height, until the petal visually approaches the natural one. Next, give the petal a bulge from the outside, thus giving it some volume.
When stretching the petals or leaves, the use of nails must be avoided, otherwise the tenderness and fragility will be spoiled by unwanted lines.
Then the process of "folding" the bud begins. To do this, take a few of the smallest petals and tightly wrap one and the other. When wrapping, make sure that each subsequent layer overlaps the seam of the previous layer.
Thus, gradually, the petals are stacked on top of each other in layers. When the flower has been collected, its base should be fixed with a thread, fishing line or glue. Since a peony is a carelessly disheveled flower, you can safely tear some of the petals of the finished product slightly and then stretch the edges again.
In total, it takes about 25 petals to make one peony. Sepals are made from green paper. It is necessary to prepare about 10 green leaves, after shaping, wrap the finished peony with them.
In order to make the flower more voluminous and lush, at the initial stage, a round candy or a formed foil ball is placed in the core.
It should be remembered that natural flowers in nature do not have perfectly smooth edges and lines, so the less accuracy in the bud, the better.

Master classfor making delicate lilies
The royal lily flower is sensuality combined with majesty. Volumetric flowers made of corrugated paper always attract attention. This is not only a good addition to the main gift, but also a great decor element for any holiday or event.
In the example below, it will be described step by step how a wonderful lily can be made from ordinary corrugated paper.
For work you will need:
- paper of light lilac, yellow and green shades;
- watercolor, gouache or acrylic paints;
- glue or glue gun;
- wire for the stem, about 30 cm;
- brush and sharp scissors.
If the paper is in a roll, then it is necessary to cut off a strip from it, 7 centimeters wide. From the resulting segment, cut into small rectangular blanks, which should be given a rounded shape of lily petals. Then, the edges need to be stretched a little with the fingertips, for greater naturalness, and twisted a little with scissors or an ordinary pencil. Make a recess in the middle of the petal, thus giving it a natural roundness.
When the petals are completely ready, the magical process of reincarnation begins. To do this, you need to mix brown and dark lilac colors and draw natural dots at the base of the petal with the resulting tone. For more naturalness, the dots should be thicker at the base and practically disappear towards the middle.
The stem is made of wire. The desired piece of wire is cut off and decorated with a thin strip of green corrugated paper. Before wrapping the wire with paper, it is recommended to stretch it properly. This is done so that all unnecessary stripes and folds disappear.

On any edge of the finished stem we make a pestle and form a stigma with hot glue. For persuasiveness, you should paint over this place with green paint.
The stamens are made from yellow paper. A small even square is cut out of the roll. We cut strips along its entire length, but leave the base intact. Then it is necessary to twist each strip with twisting movements and treat the tip with a drop of hot melt adhesive. After all the work has been done, dip the made stigmas into semolina, paint over with acrylic or chocolate-brown gouache and let dry.
Leaves for lilies have a rather elongated shape. It is necessary to cut long rectangular strips of green crepe paper, slightly stretching and folding them. We glue the stamens to the pistil and add three petals of lilies to the finished structure, placing them slightly above the tips of the anthers.
After that, glue three more petals over the joints of the previous petals and twist the edges of the finished flower again.
The final stage is the "installation" of the finished lily on the stem, the addition of petals and fixing with drops of glue.

Corrugated flowers with candies
Each needlewoman, having reached a certain level, wants to do something extraordinary and memorable. No holiday or solemn event is complete without sweets and flowers. Modern craftswomen decided to combine these two components into one and call this direction suite design.
Corrugated paper flowers with sweets came into fashion not so long ago, but they have already managed to win a fairly large number of the public with their eccentricity and creativity. Today, through your PC, you can get acquainted with photos and videos with a huge number of master classes on making an unusual bouquet. A detailed step-by-step description will help to translate all your bold ideas into reality. The main thing is not to be afraid to experiment. Only in this case will you get bouquets that are worthy of decorating not only birthdays, but also weddings.

To make a bouquet, you will need chocolates, preferably round and in a wrapper. This will greatly facilitate the task during the formation of the flower bud. Paper can be taken in absolutely any color, here you can give free rein to your fantasies. Squares should be cut out of the corrugation, rounded off and petals formed by pulling and stretching the finished canvas.
The next step is to cut the squares of the baking film. A candy is wrapped around the finished square and a small tail is left at the bottom, which is then wrapped with a beautiful thread or gold-colored ribbon. The finished workpiece is gradually, layer by layer, “wrapped” with petals, immediately giving the shape of a natural flower. It is necessary to try so that the first layers completely cover the candy, but the subsequent ones may already be half-open.
A chic bouquet is carefully formed from ready-made flowers. This is done in different ways. You can “plant” each flower separately on a pre-prepared wire, you can use skewers, a foam ball, a plastic bottle or polyurethane foam.
After the bouquet has been completed, it can be decorated with satin ribbons, various laces, beads, stones or rhinestones. Such an original gift will definitely leave behind indelible pleasant memories.
To create a spectacular bouquet, you can not stop at one type of flower. It can be a wide variety of combinations of daisies, roses, daffodils, poppies, tulips, orchids and so on.

giant flowers
Large do-it-yourself corrugated paper flowers can be made for any occasion. Such decoration will always look festive and unusual. Flowers of a gentle shade can decorate a romantic party or a wedding celebration. Huge, but at the same time fragile, as if made of porcelain, can give the holiday even more atmosphere.
For a children's birthday, products of bright and flashy colors are suitable. They will become indispensable not only in decorating the festive photo zone, but also in photo shoots. Gorgeous growth flowers made of corrugated paper will be able to "greet" guests at the entrance. With such a huge bouquet, you can adequately meet your beloved wife from the hospital or give it to a girlfriend.

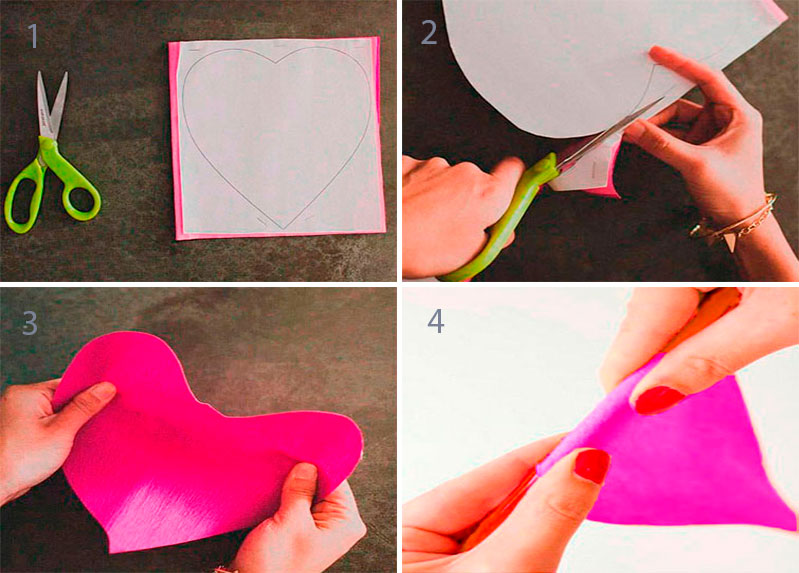
Step-by-step process of making a large rose:
- on thick cardboard, draw a petal pattern in the form of a heart and a droplet;
- cut out of paper according to the pattern 15 large hearts and 5 petals in the form of droplets;
- each cut petal should be well stretched up and to the sides, giving it a natural and natural shape;
- for petals in the form of droplets, it is necessary to beautifully wrap the edges with a pen or pencil;
- at the petals in the form of a heart, we make wavy bends with a pencil only on the sides;
- for the stem you will need a piece of ordinary soft wire, which must be decorated with floral tape or green corrugated paper;
- the formation of a bud should begin with small petals, after gluing them to the stem with a drop of glue;
- after the base is formed, droplets are glued to it in turn, and then hearts;
- from a long strip of green paper, a sepal is cut out with small teeth;
- the finished sepal is fixed around at the base of the bud, fixed with green adhesive tape or a drop of glue.
At this stage, the rose is completely ready. In order to make leaves, oblong molds should be cut out of green corrugated paper. After that, put the edge of the decorated wire in the middle of the finished sheet, after wetting it with glue. Then fold both halves of the sheet so that the wire remains hidden inside the petal, and unfold the remaining edges of the paper back.
At the final stage, the leaves are attached with adhesive tape to the stem and decorated with corrugated paper or a few strokes of acrylic paint.

Giant corrugated paper flowers can magically turn the most ordinary holiday into an enchanting celebration.
How to make DIY crepe paper flowers
4 /5 - 87 ratingsAny vegetation instantly transforms the space, making it more alive and natural. Alas, real flowers do not retain an attractive image for as long as we would like. Recently, crepe paper flowers have become popular. From them you can create wonderful bouquets or something more original. In our article we will talk about working with this material. We invite you to dive into the world of needlework with us!
Paper flowers: application ideas
These non-trivial crafts decorate both special occasions and living spaces in any style. Let's take a closer look at exactly how they can be used:
— Flowers have gained incredible popularity as decor for weddings, birthdays, corporate parties and other themed celebrations. Of these, they make garlands, arches, bouquets for marriage, use for photo studios.
— Floral arrangements are also used to decorate exhibition centers, needlework stores, beauty salons and showrooms.
- Flowers in vases, pots, on ceilings, in the form of wreaths, topiaries are suitable for the interior of a living space.
- For the New Year, decorate the Christmas tree with small rose inflorescences, creating the illusion of flowering.
- On the wall or ceiling of the children's room, you can hang colorful options for peonies.
- Before Christmas, hang a wreath on the door, made up of spruce branches and flowers.
- On Valentine's Day or for the wedding, design a red, pink or white heart.
- Another trend is to create giant flowers in human height. Put them against the wall or form a whole forest in the room.
Thus, crepe paper flowers really have the power to make any space unique and dressy. Moreover, the very process of creating a rainbow decor is very exciting and can attract even a child. Try to make a flower yourself and connect your child, having previously selected a simple task for him.


Roses
Rose flowers are one of the most popular and desired by millions of girls. And this is not surprising, because a beautiful bouquet is distinguished by nobility and sophistication. However, before appearing before our eyes in the form familiar to us, the plant went through a long path of selection from wild rose. We are unlikely to have time to talk about the intricacies of crossing and selection, but read on about how to create a man-made miracle on your own.
For this flower, it is best to choose several similar shades so that its appearance is close to natural. As for the number of petals, it can be arbitrary. Consider drawing up a rose from white and crepe paper. Work plan:
1. Cut out 8 small, 10 large and medium, as well as 8 largest petals. Half of the total - from crepe, and the same amount from white paper.
2. Make a long strip of green base for the stem, as well as 4 narrow and oblong green leaves that are attached at the bottom of the bud.
3. Round the petals with your fingers, straighten one edge, slightly wrapping it in the opposite direction, and twist the other.
4. Take the wire for the stalk and wrap it with the ribbon that we have already prepared.
5. We compose the bud itself. Twist the lower edge of the smallest petal onto the wire, completely wrapping it. Apply glue to the base and place the next medium-sized petal on it. Press half of it firmly against the first, the subsequent parts are compacted in the same way.
6. The remaining petals are attached as their size increases.
7. At the end, glue the leaves.
Thus, we got a delightful rose that looks like a real one. There are also simplified techniques, but their result is not so realistic.


peonies
Delicate peonies, created by hand, will harmoniously complement the interior of a bedroom, nursery, kitchen or hall, and will also act as an excellent decor for a party.
What we need: corrugated paper in several shades; plain paper or cardboard for stencils; floral tape in green; PVA glue; wire; scissors; pencil.
On the prepared materials, outline the patterns of leaves and petals, cut them out. Cut the corrugated paper on the line, the width of each of them should correspond to the length of the blanks. Fold the strips into an accordion, and place a stencil at the top and cut out the future parts of the bud along it.
Make frequent and long cuts on the stamen templates, apply glue to the base and wrap the blank on the wire. Secure the stamen with floral tape. Lubricate the lower part of large leaves with glue, stick the stem inside and press the base of the sheets.
Add bulges to the smallest petals: grab the edges and gently pull to the sides, and press the top edge to get a slight wave. Next, fix the petals at the bottom of the stamen. Do the same with the heart-shaped parts. At the end, the 3 largest petals are added to the bud.
Glue the sepals to the bottom of the flower, and wrap the stem with floral tape. A cute and romantic flower is ready!


sakura branch
The most revered flower of the Land of the Rising Sun delights with its beauty. Every spring, the Japanese tend to spend the festivities under the cherry blossoms, enjoying the first warm rays of the sun.
We offer a simple master class that will help bring gentle spring decor to your home. To create a flowering branch, you will need: a dry branch, corrugated paper in muted colors, PVA or silicone glue, scissors, cardboard or blank paper, a pencil.
1. On the materials for blanks, outline the stencils of stamens, petals and leaves and cut them out.
2. Cut corrugated paper into rectangular parts for leaves and petals, as well as squares that will become stamens.
3. Align the details for the petals in the center with a pencil or scissors.
4. Create a stack of all the rectangles and cut according to the templates. Cut the squares from one edge into strips.
5. Slightly flatten and twist all the elements in the middle into a tourniquet. Lubricate the lower part of the stamen with glue and twist.
6. Fasten together the lower parts of the three petals. Give volume to the leaves.
7. Glue the stamen and leaves to the bottom of the bud.
8. Dry the glue, and then glue the flowers to the branch.


Daisies
If you have a desire to fill your interior with summer joy and the warmth of the sun, then you will not be able to ignore the delicate field daisies. They are perfectly combined with any wildflowers, allowing you to create a multi-faceted summer bouquet. Such a bouquet made of paper will delight you for a long time and in any season.
Before you start making, arm yourself with the following tools and materials: corrugated paper in yellow, green and white; ruler, pencil and scissors; glue or glue gun; wire, about 10-20 cm.
1. First make white chamomile petals. Take white crepe paper and cut a strip 5 cm wide.
2. Cut the finished tapes into thinner strips so that the width of each is 1.5–2 cm.
3. After the first two steps, cut out the petals from the strips.
4. To make the petals more natural and convex, we need to stretch the blanks in the middle.
5. To make the stem of our future chamomile, we tightly wrap the wire with green corrugated paper. We attach the ends of the paper using glue.
6. From a yellow roll, you need to make a strip 1 cm wide. After that, make shallow cuts along the entire length of the workpiece. Next, wind the workpiece on the tip of the stem and form a chamomile stamen.
7. Glue each element in turn onto the base of the flower. When the whole bud is ready, we make sepals from green paper and stretch the petals to the sides. Our chamomile is ready!


carnations
Graceful and gentle carnations will become a charming decoration of your interior. Carnation arrangements are wonderfully combined with wildflowers such as yarrow or gypsophila. This decor fits perfectly into the rustic style - the so-called "country".
Stock up on the necessary tools and materials: wire for making the stem; scissors, adhesive tape, glue; corrugated paper in green and white or pink; pastel crayons.
1. The first step is to create the petals of our carnations. To do this, we need to make two pieces of white paper: one is 5 cm, the other is 3 cm.
2. Using lilac chalk, paint over the edges of a small strip so that one tip is more saturated. We do this from both sides.
3. Next, we will cut out small teeth along the entire painted edge of the strip, after which we will fold it 4 times and make 4-6 shallow cuts.
4. We twist the strip into a bud. When about 10 cm remains to the end, stretch the rest and get a wavy bend along the entire length. Fix with glue or tape.
5. In the same way we create large petals, but so that they are a little wider.
6. Using wire and corrugated paper, make a stem and glue the finished bud to it.
7. We make a sepal and a couple of leaves from green paper. To make them look more natural, they should be stretched in order to give volume.


Mysterious wreath for Halloween
Despite the fact that Halloween is an unconventional holiday for our region, it has already managed to organically intertwine in our holiday calendar. This decoration is suitable for a themed entourage for All Saints Day, as well as for a contrasting interior in a modern style.
To make this unusual wreath, you need to have the following: a blank for a wreath made of foam or polystyrene foam; corrugated paper in your chosen colors (for example, black and purple); large sequins or decorative beads; spray paint can; glue or glue gun; paper for templates of our future petals; scissors and thin string.
1. We make a blank. If necessary, paint it in the desired color, then prepare templates for petals of different shapes and cut them out.
2. Cut the crepe paper into long strips so that the width equals the length of the templates. We fold our strips with an accordion, placing a template on top, and cut it out.
3. To make our petals look natural, let's give them a convex shape. This can be achieved by stretching them in the center. When all the details are ready, we form a flower out of them. We apply glue to the base and collect a flower from about 5-7 petals.
4. Make similar flowers from paper of a different color. Then randomly glue all the flowers on the base of the wreath.
At the end of all the work, you can lightly sprinkle the finished wreath with paint and glue beads on it in a chaotic manner to give it a finished look. On this, our wonderful wreath is ready!


DIY paper flowers - photo
Our article would not be complete without a photo gallery. There are many more colors that can be made from crepe paper than we could possibly cover. We have selected visual photos of ready-made compositions from irises, tulips, blueberries, orchids, lilies and many other flowers, as well as ideas for their use in the interior. Happy viewing!


