DIY wooden doors
Doors are one of the most basic elements of many buildings and structures. They serve to protect against uninvited guests, whether they are people, animals, heat or, on the contrary, the cold of the street, sounds, and much more.
Wooden doors differ in their specifics from. They are less durable. But home-grown "kulibins" are able to overcome any obstacles, if they wish. For them, that wood, that metal is all one. For there is no reception against scrap.
If the front doors are often made of metal nowadays, then the interior doors, for the most part, are wooden.
This does not exclude doors made from a combination of materials (plastic, hardboard-wood, etc.)
But wooden doors were, are and will be! Starting from the simplest, and ending with heaped, double (such as tambour), round, with a top in the form of a part of a circle, bivalve, and up to 4 or even more meters high.
We won't talk about the saloon-type doors that American westerns like to show, when the door is kicked open in any direction - either in or out, it doesn't matter. Also about many others. Let us dwell on the most common and widely used.
The simplest door, which can be made by almost every man, who has "hands planed" under it, is called a gate. Making wooden doors with your own hands is not difficult. Such a door is installed in fences of various types, or in animal sheds.
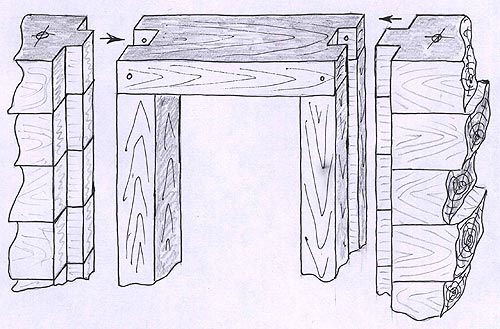
Doors with dowels. Gate and barn door. Dowel, brace.
Such a door can be made of boards hammered together without gaps, or with gaps that allow you to ventilate the room and peep (for animals).
Wooden door with dowels
The main elements of such doors are the boards that make up the door leaf, dowels (2 pieces) and a brace located diagonally and serving to protect the door from skew.
In the simplest case, the dowels and strut are simply stuffed on the door panel. What are simple ones used for? It is somewhat more difficult when the keys cut into the door boards. But for this, the keys are already made according to the dimensions indicated in the figure.
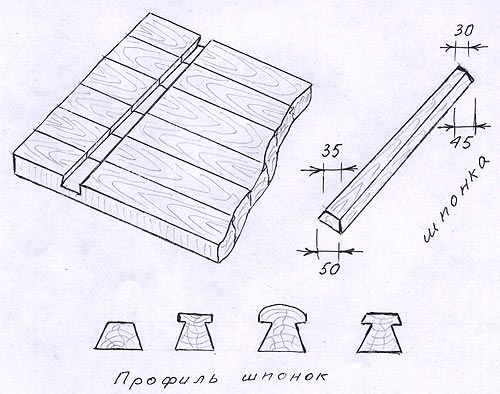
Doors with dowels. Key, key profile.
Previously, this was done with hand saws-awards. Why the door panels were laid in a row, on a plane and leveled. They fixed it. Marked up. On a bar sawn at 45 degrees and fixed on the boards, grooves were cut to a depth of a quarter or half of the board.
Then the excess was chosen with a chisel, striving for a flat bottom of the groove. Dowels were inserted into the grooves and driven them over the entire width of the door. The ends of the dowels are sawn into a cone so that their protrusions do not interfere with the full opening of the door. Thicker key - less possibility of warping of the door. They put them on pins, which helps a lot when the door boards dry out, or on glue, but this is not necessary.
The strut, sawn from one end at an angle to the key, excluding the gap, is attached, the angle of the other end washed down, sawed down and fastened to the overlay.
In modern times, cuts are made with electric circular saws, setting them at the desired degree (about 60). Which is much faster and easier.
It is economically feasible to make similar doors (without a gap between the boards) for baths. It is much cheaper than buying in the market.
Paneled doors
The following, also very common types of wooden doors, are paneled.
Immediately it is worth mentioning that it is economically feasible to buy or order such doors. Because if you do not have experience in their manufacture and the appropriate tools and equipment, then it will be problematic to make them.
Therefore, we will focus only on their description.
First, what is a fillet? In wooden doors, a panel is understood as a wooden smooth, profiled or carved shield that is inserted into the harness. It is made from one or more boards, depending on the width of the door. A groove is made in the strapping bars (boards), and the ends of the panel boards have a profile that can fit into the strapping groove. In some doors, the panel may be made of chipboard, wood fiber or.
Paneled doors are assembled from simple, well-crafted bars (strings), into which panels are inserted. Without going into too much detail, it can be noted that the panels are floating, flat, with overlay moldings (curly profiles, which are a combination of straight and curved lines), with figurines (figuratively planed edges).

Types of panels for wooden doors. Floating, flat, with figurines, with overhead moldings.
Sometimes paneled doors are combined with their glazing. At the same time, if earlier bindings like this were made for glasses, now another innovation is being practiced. A solid glass, cut into the entire opening to be glazed, is applied to the salary molding on one side of the door. Then, on the other side, removable overlays are attached to the glass and fixed. This method makes life easier for manufacturers of such doors.

Door leaf with built-in binding. Removable overlay. Glass.
Paneled doors made for exterior use are thicker than those made for interiors. External - from boards with a thickness of 40 to 60 millimeters, the second - usually less than 40 mm.
door blocks
Purchased and custom-made wooden doors include, in addition to the door leaf itself, and the door frame. Collectively, this is called a door block. For external doors, the frame is made of timber with a thickness of about 75-150 mm. For internal about 40-50 mm. All this is indicative.
Doors external and bath, internal, necessarily have a lower bar. It serves as a threshold and is designed for better thermal insulation of adjacent rooms.
For ordinary internal doors, such a threshold is not needed. Not only because you can stumble on it, but also in order to be whole and unified throughout the premises. It is more convenient for housewives to wash floors.
The door frame on its inner surface is selected in a quarter. What is done for a snug fit of the door panel to the frame. This achieves a small sound protection and heat preservation. The gap below the door leaf can be covered with a rug for this purpose. And you can't do without a hole. It serves not only for ventilation, but also to compensate for the possible sagging of the door during operation. Moreover, it will come in handy if you decide to cover the floors with laminate, linoleum or something else.
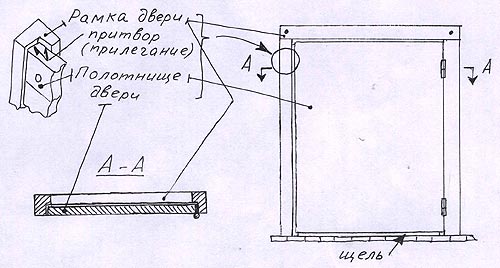
Door frame, door porch, door panel.
The frames of wooden doors in, which settle, should have grooves along their vertical bars, combined with wall spikes. That does not prevent sediment.
Fastening door blocks
In wooden structures not subject to settlement (frame-panel and similar), the door frame is attached to the posts of wooden walls with nails or self-tapping screws located in the quarters. Then they are less noticeable, because they are covered by the door leaf. The heads are heated, then you can cover the recesses with putty or close them with special plugs of the appropriate color.
Fastening of door blocks is carried out strictly according to the level both vertically and horizontally, using wedges. At least 3 nails (self-tapping screws) are allowed along the vertical bars. In log cabins that settle, fastening is carried out along the lower crown, above - according to a temporary scheme, with the ability to remove fasteners. The final fastening is carried out after the complete settlement of the log house in a year or two.
In stone, the door frame is attached to the so-called embedded bars. That is, built into the walls to a sufficient depth. There are other methods, for example, on anchor bolts or rebar pins. Why first drill holes for them, both in the bars of the door and in the stone wall. Don't overdo it when attaching. Sometimes it is easier to drive out than to return to its original place.
The gaps between the frames and walls are closed in different ways, some with tow, some with macroflex (again, do not overdo it, otherwise it will open, it won’t seem enough, you won’t open the door). Maybe cement mortar. All the same, then you will cover it with door frames.
Door frames
Speaking of cash. On the doors they are internal and external.
Internal platbands in width, as a rule, range from 60 to 200 mm. In any case, they must be at least 20 mm wider than the box bars. Classic architraves on the inside have grooves up to 5 mm deep for a tighter fit. The outer side is both simple and embossed.
At the corners, the architraves are most often connected "in a mustache", i.e. under 45 degrees. With the help of a chair. First, vertical platbands are sawn and set according to the level. Then, under their upper part, an upper horizontal platband is slipped, an angle is marked on one side with a pencil, and sawn off. It is attached again, another corner is marked and also cut out.
Why is that? When you try it differently and you get gaps at the joints, you will not ask.
The outer architraves are often somewhat more massive than the inner ones. Often covered with carvings, especially if it is a country house.
The platbands are fastened with self-tapping screws or nails, most often finishing or with a flattened head, so the attachment points are less noticeable. Lately, fasteners are being made less and less with screws, it is believed that this is the last century. The geometry of the screws is much more attractive.
Door pins - a mandatory element of the door
The most common defects found in doors are warping due to insufficiently dry material used in the manufacture. But if there are pins in the door panel, then even if warped, it will not crumble. The absence of pins when assembling door panels made of strapping and boards is unacceptable (if you are convinced of their absence, in no case do not buy such doors and bypass their sellers and manufacturers for a kilometer!) Sometimes some manufacturers there are not very willing to use glue, where it is impossible to do without it.
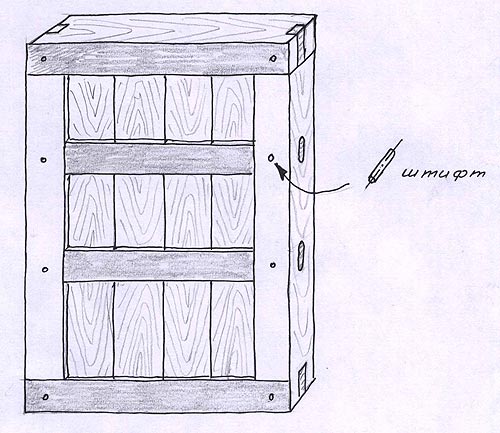
Door pin locations
Since not every professional can determine the moisture content of the wood and the possibility of further warping of the door, keep receipts and receipts when buying doors, what if you have to return the marriage in six months?
It is far from always possible to fix a warped door by replacing part of its elements. Once they put a balcony door on a client, which "sausaged" for a year and a half. What just did not happen to do with it! And wedged, and trimmed, and put extras, and changed the elements. (This is all about the door).
A professional carpenter with 35 years of experience, who then worked with me, said that there was no such thing in his practice. And what is the reason, and did not find out. In the diagnosis, they settled on something in between the graininess of the wood and the charmed place where it grew.
Installation of door hinges.
A very crucial moment when installing door hinges. This operation in the case of purchased doors may or may not be. Sold in different versions, but mostly without loops.
Door hinges are extremely diverse, now there are about 2 dozen of their types alone. Let's take a look at the most used ones.
For massive doors, the height of the hinge in the kit can reach up to 30-40 centimeters. But such monsters are of no use to us. The cursed legacy of former regimes.
For home and garden and country buildings, a height of 75-150 mm is quite enough for us.
Hinge types
The most popular are removable, semi-articulated, consisting of two parts (cards). One card with a rod (axis), the other without. Such hinges are good because the door is removable. Although there are special cases when it is necessary to first remove the upper trim to remove the door, or, in general, unscrew the hinges.
In addition, somewhat less often, but also widely, hinged hinges are used (with a removable or non-removable rod).
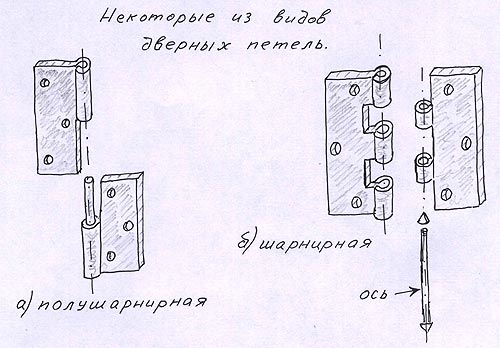
Some types of door hinges. Semi-hinged and hinged hinges.
Both those and other loops are right and left. It is not difficult to determine which loop is right or left. To do this, you need to position yourself facing the door, imagine that you are opening it towards yourself by the handle. If at the same time the handle is to your right, and the loops are to the left, then such loops are left. And vice versa, if when opening the door the handle is on your left, and the hinges are on the right, then the hinges are right.
There are also universal hinges that open both to the right and to the left. But I do not like them, why, to explain for a long time. It’s just that they are often too fancy, crumble or take apart one, then it can be difficult to assemble later. Genius is in simplicity.
door gaps
Before installing the hinges, the door panel is positioned so that there is no gap along the hinge line between the door opening and the panel, but it is present for all the rest.
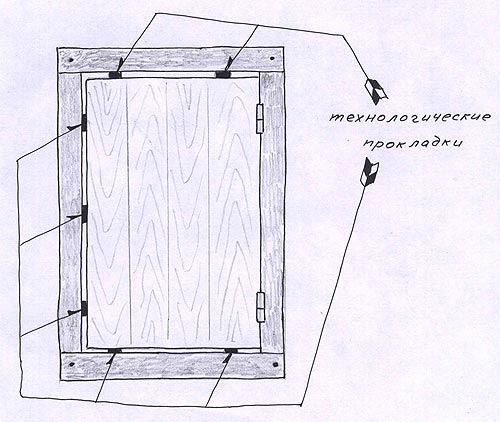
Technological gaskets when setting the door
To do this, take scraps of hardboard or wooden slats of the same, fixed thickness and place them so that the gap is uniform across all fit. This is not a simple matter (choosing the thickness of the gasket), since in the process of further operation, doors, especially external ones, as well as those made from insufficiently dried wood, can change their dimensions under the influence of temperature and humidity. In other words, shrink or swell.
Some clients of pedants are shaking with indignation because of the slightest gaps in the doorways. But these are the properties of wood, (with the exception of very hard rocks) you can’t get away from them anywhere. This is tantamount to forcing a client to run a hundred meters and demanding that he not sweat.
And for normal customers I will say that the gaps are simply necessary. And they should be such that, both in dry and wet conditions, the door can both close and open without straining.
In practice, I had to deal with gouging panels and hauling frame racks and wedging and inserting additional bars and slats, and God knows what else. And all in order for the doors to function normally.
The hinges are cut, according to the classics of the genre, at a distance in their height, set aside from the inner corner of the door frame. But, if there are door spikes in this place, then at least 1 cm should be retreated from them.
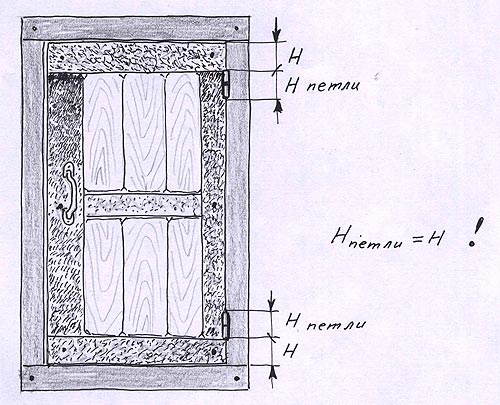
Geometric arrangement of door hinges
After installing the technological gaskets and measuring the distance at which the loops should be, the loop maps are drawn around the contour with a pencil and the sockets for the loops are selected with a chisel to the depth of the loop thickness. No more, no less! Then, when installing the hinges, their surface becomes flush with the door panel and the bar of the door pillar.
At the same time, do not forget that the parts of the hinges (axes) protruding outward from the surface of the door leaf must be strictly parallel to it. The slightest distortions lead to poor closing and opening of the door.
Door hinges are fastened with self-tapping screws, which are sold complete with them. They are the same color. But the disadvantage of these colored screws is their fragility. A little overzealous and the slots are cut off. Black, wood, better hardened, stronger, but the color does not quite match.
Door adjustment
If, for some reason, the doors immediately or after some time become loose or creaking, difficult to close, they will have to be adjusted.
The adjustment consists in lubricating the hinge axes, tightening the screws, replacing them with longer ones, installing wooden wedges in the old holes from the screws if they are loose. Up to the replacement of wood sections in the places where the hinges are installed, if the wood does not have a living place from numerous holes for self-tapping screws and screws.
Solid and thick consistency are used as lubricants. Starting from pieces of a graphite pencil rod and ending with grease, graphite lubricants. With the door removed or lifted up, apply a sufficient amount of grease into the hinge hole. If after a while the grease pops off the hinges, it means that too much of it was applied. Remove excess. Liquid lubricants such as spindle oil, various "defrosts" can only be a temporary remedy, their action is very limited in time.
To remove doors, especially heavy and bulky, you need a couple of people. The door is opened wide open, as wide as possible, with both hands they take hold of its panel in the middle and, shaking it in different directions, lift it until it is completely removed. If the door is very heavy, then an ax or a mount is used as a lever, which is slipped between the floor and the canvas as close to the axes as possible. Here, remember about removable hinges with a kind word, this is not something that is not detachable hinges.
Then you have to either unscrew the screws (screws) from the hinges, or knock out the axles (pins).
Sometimes the doors sag very cool and cling to. To eliminate it, washers of the required thickness and the required outer and inner diameters are placed either on the axis between the hinge cards. Or rearrange the loops higher. Or they cut through the lower end of the door leaf. In this case, the end should be parallel to the floor throughout. It is necessary to plan in moderation so that at any permissible humidity of the premises the gap is minimal.
The places where the doors fit when painting should not be covered with an excessive layer. How would you not have to remove the excess.
Sometimes, with increased, for some reason, gaps, doorways have to be stuffed with planks to eliminate them. With subsequent sanding.
Sometimes when the door is closed, its panel does not enter the porch from the side of the handle (lock), this happens when there is too much clearance along the door panel from the side of the hinges, they need to be sunk for which to select wood under them. The sample should be small, on the order of a millimeter. Put the loop on a couple of screws, check, if necessary, make a sample, and so on until normal closing.
If the hinges are too deep into the tree, then the door will "pull", it will not close. In such cases, thin linings are placed under them (sometimes they take a layer, or several, of ordinary plywood).
When gaps are formed between the panels of the door panel, they are sealed and puttied, either sorted out or covered with planks.
In order to avoid that your door, every time you open it, does not hit the handle or the canvas against the wall, furniture or, you need to attach an emphasis (buffer) to the floor, the farther from the hinges it is located, the better. Will not loosen the loops.
About door locks
A little about door locks, hecks and other locks. It is best when they simply do not exist, but there is an ordinary pen. If the door fits well, the handle is enough to close tightly. If the door still opens a little, then a heel made of genuine leather is nailed onto it. A heel of the required thickness is stuffed on the panel closer to the handle, or on the upper end (where it is more inconspicuous). If over time the skin is erased, then it is not necessary to nail another layer of it. Sometimes it is enough to slip a match under the skin and the door will close tightly again.
The handle is necessarily attached to the door trim, and not to the paneled board, it is stronger. When installing the handle, it is carried away from the doorway, otherwise you can injure your hand on it.
In any case, locks are installed on external doors. Most often used hanging with eye loops, mortise and overhead. The easiest way is hanging, but they are more often knocked down by all sorts of bad people, especially in unguarded dachas.
Mortise locks are installed in at least three to four hours and this requires some skill and the presence of a drill with nozzles and drills, chisels and screwdrivers.
Overhead locks are somewhat easier to install, although here you also have to tinker. In this case, as in many others, measure seven times, cut once.
Sometimes closers, door chains, bolts, hecks, "eyes" and so on are installed on external doors.
That's all, in a nutshell, about wooden doors. Some, especially on the outer country doors, attach horseshoes or amulets. Superstition, but sometimes helps. Good luck to you! And let uninvited guests not enter you through wooden doors!
Other questions on the topic of metal and interior doors, windows.