Why is a gate made of a profile pipe good and should I give preference to it?
In every person there is an instinct of self-preservation, which encourages you to protect your own home from any danger and outsiders.
Gates, fences, gates are one of the mandatory elements of protection. But many people like to surround themselves with beautiful things, so in addition to a simple fence, it can be decorated with decor.
A gate from a profile, the installation of which was carried out by oneself, will be an excellent solution to make not only a comfortable, but also an aesthetic environment around you.
Stages of manufacture and installation
Size selection
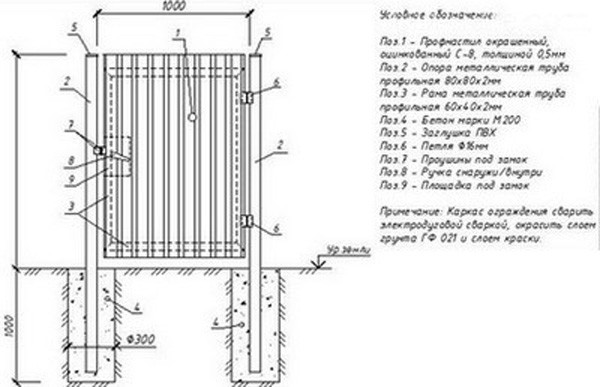
When you decide to make a gate, it is important to correctly determine the dimensions that the future design will have. The best width for an object is one meter, and a height no more than two.
If you want a larger and heavier gate, then you should take into account that the weight of the sash will increase, and because of this, the hinges and locks on the canvas can wear out much faster than you expect.
When creating an object higher than two meters, equip the frame with an additional top insert with a special crossbar.
Thus, you can get a solid canvas, which will not only hide the opening formed above the gate, but also reduce the load on the support pillars.
Create support posts
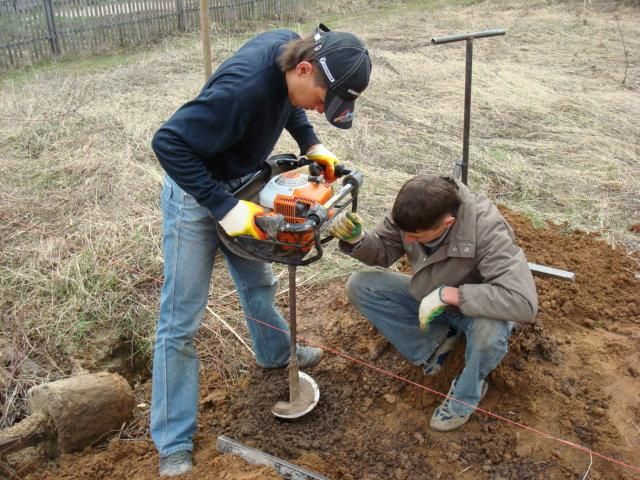
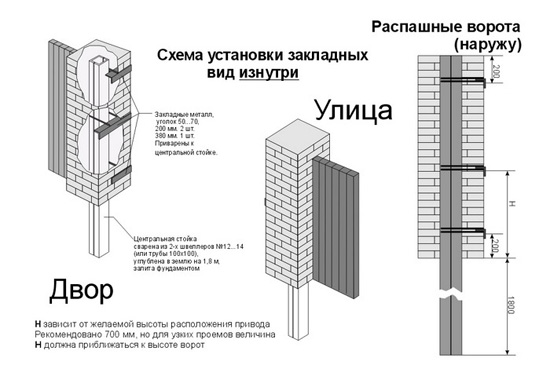
In order for the gate, created from a profile pipe, to be durable and have a long service life, it is important to correctly make and install the racks that will hold it. They can be metal pipes or pillars made of brick and stone.
During the installation of the elements, it is important to ensure that there are no deviations from a strictly vertical position. If you miss this moment, the future design may become inoperable with a strong skew.

When the foundation pit is ready, place the racks in it strictly in level and vertically, and then fill it with a special mortar of cement, gravel and sand.
In the future, about 7-14 days, the composition will solidify and acquire its strength, therefore, work must be suspended.
Wireframe creation
The frame for the gate is easiest to make from a profiled metal pipe with a section of 60x30. To get blanks and weld the gate, you should take a grinder and a welding machine.
Before you start cutting the pipe into blanks, you should clean it of scale and rust with a metal brush, which is mounted on the grinder. After that, the entire surface of the pipe must be degreased with a solvent and primed with an anti-corrosion agent.
It is worth noting that for proper operation, a small gap must remain in the structure, which will allow the gate to be opened and closed in winter without hindrance.
When you decide on the dimensions of the element, you can begin to make a frame. Make marks on the profile pipe and start cutting with a grinder, holding the tool at an angle of 45 degrees.
Thanks to this chamfer, you can improve the quality of the weld on the gate, it will be almost invisible. To fully equip the gate, you will need two longitudinal parts 1.75-1.9 and 2-3 meters, as well as transverse parts 0.9-1 meters each.
Between themselves, all the elements are welded, while the process is carried out by tacks every few centimeters around the entire perimeter. The transverse and longitudinal pipes must be strictly perpendicular to each other.

Each horizontal element must be at the same distance from each other. In this case, you can get not only a more rigid structure, but also a more elegant appearance.
To make the strength of the gate on the gate as high as possible, inside you can create a small frame from pipes 20x40 mm. So that during welding the frame does not begin to distort and overheat, it is better to carry out the process in a checkerboard pattern. After the design for the gate is ready, you can begin the installation of additional elements.
Among them you can choose:
- plates for fixing locks;
- awnings;
- external handles and locks.
Final installation of the gate
When you have finished all the welding work, it will be necessary to clean up all the formed seams, as well as prime the damaged areas and paint the frame. The corrugated board is easily attached to the frame using rivets or self-tapping screws.
The distance that you leave between the fasteners will directly depend on your preferences: you can fasten each wave of the sheet, or you can only through one. Be sure to attach a profiled sheet to the middle jumper. To install the gate, you can give preference to the usual metal hinges or choose a more modern option - polymer curtains.
If the metal poles on the gate act as racks, then each curtain must be welded to them.

Fastening to stone or brick racks is carried out by welding to a profile pipe. To keep the gate stronger and not open in both directions, a limiter from the corner is welded on the back.
With the help of feigned slats, you can close the resulting gaps between the uprights of the canvas and the gate.
