How to drill a well at home. Do-it-yourself water well using manual and shock-rope methods. How to make using a food processor
Drilling a water well is a rather labor-intensive process that requires certain knowledge and skills. The article provides information that will not make you a professional driller, but will fill some knowledge gaps and help you drill a well yourself.
If you are going to drill a well yourself, without using special drilling equipment, then you will have access to a maximum drilling depth of about 40 meters. It will be quite difficult to drill a well deeper. Therefore, you have the choice of drilling a regular deep well or an Abyssinian one. It is impossible to drill an artesian well manually, since such wells are approximately 100 m deep or more.
Manual drilling methods.
Hydro drilling.
To drill using this method, you will need drill rods with a cutter, a water supply hose and a water pump.
The essence of the method is that drilling occurs using a drill with a cutter and a stream of water. To drill, just twist the rod in different directions, first in one direction and then in the other direction. Full rotation of the drill is not required. As the rod rotates, the drill cutter loosens the rock, and the water that comes out of the rod in the drilling zone lifts the eroded rock up out of the well.
 The upper part of the drill string with removable handles and an attached hose through which water is supplied to the drill shaft.
The disadvantage of this type of drilling is that it cannot be used to penetrate clastic rocks such as pebbles or simply rocks rich in stones. During the drilling process, soft rock is washed away, and stones remain at the bottom of the well, where they accumulate and interfere with drilling.
The advantage is that there is no need to remove the drill from the wellbore to remove loose rock.
Drill rods are made 1.5-2 m long from a water pipe with a nominal bore of 25 mm and an outer diameter of 32 mm. The rods are connected using threaded couplings. The rods have regular pipe threads cut on both sides. The coupling is partially screwed onto the rod on one side and scalded.


The drill bit must be made of durable and thick metal. An old leaf spring from a truck will work best. These springs are made of 75G steel and they are hardened, which gives the metal special abrasion resistance.
The cutter, as a rule, is made with three blades or two blades. It is necessary to make notches on the edges of the cutter. These notches perform the function of a rock crusher and with them the drill rotates more easily.

For hydrodrilling, you need to organize two pits for water: one of them is larger (it should be located close to the drilling site) and the second is smaller. The pits will serve as water reservoirs. In the first pit, the washed rock will settle and settle to the bottom, and from the second pit, water should be taken by a pump and supplied inside the drill rod. This way the water will flow in a vicious circle. The first pit must be periodically cleared of washed-out rock and, at the same time, this rock must be inspected in order to search for coarse-grained aquifer sand.
To reduce the amount of water that goes into the soil of the pits, their bottom can be covered with polyethylene.


Video: making a water well using hydrodrilling.
Auger drilling.
To drill a well with an auger, special auger rods are required.
This type of drilling has both its advantages and disadvantages. Augers allow you to drill into rocks saturated with stones, but in order to lift loosened soil to the surface of the earth, you need to periodically remove the entire drill string from the wellbore. And the deeper the well, the harder it is to remove the drill string. Therefore, when drilling deep wells, it is necessary to manufacture a lifting mechanism.
For manual auger drilling, it is enough to make the first rod with the auger. It makes no sense to make the remaining rods with augers. You can make a rod with an auger yourself or use some other auger, for example, from an old fishing drill.


Video: drilling a well with an auger.
Drilling using the percussion-rope method .
The operating principle of such drilling is that a round metal pipe is lowered into the wellbore under its own weight. Hitting the bottom of the well, it breaks the soil, stones and is filled with broken rock. Afterwards, the pipe is removed from the well and cleared of soil. This process is repeated many times.
The effectiveness of this drilling method directly depends on the height from which the drilling tool falls and its weight. Therefore, this projectile should be weighted. You can make it long and fill one part with concrete or lead, and leave the other part to receive soil.
The big advantage of this drilling method is that it allows you to penetrate rocks with stones. But there is also a drawback. If you do not use a winch to lift the projectile, you will have to expend great physical effort.
 Homemade drilling rig for percussion-rope drilling.
For manual well drilling, two main types of tools are used:
- Drive glass- This is a pipe with pointed edges and longitudinal slots for removing soil.
The pointed working edge should be slightly larger in diameter than the diameter of the pipe. To do this, the edge of the pipe is flared with a hammer.
This is necessary so that when using this tool, a hole is formed in the ground slightly larger than the diameter of the glass. This removes friction between the nozzle and the wellbore.
Basically, a glass is used to remove soil that may stick to its walls. Such soil can be clay and loam.

- The second tool is bailer.
This tool is also made of a metal pipe and its working edge must be sharpened and flared. The difference from the glass is that the bailer does not have longitudinal holes for excavating soil, but there is a valve inside near the working edge. This design is due to the fact that the bailer is designed to remove extremely loose or waterlogged rock. For example, a mixture of clay and water is lifted very well by a bailer.

Video: homemade glass and bailer for drilling.
Hammering the Abyssinian well with a needle.
The essence of the method is that a pipe with a diameter of 57 mm with a sharp end, which is also called a needle, is driven into the ground. Often a tip made from old scrap is welded onto the tip of the pipe. The needle consists of several pipes along the length, which are extended during the driving process using conventional welding.
During driving, the pipe pushes the soil apart with its tip and enters it. This method of drilling a well is suitable only for shallow wells, for example, for the Abyssinian.


Slots are cut in the pipe in a checkerboard pattern using an angle grinder (grinder) in a thin circle at a distance of about half a meter from the tip. The number and size of the cracks will affect the ability of water to penetrate inside the pipe, so there should not be too few of them. The cutting wheel should be as thin as possible. These slits will act as a coarse filter. The length of such a filter must be at least two meters on the pipe. The slot filter should be located 50 cm from the pipe tip. Thus, this distance will act as a sump.

To make it easier to plug the pipe, you can first walk a couple of meters with an ordinary garden drill, and only then proceed to plugging.
The driving process can be mechanized by using a hammer drill or jackhammer for this purpose.
To reduce friction between the pipe and the ground and make work easier, a small thickening is made in a circle immediately after the tip. The easiest way to make such a thickening is to weld around the pipe. If the pipe reaches stones that cannot be penetrated, you can always remove it and try to hammer the needle in another place.
This method of drilling a well has two significant disadvantages.
- The problem with driven wells is that the water carrier is searched for blindly, since there is no soil to be removed from the well. Therefore, to determine the aquifer, you need to pour water into the pipe after every meter of blockage and watch its absorption by the earth. As soon as good absorption has begun, the aquifer has been reached. One point is worth paying attention to here. Sometimes, when clogged, the holes in the pipe become clogged with clay and therefore it is worth paying attention to every, even small, absorption of water by the well. If there is absorption, then you need to first backflush and then pump the well.
If, after pumping the well, the volume of water that it can produce remains small, then the pipe should be driven deeper.
- After reaching the aquifer, it may turn out that the water surface will be established at a depth below 7-8 m. In this case, the surface pump simply will not be able to lift water from the well to the surface.
If the well has been pumped, then a HDPE pipe with a diameter of 32-25 mm with a filter is lowered into the well and a pump is connected to it.

 The filter is wrapped in stainless steel mesh.
If during the drilling process the so-called slurry is removed - it can be sand mixed with water and clay and the well is not deepened, then it means they have drilled to quicksand. Quicksand constantly fills the drill shaft and prevents it from being deepened.
To pass the quicksand, you can try the following options:
- Wash the quicksand with bentonite or glue.
- Drill the well to a larger diameter to the quicksand and drive the conductor. This is a metal pipe that is one or two sizes larger than the casing pipe. It is important that the conductor completely covers the quicksand and enters its end into solid ground. If this is not done, the conductor may turn into quicksand, since he is in constant motion. After this, you can continue drilling through the conductor using a bailer or hydraulic drilling.

Why is it necessary to flush a well?
Washing a well is washing it with a special adhesive solution, which glues and strengthens the walls of the well and prevents them from crumbling and collapsing.
The solution is prepared using water and bentonite, which can be purchased at a hardware store.
Bentonite is a natural, non-toxic material that swells in water and forms a dense gel. In confined spaces, this gel does not allow water to pass through.
Approximately 25 kg of bentonite per ton of water is diluted. After this, the resulting solution should sit for at least 2 hours, and preferably 12 hours. During this time, the bentonite will swell and the solution will resemble jelly.
As a replacement for bentonite, you can use ordinary CMC wallpaper glue. It costs an order of magnitude cheaper. Dilute it with approximately 20 liters of water per 4 plastic cups of glue. If during the work the glue begins to curl up and turn into a paste, then ordinary soda can be added to the solution. This will prevent the glue from curling.
You can also mix water with fatty clay and create a jelly solution. This solution also works well.
Cases when well cleaning is necessary:
- If a well is drilled in sand, then it must be washed along its entire length. If the hydrodrilling method is used, then the drilling fluid should be prepared from the very beginning of drilling. If the auger drilling method is used, then the well must be flushed after changing each rod.
- If a well was drilled in clay and reached a sandy aquifer, then the well must be flushed before removing the drill and installing the casing. While drilling is taking place in clay, it is not necessary to fill in the well.
- If you need to pass quicksand.
- If it is necessary to pass through an unnecessary water carrier, for example, a perch. In this case, this aquifer must be sealed and prevent the drilling fluid from escaping into this aquifer. The density of the drilling fluid should depend on the rate of outflow of the solution into the aquifer. The stronger the outflow, the thicker the solution should be and, therefore, the longer it will take to flush the wellbore.
How to understand that an aquifer has been found.
There may be more than one aquifer. Therefore, if water is needed for technical needs or for irrigation, then you can stop at the first layer. Such a layer can be at a depth of 4 meters. Water taken from this layer is usually not pure, but there may be exceptions. This water is called perched water.
Verkhodka is underground water that accumulates above temporary support (frozen soil, etc.). They occur near the surface (above the groundwater horizon), are prone to sharp fluctuations, and are easily polluted. Wikipedia
If water is needed for general use, then it is better to drill deeper.
It is not difficult to understand that you have reached an aquifer.
If the hydrodrilling method is used, the drilling fluid will begin to flow into the well. This will be clearly visible by the drop in water level in the technical pits. That is, the aquifer will absorb the water that is poured into it. At the rate at which the water carrier consumes water, at the same rate it releases it. In 95% of cases it will be an aquifer, in 5% of cases it will be a crack in the ground or a void. If water goes into the well very quickly, then it may be a void in the ground.
If the auger drilling method is used, then you can understand that you have reached the aquifer by the wet soil being removed and its type.
Good aquifers are found in coarse sands, limestones, sand and gravel, or gravel. Sometimes there is water in loam, but very rarely. Therefore, one of the signs of an aquifer will be coarse sand or other aquifer-bearing rocks.
The end of a sand aquifer can be determined when the drill hits something harder than sand, most likely limestone or clay. If the coarse sand runs out and another rock starts, it means the aquifer has ended.
Once the aquifer has been found, it is necessary to install a casing pipe with a filter.
Why is well backflushing done?
Backflushing is done immediately after the casing is installed. It is necessary to unseal the water-bearing channels of the well and wash sand and small stones out of it. Essentially, this is hydraulic fracturing (creating voids in the well).
Backwashing also flushes water-bearing channels that were previously sealed with bentonite or glue. Moreover, if the water carrier was sealed in loam, then it will take longer to erode than a water carrier in sand.
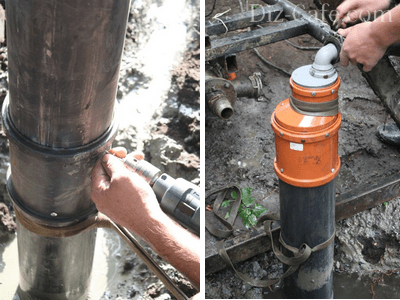
It is best to wash with a high-capacity motor pump (from 1000 liters per minute) with water in a volume of 2-3 m3. In order to perform backwashing, a head with a fitting is placed on the casing pipe, to which the hose from the pump is connected. Water under pressure is fed into the casing, exits the filter into the well and rises to the surface of the earth between the casing and the walls of the well.
 A pressurized water supply hose is connected to the blue plastic casing.
How to pump a well.
Pump the well immediately after backflushing.
Pumping a well is a long-term pumping of water from a well in order to flush water-bearing channels, clarify the water and increase the productivity of the well. Well pumping can be continuous for 2-48 hours.
This action allows you to clean the well water from small rock particles dissolved in it. Therefore, you need to pump the well until the water becomes clear. Also, in order to increase the productivity of a well, it is practiced to pump it for a long time for a day or more.
All small particles that pass through the filter are pumped out of the well, while the rest accumulate at its bottom. Therefore, it is better to use an inexpensive pump to pump the well, as it can easily clog. If the well was drilled in the warm season, then you can understand what kind of water flows from the well by its temperature. The water from the well will be noticeably colder than the water that was previously backwashed.
Well filling.
Filling the space between the casing pipe and the walls of the well is carried out in order to protect the well from various contaminants entering it from the surface of the earth.
In order not to clog the water-bearing channels, sprinkling is carried out only after backwashing and subsequent pumping of the well. Also, sprinkling is done only under water pressure, so as not to clog the casing filter. Therefore, before sprinkling, a pump is connected to the casing pipe and water is pumped into it. Everything is the same as when backflushing a well.
The well is filled with sand or crushed stone above the height of the casing filter, and then covered with clay.
How to determine the water level in a well.
Everything is very simple. You need to take a regular rope with a narrow weight. For example, you can attach a regular wrench to it.
You lower the rope and listen. When you hear the sound of a “gurgle,” this is the beginning of the water column, that is, the level of the mirror. Tie a knot in the rope and lower it further. If the rope weakens, it means it has reached the bottom of the well. Tie a second knot. Pull out the rope and measure the distance between the knots, this will be the height of the water column.
You also need to understand that the level of the water surface may change according to the season or during active pumping of water from the well. Therefore, the level of the water column in the well should be as high as possible. Preferably at least 2m.
Thu o what to do if clay sticks strongly to the walls of the drill shaft and drill rod?
Red-brown clay tends to swell and stick strongly. In this case, ordinary soda helps well, as it makes the clay inactive. Soda must be added to the drilling fluid. As a result, the clay stops sticking to the tool and the walls of the drill hole.
Does the water surface level depend on the depth of the well?
A well is drilled to find a source of water - an aquifer. It may end up at a fairly large depth, for example, 25m. But this does not mean that water will need to be raised from such a depth. After the well has reached the aquifer, water fills the wellbore and rises along it to a certain level, for example, 10 m from the earth's surface. This level is called the water surface in the well. The exception is artesian wells, where water is under pressure in the ground and when such an aquifer is opened, water can spontaneously flow to the surface of the earth.
What pipes to use as casing.
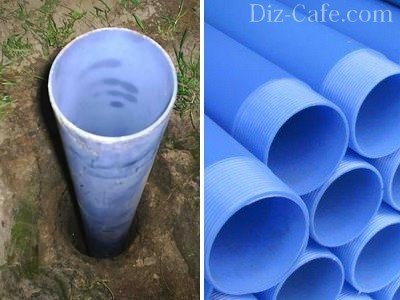
Metal or plastic pipes are used as casing pipes. Since metal pipes are quite expensive, plastic casing pipes are most often chosen for wells. Special blue HDPE (low-density polyethylene) plastic casing pipes for wells are available for sale. These pipes are made of food-grade plastic and are chemically safe for humans. It is strictly forbidden to use ordinary yellow or gray PVC sewer pipes for the well.

 Pipe with slot filter. Filter length 3 meters.
When purchasing plastic casing pipe, try not to purchase black pipes. As a rule, such pipes are made from recycled materials. And no one can guarantee that secondary raw materials will not contain potentially hazardous substances.
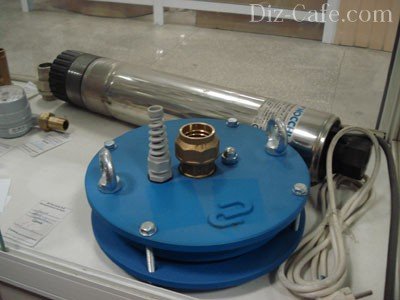
Which pump to choose for a well?
A deep-screw pump is best suited for a well. The main thing is not to use a vibration pump. Due to constant vibrations, the soil around the well is compacted and the water channels are closed. As a result, the well's flow rate may decrease until it completely dries out. Also, due to constant vibrations, the water in the well will be cloudy.
If the water surface is at a depth of 7-8 meters, then you can install a centrifugal pump on the surface of the earth.
What oil should I lubricate the threaded connections of drill rods and plastic casing pipes?
The lubricant must be safe, so ordinary grease and machine oil cannot be used. Can be lubricated with vegetable oil or soap solution.
Abyssinian borehole
Before considering how to drill a water well with your own hands, you need to understand what types they can be. Water can be extracted using different technologies.
The main types of well structures for water production:
- If you have a good spring, you can build an excellent well, which will quickly fill up, becoming a good reservoir that can hold up to 2 cubic meters of life-giving moisture. The depth reaches 15 meters. Above this boundary, a phenomenon such as “overwater” is often encountered - an aquifer with a high level of pollution that comes from the soil surface. It is not recommended to consume water from this layer.
- A sand filter well, which is a pipe with a diameter of 100 mm, using an auger, immersed to a depth of 17-30 meters. At the end of the pipe, which is recessed, a stainless steel mesh is fixed, which plays the role of a filter immersed in coarse sand. The depth of the well is on average from 20 to 30 meters, the service life is from 5 to 15 years.
- A filterless artesian well, its operating principle is that it extracts water from layers of porous limestone. An artesian well can be drilled to a depth of 20-100 meters, and its service life reaches 50 years.
The exact depth of the water source cannot be determined in advance. The approximate depth will be the same dimensions as in similar wells drilled in neighboring areas or in a nearby well. Slight deviations are possible due to uneven occurrence of soil layers. It is recommended to purchase casing pipes, taking into account the parameters of nearby water supply sources, but making minor adjustments.
Now let’s take a closer look at drilling water wells with our own hands, taking into account the type of source.
Unlike traditional underground canals, the Abyssinian well has a small diameter (no more than 50 mm) and water is pumped out of it by a surface pump, not a submersible one. There is an opinion that, due to the vacuum created, such a well does not silt up, and over time its flow rate only increases due to the forced erosion of soil capillaries. In reality, such statements have no serious basis.
Before making an Abyssinian well, prepare the required number of casing pipes 2-2.5 m long. Since a depth below 15 m is not expected, it is enough to have on hand 6-7 ready-made sections Ø50 mm plus the first section with a steel cone at the end - a needle. It will play the role of a drilling tool.
Finished needle with mesh
The technology looks like this:
- Make the first section of the casing - the so-called needle. Weld a metal cone to its end, and make holes on the sides and place a mesh, as described in the previous section.
- Dig a small leader hole, insert a needle into it and start driving, keeping it vertical. To do this, you can use the same tripod with a suspended weight or another device.
- As you dive, weld new sections and continue hammering the casing. As you approach the calculated depth, check the appearance of water using a weight on a string.
- After passing through the aquifer, lower a polymer pipeline connected to a hand column into the well. Fill it with water and pump the source for 30-60 minutes until clean water comes out. Then proceed with the installation of an autonomous water supply system.

Construction of an Abyssinian well
The main methods of drilling wells under water
A well for water extraction can be constructed in different ways. How to make a well at your dacha with your own hands and its specific type depends on how deep the aquifer lies.
Hydrogeologists distinguish three ranges:
- up to 12 m;
- from 12 to 50 m;
- from 50 to 200m.
Before you drill a water well with your own hands, you need to choose the type of drilling rig (there are three of them).
Shock-rope
A heavy load, called a chuck, as well as a special tool - a bailer - are suspended from the frame using a cable. From below, several strong triangular teeth are welded onto the cartridge, which weighs about 80 kg. By lifting it and dropping it, they loosen the soil, which is then removed with a bailer.
Before starting work, you need to make a shallow well using a garden drill. The chuck can be lifted manually, but it is better to use a rotary motor for this.
With the help of such simple equipment you can build a well yourself
This method is used when working on light or clayey soil.
Auger
Drilling a well with an augerThe working body of such an installation is similar to a garden auger, only very powerful. It is made from a 100 mm pipe onto which a couple of turns of a screw with a diameter of 200 mm are welded. To make one turn, a round sheet blank is used with a hole cut in its center with a diameter of just over 100 mm.
As the drill sinks, the rod on which it is attached is increased. The tool is rotated manually using a long handle made from a pipe. Every 50 - 70 cm the drill will have to be removed, and since as it goes deeper it will have more and more weight, for this it will be necessary to install a tripod with a winch.
Rotary
Despite its complexity, this option is the most effective and versatile. Soil development is carried out using a drill bit attached to a constantly expanding pipe - a drill rod or column. Drill bits can have different designs, the choice of which depends on the type of soil being overcome at the moment.

Rotary drilling combines rotational and impact effects on the rock. In addition, the design of the drill column allows water or clay solution to be pumped into the well, which erode the soil and significantly speed up the advancement of the tool.
This is the most inexpensive technology, but quite labor-intensive. To work you will need the following devices:
- tripod made of rolled metal with a hook and a block on top;
- winch with a cable equipped with a handle;
- driving tool - glass and bailer;
- welding machine;
- hand drill

Glass for punching soil
Before drilling the soil to the required depth, prepare casing pipes. Their diameter should be such that the working tool fits freely inside, but with minimal clearance, and the length should correspond to the height of the tripod. One condition: impact technology is not applicable on rocks or in soils with stone inclusions. To penetrate such horizons, you will need a drill with carbide tips.
Self-drilling a water well is carried out in the following order:
- Make a filter from the first section of the casing by drilling staggered holes Ø8-10 mm in increments of 7-8 cm on a section of pipe 1 meter long. Cover the top of the hole with a stainless mesh secured with rivets.
- Make a leader hole with a hand drill to a depth of 0.5-1 m. Here it is important to correctly position the tool at an angle of 90° to the surface so that the channel is strictly vertical.
- Insert the first section of casing into the hole, adjust the vertical and place the impact tool inside.
- Leaving an assistant to support the casing, lift and release the glass using the reel. When full, remove it and clean out the rock. As the soil is removed, the pipe will begin to take its place and gradually sink into the ground. To speed up the process, attach a couple of heavy weights to it.
- When the edge of the first section drops to the surface of the ground, weld the second section to it, strictly controlling the vertical level. Continue working in the same way until you reach the water layer.

Welding the next section in level
Drilling a well with your own hands is quite possible and affordable if you have the necessary hydrogeological information. Having chosen a method for drilling a water well, you should correctly determine the location for its installation. There should be no sewerage, drainage pits, or other communications nearby that could pollute the water. It is also necessary to take into account the distance from the housing where water is planned to be supplied.
There are quite a lot of types of drilling manually, using various mechanisms, devices, and complex equipment: from simple driving to hydraulic drilling.
Impact drilling is the most inexpensive and easiest way to provide an area with drinking water
Methods for drilling water wells vary depending on the technology used to destroy the rock. There is drilling:
- percussion;
- rotational;
- mixed type.
Auger drilling
This method is used for constructing sand wells. Typically, auger drilling of water wells is carried out in relatively soft, loose or frozen soil. An auger is a pipe wrapped in metal tape. By rotating, the screw-shaped device deepens, bringing the selected soil to the surface.
- good speed;
- no need for rinsing;
- The walls of the well are compacted.
If auger drilling is carried out in an area with soft or loose soil, then the bit blades should be positioned at an angle of 30 to 60 degrees relative to the bottom. If wells are drilled using this method on denser sediments, which are based on gravel and pebbles, then the blades should be at an angle of 90 degrees relative to the bottom. It is necessary to determine the angle when carrying out work depending on the hardness of the soil with which you are supposed to work.
Of all the methods of self-drilling, auger can be considered the least effective
The depth of auger drilling of a well is carried out to the size of one rod, which is then raised upward and expanded with an additional rod. After this, drilling can continue. The diameter of the auger well ranges from 6 to 80 cm.

Rotary drilling refers to rotational methods: a rotor located on the surface drives a bit lowered into the well. The bit is additionally weighted (“loaded”) with pipes to increase the degree of soil grinding.
Using this technology, it is possible to destroy rock of almost any hardness. This is an expensive method, used for artesian wells.
When rotary drilling, flushing is mandatory. This process quickly removes waste material while leaving the hole clean, allowing casing to be inserted without obstruction.
There are two types of flushing: direct and reverse. Direct flushing is carried out with a clay solution, which quickly removes waste rocks and strengthens the walls, since clay prevents clogging of the formation. Backflushing with water is used to clear slag from the annulus.
The rotary method of drilling wells is one of the types of rotational technology
Advantages of rotary drilling:
- the power of the equipment used, which allows breaking rocks of any hardness;
- durability of the drilled well (wall strength);
- the ability to drill in a limited area due to the small size of the drilling rig.
A well-maintained well in a dacha is an almost obligatory condition for a comfortable stay, since centralized water supply outside the city is not always organized. However, drilling work is expensive, and the expected result is not guaranteed to site owners. The desire to save money and manage the process prompts many summer residents to start drilling a well on their own. It is difficult to accomplish this task, but it is quite possible.
Is the water deep in your area?
First, you need to decide on the type of well, finding out how deep the aquifer lies in a particular area. There are several possibilities for this:
- hydrological maps;
- exploration drilling;
- survey of neighbors.
The first, as well as consultations with a hydrological engineer, can be obtained from the relevant departments. Exploratory drilling work is resorted to only as a last resort, since it is an expensive pleasure. Most often, site owners simply ask their neighbors, who are already happy owners of an existing water well or well, about the characteristics of the property.
A little about the types of water wells
Based on the results of assessing the depth of the aquifer, dacha owners will have to choose from three options:
- the water lies close, at a depth of up to 12 meters -;
- an aquifer no deeper than 50 meters - a well “for sand”;
- the water is very deep, up to 200 meters - a well “for limestone”.
An aquifer lying close to the surface is rare. The lucky owners of such a site can make a needle well, which will take only one day or even a few hours to create. The technology for creating an Abyssinian well is that the soil is pierced with a rather thin pipe: only 1-1.5 inches. A cone-shaped pipe is installed at the end of the pipe, which facilitates penetration through the thickness of the soil. A suction pump is mounted on top. However, little water comes from the Abyssinian well, so it may be necessary to construct another water source of this type. The compact shape of the Abyssinian well allows you to drill such a well even in the basement of a house.
A “limestone” well, i.e. an artesian one, is also not common. This option is good because it allows you to get a large amount of very clean water. But it is almost impossible to successfully drill such a well on your own; you will need to attract a team with professional drilling equipment. In addition, artesian water sources must be licensed by the relevant authorities. Please note that if there is a layer of artesian water under the dacha plot, it makes sense to discuss with your neighbors a joint payment for the brigade’s services, since such a well can easily provide water consumption for several households at the same time.
To create an Abyssinian well, a thin one and a half inch pipe with a filter tip is driven into the ground. Compact dimensions and simple technology make it possible to install such a well in the basement of a house or make an additional source of water in a summer cottage
Most often, water lies on the horizon within a depth of fifty meters. Such a well can be completed even by novice drillers using one of the methods developed for such situations. Which ones? Read on.
Which drilling method should I choose?
For such large-scale drilling work, you will need a special installation that you can make yourself. The type of installation depends on the selected drilling method:
- shock-rope;
- screw;
- rotary.
To make a unit capable of creating a narrow well several tens of meters deep, in addition to conventional tools, you will need a drill, an angle grinder and a welding machine. Inexperienced craftsmen are advised to acquire skills in working with these complex devices. Although creating a homemade drilling rig will require a lot of time and effort, the device can be used effectively in the future, for example, when installing a pile foundation. Some craftsmen with such an installation started their own business installing water wells in neighboring dachas.
Option #1 - shock-rope installation
A working tool of this design is a rather heavy cartridge and a bailer mounted on a cable. The cable with the load is suspended vertically on a special frame. The soil is broken up using a chuck and removed with a bailer until the depth of the pit reaches the aquifer. The weight of the cartridge must be at least 80 kg. Such devices are now practically not used manually; operations are performed using a rotary motor, which raises and lowers the rope with a load.

To create a cable-percussion drilling rig, you will need a bailer and a chuck with sharpened edges, as well as a cable, a frame on which the load will be attached, and a motor to control the cable
It is recommended to sharpen the lower edge of the chuck and also attach several sharp triangular elements to it to increase efficiency. First, a hole of a suitable diameter is made in the ground using a regular garden drill, and then work begins with a chuck and bailer. Impact-rope drilling is quite effective on both light and clay soils.
An interesting version of this installation is presented in the video:
Option #2 - auger drilling rig
When this device operates, the soil is removed using a special drill, which is made from a 100 mm steel pipe. A couple of turns of a screw with a diameter of approximately 200 mm are welded to its lower end. Two inclined steel knives are installed along the edges of the auger. A removable handle, also made from a piece of steel pipe, is mounted on top.

To make a drill, several turns of metal with sharpened edges are welded to a metal pipe. As the wellbore deepens, the pipe is extended to the required length
As the structure deepens into the ground, the main pipe is extended using a threaded connection or coupling. The device is secured using a tripod tower made of wood or metal. To remove a fairly heavy pipe from a pit, it is recommended to use a winch with an electric motor.
Here is an example of auger drilling work with simultaneous casing:
Option #3 - rotary drilling rig
This is the most complex, but also the most reliable installation option for drilling wells. You can make only the frame for such a device yourself, and it is recommended to purchase other elements, such as a drill rod, swivel, blade drill, motor pump and gear motor, from a reliable manufacturer. Using such a setup, you can carry out flushing drilling, impact drilling, rotary drilling, etc. The ability to supply a solution that erodes the soil and facilitates its excavation increases the speed of drilling work several times.
Example of work:
Please note that if one of your neighbors already has experience in drilling a well on their own, it makes sense to inquire about the possibility of borrowing ready-made drilling equipment.
Procedure for drilling a sand well
Like any important matter, drilling a well should begin with drawing up a project diagram. First you need to choose a suitable location for the well. It should be located quite close to the house and as far as possible from sources of potential pollution: septic tanks, places where livestock and poultry are kept, bathhouses, the banks of a reservoir, etc. It is necessary to take into account not only existing objects, but also those that are still planned to be built on the site, since moving the well to a new location will be, to put it mildly, problematic.
Once the plan has been drawn up, it is time to begin executing it. To do this you need:
- Apply markings for future work.
- Dig a hole according to the markings, which will contain the drilling tool (bailer, auger, drill, etc.).
- Install drilling equipment.
- Carry out drilling in accordance with the selected technology.
- Lower the filter column into the pit, which is a structure consisting of a filter, a sump and a pipe.
- Fill the space between the outer walls of the casing pipe and the soil with sand or crushed stone.
- Seal the top of the pipe and use a pump to pump water into it to flush the filter.
- Pump water from the well using a bailer or auger pump.
- After the water is clear, lower the submersible pump into the well using a safety rope.
- Connect a hose or water pipe to the pump.
- Install a valve on the pipe that regulates the water supply.
- Waterproof the part of the casing pipe protruding above the surface.
- Equip the wellhead with a caisson and weld it to the head.
- Lay the water pipes leading to the house in the trenches provided for them.
- Cover the caisson with soil and a concrete blind area.
This is a general procedure; depending on conditions, necessary changes may be made to it.

A properly constructed caisson prevents well equipment from getting wet or freezing. Industrial models of caissons made of durable plastic are very easy to install
Review of popular beginner mistakes
As you know, the soil is heterogeneous and consists of different layers. To successfully drill a well through them, it is recommended to use various drilling methods:
- sandy horizons are best overcome using a spoon drill with simultaneous flushing with drilling fluid or ordinary water;
- For drilling hard sand, it is recommended to use a chisel;
- on quicksand it is considered the most effective to use;
- for drilling clay, it is better to use a coil; a bailer or spoon drill is also suitable;
- hard rocks are drilled in two stages: first, they are chiselled with a chisel, then the soil is excavated;
- pebble and gravel layers are also passed through the alternate use of a chisel and a bailer;
- In most cases, supplying water to the pit facilitates and speeds up drilling.
It should be remembered that the dimensions of the hole should be slightly larger than the outer diameter of the casing. When choosing, it is also necessary to take into account that the minimum clearance between the inner wall of the pipe and the pump should be at least 5 mm, optimally 10 mm.
The condition of the soil indicates that the drillers have reached the aquifer. If wet soil appears from the well, it means water is close. Soon after this, the drilling tool will move noticeably easier than before, when the drill hits the aquifer. Work should continue until drilling becomes difficult again, i.e., until the waterproof layer is reached. Only after this can drilling be stopped.

The submersible pump for a country well must be lowered to the correct depth. If the device is located too high, water will not flow in sufficient volume, and if the device is too low, it will quickly become covered with sand.
It happens that a recently drilled well suddenly stops functioning. This may indicate low quality of work performed. Both beginners and professionals often make a number of mistakes while drilling. Here are the most common of them:
- Over-drilling, i.e. drilling to excessive depth, as a result of which the pipe “slipped through” the aquifer. To correct the situation, you should either raise the existing pipe to the required level, or insert a new pipe of a smaller diameter inside the pipe, and remove the old one completely or partially.
- Incomplete installation of the casing pipe into the hole, as a result of which the required well flow rate is not achieved. This occurs due to the soil collapsing into the shaft during the excavation of the drilling tool. The soil should be removed with a bailer (washing will not help) and the pipe should be settled.
- Underdrill, i.e. the pipe is not cut to an insufficient depth. The well is drilled to the correct depth and a new one equipped with a filter is inserted into the existing casing.
- The pump is lowered too low, as a result the well is silted with sand. The pump is removed, the sand is selected with a bailer, the pump is installed correctly.
To install the submersible pump correctly, it should be lowered to a minimum depth. Then slowly immerse, checking the condition of the water every 20-50 cm. When sand comes out, the wrong position has been reached, the pump must be raised to the level at which clean water flowed.
Any estate, be it a country house or a private house, must be provided with water. Without life-giving moisture, no cultivated plants can grow, delight the eye with lush flowering, or fully bear fruit. Do-it-yourself water well, despite the seeming enormity of the process, is a very real possibility of extracting water, which can be done independently without the use of heavy drilling equipment. There are several drilling methods that are quite simple to implement and do not require the use of expensive equipment or significant effort.
Water extraction can be carried out using different technologies. The main types of water wells used to extract life-giving moisture:
- Construction of a well, which, in the presence of a good spring, fills quickly and, being an excellent water storage device, can hold up to 2 cubic meters of water;
- A sand filter well, which is a pipe d=100 mm, immersed using an auger to a depth of 20-30 meters. A stainless mesh is attached to the recessed end of the pipe, which acts as a filter, being immersed in coarse sand. Well depth is 10-50 meters, service life is 5-15 years.
- A filterless artesian well used to extract water from porous limestone rock layers. The depth of the well is 20-100 meters, the service life is about 50 years.
The exact depth of the water well cannot be determined in advance. Approximately, this will be the same depth as a similar well drilled in neighboring areas, or a nearby well. Since deviations are possible due to uneven occurrence of soil layers, casing pipes should be purchased based on the parameters of the water supply sources already installed on the site, but taking into account minor adjustments.
The design of the water well is a kind of narrow well

The service life of wells directly depends on the intensity of use: the more often you use the structure, the longer it will last
Drilling a well manually
To perform the work, you need the drill itself, a drilling rig, a winch, rods and casing pipes. A drilling tower is necessary when digging a deep well; with the help of this design, the drill with rods is immersed and lifted.

The easiest way to drill a water well is rotary, which is done by rotating the drill
When drilling shallow wells, the drill string can be removed manually, without using a tower at all. Drill rods can be made of pipes; the products are connected using keys or threads. The lowest rod is additionally equipped with a drill.
The cutting attachments are made of 3 mm sheet steel. When sharpening the edges of the attachments, it should be taken into account that when the drill mechanism rotates, they should cut into the soil clockwise.

Drilling technology, familiar to most owners of personal plots, is also applicable for constructing a water well
The tower is installed above the drilling site; its height should exceed the height of the drill rod in order to facilitate the removal of the rod when lifting. Then a guide recess for the drill is dug onto two bayonets of the shovel. The first turns of rotation of the drill can be completed by one person, but as the pipe sinks, additional assistance will be required. If the drill does not come out the first time, you should turn it counterclockwise and try again.
As the drill goes deeper, it becomes more difficult to rotate the pipe. Softening the soil with water will help make the work easier. As the drill moves downwards, every half a meter the drilling structure should be brought to the surface and freed from the soil. The drilling cycle is repeated again. At the stage when the tool handle is level with the ground, the structure is extended with an additional elbow.
Since lifting and cleaning the drill takes a significant part of the time, you should make maximum use of the design's capabilities, capturing and extracting to the surface the maximum possible portion of the soil layer.
When working on loose soils, additional casing pipes should be installed in the well to prevent soil from falling off the walls of the hole and blocking the well.
Drilling continues until it enters the aquifer, which is easily determined by the condition of the soil being removed. Passing the aquifer, the drill dives even deeper until it reaches the next aquifer - the aquifer. Immersion to the level of the waterproof layer will ensure maximum water flow into the well. It is important to note that manual drilling is only applicable for diving to the first aquifer, the depth of which does not exceed 10-20 meters.
To pump out dirty water, you can use a hand pump or a submersible pump. After two or three buckets of dirty water, the aquifer is washed out and clean water usually appears. If this does not happen, the well should be deepened another 1-2 meters.
You can also use a manual drilling method, based on the use of a conventional drill and hydraulic pump:
Rope Impact Drilling Technology
The essence of this method of making a water well with your own hands is that the rock is broken using a driving glass - a heavy tool falling from the height of an equipped tower.
To carry out the work, you need a homemade drilling rig, as well as tools for using the shock-rope method and extracting soil from the well.
A well tower, which looks like an ordinary tripod, can be made of either steel pipes or ordinary wooden logs. The dimensions of the structure must be proportional to the dimensions of the downhole tool.

The optimal ratio is the height of the tower, which exceeds the length of the downhole glass by one and a half meters
The process consists of alternately lowering the driving nozzle, which breaks and captures the rock, and raising it to the surface with the captured blade of the drilling tool.
To equip the drilling rig, you can use a steel pipe, the end of which is equipped with a cutting device. The cutting edge, resembling half a turn of an auger in appearance, will be in direct contact with the bottom. Half a meter from the edge, a hole must be made in the steel pipe through which the extracted soil can be removed by emptying the drill bit. A cable is attached to the top of the glass, which will be used to lower the glass and remove its contents to the surface. The glass should be freed from the ground as the structure deepens every half meter.
Here is a video example of conducting exploration drilling in this way:
The nuances of installing casing pipes
A do-it-yourself water well dug requires additional casing, which can be made from either a solid asbestos-cement pipe or individual sections of asbestos pipes. When working with cuts, special attention is paid to equal pipe diameters in order to ensure subsequent unhindered immersion of the entire structure. Each pipe link is kept from slipping and secured with brackets, which are then hidden under stainless steel strips.
A do-it-yourself water well can also be “lined” with steel or plastic pipes
Pipe casing is required:
- to prevent walls from collapsing during drilling;
- to prevent clogging of the well during operation;
- to cover the upper aquifers with poor water.
A pipe with a filter made of a fine mesh that does not allow grains of sand to pass through is lowered to the bottom of the well and provides water filtration. The pipe, lowered to the required depth, is secured with a clamp. This will prevent spontaneous subsidence.
When properly constructing a water well, the above-ground part of the structure is covered with a caisson - a cap that protects the source from contamination.
The head is a tank with a closing hatch with a hole diameter that allows easy access to the water intake well
Over time, the effect of a slight “squeezing” of the pipe from the soil may be observed. The natural process of spontaneous lifting of the pipe to the ground surface does not require additional measures for deepening.
Drilling a water well yourself is difficult, but exciting. And it is quite feasible if you study the issue, then act according to a well-designed plan, follow existing rules and pay attention to the advice of specialists.
Today, such a well is the most affordable possible method of independent water supply. And if you take into account the current cost of drinking water, the costs of drilling it yourself, developing it and equipment will pay off quite quickly - in about a year.
In such a matter as drilling water wells, there are no standard instructions. This is not an easy matter, requiring a comprehensive and necessarily individual approach. Experienced drillers know this for sure. And to help beginners, you can give a number of recommendations and advice from professionals. Then, even on the first try, you will be able to get “your” water of good quality and in the required quantity.
Table of contents:Where to drill?
How aquifers form in nature can be seen in the following diagram:

High waters, lying to a depth of 10 m, form predominantly atmospheric precipitation. Such water can be used for drinking after purification (filtration through shungite, boiling), and for technical purposes, perched water is taken directly from the well. As for the flow rate of the well under it, it is too small, and even unstable.
For drinking water, it is best to drill a well into interstratal waters on your own (they are indicated by red arrows in the diagram). Of course, the highest quality water is artesian, but it is almost impossible to get to it on your own, even if you know for sure where to drill. And in addition, individual development and extraction of such a valuable natural resource is prohibited by law, including criminal liability.
On your own, you can only drill a well into a non-pressure formation - that is, into sand saturated with water and lying on a clay bed. Hence, another common name for such wells is “sand” wells, although the aquifer in them can consist of pebbles, gravel, and some other substance. Their debit is small (if there are 2,000 “cubes” per day, then this is very good) and can fluctuate.
The depth of free-flow water is 5-20 m from the surface of the earth. And such water can already be drunk, however, after the well has been pumped up and the quality of the produced liquid has been properly checked by the regulatory authorities.
note! The design of any well into a free-flow formation is quite complex, since it requires filtering out sand during production. The lack of pressure also adds complexity - in connection with this, a number of requirements arise for the pump and the water supply system as a whole.
 Pressure strata are lower than unconfined strata. The depth range of their occurrence in the ground is from 7 to 50 m. Such layers are dense rocks: fractured, water-resistant (loam, limestone) or gravel-pebble deposits. The highest quality water can be obtained from limestone. And wells (they are also called “limestone wells”) drilled into this rock last quite a long time. Their flow rate, like that of many other pressure wells, is up to 5 cubic meters of water per day. These structures are also distinguished by high levels of stability. Water is lifted almost to the surface of the earth by its own pressure, so any pressure wells, as well as the corresponding water supply systems, are much easier to equip.
Important circumstances
When planning to drill a well for water, you should remember:
- In places where water is withdrawn en masse and uncontrollably from unconfined strata, soil suffusion becomes possible, which, in turn, leads to unpredictably sudden ground failures.
- On the Russian plain, the critical depth for self-drilling is 20 m, and if you need it deeper, you should order a well from professionals, since the cost of a self-drill is no longer justified.
- The service life of a self-made well depends on the regularity of water intake from it. So, if a well is made “for sand”, and water is taken from it regularly and little by little, it will last up to 15 years, “for limestone” under the same conditions - up to 50 years. When a well is used occasionally, and even periodically pumped to the bottom, the service life of the structure is reduced to 3-7 operational years. But repairing a well or restarting it is so expensive that it is easier and cheaper to drill a new one. Therefore, if you encounter free-flowing water at a depth of 12-15 m, you should not stop drilling. It is better to move on and reach the limestone.
If there are difficulties with funds, time and effort, it is more correct to start with exploratory drilling using a needle well. Such a well will also cope with the role of a temporary source of water supply until auxiliary production resources are found and used.
Well or well?
Work on the design of a well is more difficult and dangerous than the production of a water well. But the well is repairable .
You can draw as much water from a well as the “earth will give”, while the well itself “pulls” water from the earth layers. That is why the service life of wells is limited, and they can change the geology of a particular area for the worse. And a well-designed well is not only exploited for decades, but also for centuries and even millennia, if it is carved into rocky ground. And these structures have absolutely no negative impact on the environment.
It is considered a competent approach to organizing water supply to dig a private water well “with an eye toward” a collective artesian water supply system, which is durable and safe. If there are no such plans, they dig a well. And a major water supply system is being built. The used well is concreted, and the land around it is returned to economic use.
Types of wells
A water well is a long and narrow shaft in the rock. It is into this that the drill or drilling apparatus is lowered on a long rigid rod assembled from pipes or on a cable. A casing is placed in the shaft, which protects its walls from destruction and maintains the pressure of the surrounding rock. Such casing either sits tightly in the trunk, or is formed with an annular space filled with backfill, clay (the so-called “clay castle”) or poured concrete mortar.
As for the lower end of the trunk, it can be plugged, open, or with a stepped narrowing - a bottom. An intake device is made in the face or simply from below.
The upper part of the casing is the head of the well. A set of devices called “well development” is placed in it or around it.
Wells can come in a variety of designs, but the ones most suitable for DIY projects are:

Drilling methods and drilling tools
The following methods are suitable for self-drilling wells:

All of the above methods are so-called “dry drilling” methods. If we talk about hydraulic drilling, you have to work in a layer of water or drilling fluid, which makes the rock more pliable. Hydrodrilling is considered an unecological and costly method, so amateurs use it extremely rarely. In addition, it requires special professional equipment, whereas with any of the dry methods you can get by with:

The cutting edges of all of the above drills are made of hardened steel. You can see the diagrams for making homemade drilling rigs for water wells in the figure:

Diameters vary depending on the caliber of a particular well.
Rocking up a homemade well
A drilled well is not everything. It will not provide water of the required quality in the required quantity. To do this, it is necessary to open the aquifer or “pump” the well. If you open the formation (directly or inversely - it doesn’t matter), water can be obtained within 24 hours, but complex, expensive equipment will be required. And pumping up the well will last several days, but for it it is enough to have the most ordinary household submersible pump (only a centrifugal one, because a vibration pump will not work).
To pump a drilled well, the silt is first removed from it with a bailer, and then water begins to be pumped - completely, as soon as a volume has accumulated to cover the pump involved.
You can do the rocking with the help of a manoeuvre, but then you will have to scoop up water for a long time - 2 weeks, no less.
Important: The pumping of the well can be considered complete when the transparency of the water reaches 70 cm. You can check this in an opaque vessel (for example, in a clean barrel), using a white enamel or earthenware disk, the diameter of which is approximately 15 cm (take, say, a saucer or pan cover). You should look at the submerged disk strictly vertically, and as soon as the liquid begins to spread along its edges, blurring the contours - this is already opacity, you need to stop. As soon as transparency is achieved, you need to take a water sample and submit it to a laboratory for analysis. If the regulatory body confirms the quality of production, the annulus of the well is concreted or sealed with clay, and then a filter is installed.
Filters

The quality of water from any well is largely determined by the presence of a special well filter. And this part is more susceptible to wear than others included in the well structure. This means that your choice should be approached responsibly.
For wells “for limestone”, for example, a simple mesh filter will be sufficient - that is, perforation on the lower casing bend. It can also become the basis of a well filter “for sand” (in combination with gravel backfill). In this case, the requirements for perforation are as follows:
- hole diameter from 15 to 30 mm, depending on the soil;
- duty ratio (the ratio of the total area of the holes to the area they occupy) 0.25-0.30;
- the arrangement of the holes is transverse, in a checkerboard pattern;
- the area (total) of the holes must be no less than the cross-sectional area of the casing pipe (its lumen).
When a pump is placed in a well equipped with an internal filter, the bottom of this well is considered to be its (filter) upper edge. Because of this, the single volume of water intake is significantly reduced. In addition, the filter heavily silts up the well structure, because water seeps into the gap between it and the casing pipe. Both the service life of the filter itself and the pump are reduced, since sand inevitably gets into the latter. Therefore, the pump is often placed in a separate pipe, which is attached to the filter outlet. But for this you need to make a hole with a larger diameter.
If drillers have an expensive and structurally complex centrifugal pump at their disposal, everything is simple - it is connected to the outlet pipe of the filter, and as a result, both silting and sanding stops. But when there is no such equipment, you have to come up with something.
note! Many craftsmen make filter parts themselves using PVC pipes, polymer mesh and springs made of stainless materials. But such designs rarely last long, and they don’t filter water very well.
It’s better to spend money, but choose and buy a truly reliable, well-functioning filter. Moreover, there is plenty to choose from:

Do-it-yourself well construction
In order for water from a well to be supplied to the house, this well must be equipped and coordinated with the water supply system. For this:
- install a steel or concrete caisson;
- equip a stone pit;
- or install a downhole adapter.
The latter is the most modern method of well equipment. And install it like this:
- When the water flows, they decide how much deeper it can go based on the speed of its clearing. And then the last casing pipe is cut to size from above.
- They dig a trench towards the house so that it is deeper than the standard indicators for soil freezing.
- A hole for the adapter is cut out in advance in the pipe and it (the adapter) is installed, plugging the pipes.
- The pipe is placed and drilled, with the outlet of the adapter oriented into the trench just below the freezing mark of the soil.
- They rock the well, install a filter and lower the pumping equipment.