The most beautiful and unusual do-it-yourself topiaries. We create a topiary with our own hands. How to make the easiest topiary from beads with your own hands: instructions
The photos, which can be considered a small advertisement, show how beautiful and perfect topiaries are. A small souvenir tree will complement one interior, transform a second, and make a third brighter. And you can do these transformations with your own hands. Numerous photo and video master classes show in detail how to create a new image from the most ordinary things. How to make topiary yourself, what is needed for this, and what subtleties should be taken into account?
This master class is, let’s say, a universal recipe. It doesn’t matter what kind of topiary you are going to make; this master class will describe in detail each stage and its variations.

The first thing work usually begins with is the search for materials. Craftswomen who make more than one craft with their own hands are accustomed to stockpiles. Making stocks means purchasing not just one item, but five at once. This means that you should not pass by beautiful chestnuts, rowan branches, and dried flowers. Take everything home to your handmade treasure chest.
The same goes for possible decor - scraps of fabric, beads, buttons, rhinestones, ribbons, threads. All this can become the basis for decorations that you make yourself.

Tips for beginning craftsmen:
- Place photos of the topiaries you like in a separate folder, save the desired master class, step-by-step instructions.
- Distribute everything into boxes: threads in one, natural materials in another, fabric in a third, etc.
- Visit craft stores. There you can find various blanks that will make your work easier. Yes, and they are inexpensive.
If you have already created at least one successful topiary, think about the fact that the process is worth filming. This could be a photo or video, but such material may be useful to you again, and you can place it on special resources and, by the way, sometimes they pay for it.
Fragrant topiary made from dried herbs (video MK)
Making topiary: step-by-step instructions
So, next you need to make the topiary elements directly. They usually start with the basics. The base is what the crown will rest on. And the crown in the case of a souvenir tree is its main part. Therefore, the base ball must be made strong, reliable, and solid. You can buy a ready-made foam part; this blank will fit any tree.

But you can make a ball with your own hands:
- Method one. Newspapers, threads, glue. You need to make a ball of newspaper that is dense and hard. It should be soaked in glue and tied well with thread until you get a ball.
- Second way. Ball, polyurethane foam, knife. Inflate the ball, but not too much, slightly smaller than the size the base should be. Then you put the ball on a foam balloon and fill it up. The foam swells, so fill a little. You can do this at night so that in the morning you can detect a noticeably enlarged ball. Next, just remember how you cut the peel from an orange with your own hands. You need to do the same here until you get the base ball you need.
- Third way. Papier mache. You probably remember this step-by-step instruction from childhood. Find an object whose shape you are going to repeat, and cover it with paper or napkins in several layers. Then you cut it, take out the object, and fasten the figure together.
The latter method is more often used if the basis for the crown needs to be made not of a ball, but of a heart.
DIY topiary base ball (video)
How to make topiary with your own hands
The crown must stand on something. In a tree, this mission is carried out by the trunk, and the souvenir tree follows the same path. Different workshops offer different options. Some say that only branches can be a beautiful, natural trunk. Others use both wire and aluminum cable for this purpose.

If you look in detail at any photo master class, you will see that the most unexpected things are used as a trunk. For example, sushi chopsticks.
To create the trunk you may need:
- Cardboard rods from paper towel rolls;
- Pencils;
- Drumsticks;
- Wine corks;
- Curly door handles.
Yes, it is the handles that can become the trunk - if you remove everything unnecessary from them, leaving only the elegant vertical part, this could very well become the trunk for some elegant money tree.
Basically, what serves as the basis for the trunk has to be decorated - painted, wrapped, glued, etc.
Trunk for topiary: decorating it correctly (video master class)
How to make a pot with your own hands
The tree usually stands in a pot. The easiest way is to buy a new one, which you won’t even have to decorate. But it happens, you look at a photo, and you want to do everything exactly according to this photo.

For example, from a simple penny plastic cup you can make an exquisite pot with your own hands.
The master class is very simple:
- Coat the cup with spray paint the color you need;
- The flowerpot can be textured– sparkles, salt, cereals, all this can change the glass, making it embossed;
- Textile decor is appropriate– this can be a satin ribbon that matches the color of either the pot or the crown, as well as braid, lace, twine, twine;
You can attach a small photo to the pot with a decorative clip, for example, where you are together with your loved one, or with the one to whom this tree is intended as a gift.
Pot for topiary (video)
Step-by-step instructions: creating shapes
The souvenir tree may have an unusual shape. More than one tricky technique is used to create various shapes. You can do unusual things with your own hands, and few people will guess how you did it in the first place.
To design figures you need:
- Use of bendable materials;
- Sketch of the future composition;
- Elegant decor that hides the entire mechanism of the product.

We usually talk about designing figures when we mean making garden sculptures. Such unusual landscaping is captured in numerous photographs. The figures require certain manipulations with knitting or carpentry wire. You will get topiary sculptures, entire compositions of green figures.
Making them is not so easy, but modern devices have made the process easier. So today, the production of figures is simplified by purchasing special figured meshes or metal frames. They are put on the plant, which, of course, is thus limited in growth. When shoots make their way through the mesh, they need to be trimmed.
This way you can get several elegant figures on your site. For beginners, there is advice - take simpler frames for the first time, do not try to build several figures at once, this requires care and a certain skill.
DIY topiary: design mistakes (video)
A souvenir tree, a tree with an ideally shaped crown - numerous master classes tell you how to create such beauty yourself. If you live in an apartment and don’t have your own plot, then start bringing your dream closer step by step. First, a figured tree at home, on a table, and then it can be scaled in a natural environment.
Happy plans and their implementation!
DIY topiary examples (photo)


A tree of happiness that you can make with your own hands. This is what topiaries are called, photos of which adorn numerous Internet pages dedicated to needlework and design. Each master class is interesting in its own way; you can watch the process in the video and instructions with photos. But where to start? What to make the first topiary from? What do you need to prepare?
Topiary is a tree with a round crown. And the choice of the ball is not accidental. Since ancient times, the circle has symbolized infinity, movement, life. And this is what people considered happiness. Therefore, the tree was considered a symbol of happiness, a souvenir that could materialize a cherished desire.

Almost any master class says that the crown is based on that same ball. Today you don’t have to do it yourself; ready-made foam balls are sold in handicraft stores.

But if those are not available to you, how to make a ball? The easiest way is a wad of newspaper. You simply take newspapers and scrunch them until a tight ball forms. And then you tie this lump with threads until the surface is smooth.
For the base ball the following can also be used:
- Children's small rubber balls;
- Tennis ball;
- Papier-mâché ball;
- Plastic ball from a set of children's cubes, etc.

Also, almost every tree has a trunk. In the photo and video you can see that a variety of materials are used to create the barrel.
The simplest option is wire or aluminum cable. Such a trunk can be beautifully bent. In addition, the barrel can be made from sushi sticks, drumsticks, pencils and markers, paper towel tubes, etc.
What you need to do is decorate the base for the trunk. Most often, the master class suggests wrapping it with braid, twine, twine, satin ribbon, etc..
DIY express topiary: basics for beginners (video)
Simple topiary for beginners: marine theme
Step-by-step instructions are a good help for beginners. This can be illustrated using a simple topiary as an example. This can be considered a topiary made from shells. On the shelf where there is a photo reminiscent of a seaside holiday, such a thematic topiary may appear.

To make it you need to prepare:
- Shells;
- Base ball;
- Acrylic paint, brushes;
- Flowerpot;
- Blue and white tulle;
- Decorative elements of a marine theme;
- Thick pencil;
- Blue satin ribbon.
The master class involves adjustments. You can change the topiary with your own hands, having additional decor and interesting ideas.

What to do:
- Paint the base ball with light acrylic paint to match the shells;
- While the paint is drying, prepare the shells. They can be left in their natural form, or they can be transformed a little. For example, coat it with varnish or silver spray.
- You need to make a hole in the base ball for the barrel. The barrel itself, that is, the pencil, can be wrapped with a blue satin ribbon or with a weave of white or blue tulle. As an option, light blue braid and decorative white cord are also suitable. After the trunk is decorated, it needs to be fixed in a ball with hot glue.
- Now the master class has reached the point, when can you make a crown?. You just need to glue the shells in order, in rows, from top to bottom, so that the gaps are minimal. Video and photo tips will help you understand the principle of gluing. You can’t glue it randomly! Only from top to bottom, in rows.
- Of course, when the crown is ready, you can see that something is missing. If you want a little decor in this part, you can glue a small souvenir starfish.
- Next, you have to make a pot with your own hands. The pot should also somehow reflect the marine theme. It would be great if you brought a cup from the sea with photos of the places where you happened to relax. It will fit perfectly into the decor of a nostalgic tree. But there are other options. For example, a pot can be painted with acrylic paints, and to create a wave effect, you can use white paint, PVA glue and coarse sea salt.
- You need to pour plaster into the pot, where the tree is fixed.. You also need to decorate the plaster layer on top with your own hands. It can be white sea sand, pebbles or shells of a different structure. You can place a large sea shell near the trunk of the tree.

The master class, as you can see, is simple - a beginner can handle it, step-by-step instructions can be changed by you at will.
Topiary in a marine style (video master class)
Master class: topiary for beginners
And the thought of creating a topiary often comes to mind for those who love coffee and have at least once admired a miniature coffee tree. Moreover, you don’t have to see it in front of you - it can be an inspiring photo or video.
To make such a tree, follow these tips:
- Almost every master class suggests laying grains in two layers - small and uneven on the bottom, and large and beautiful on the top;
- You can decorate such a tree with cinnamon sticks, especially if you are a fan of coffee with cinnamon - the aroma will be incredible;
- You can not only make a spherical crown, you can create a heart-shaped blank with your own hands, and then such a coffee gift can be intended for your loved one;
- Instead of a pot, use a coffee cup, it will be more natural.

The craft that turns out to be original is a floating cup. The frame instead of the trunk here will be a stream of coffee beans or flowers that flow from a seemingly weightless cup. Of course, under this stream there is a frame in the form of a wire or fork.
DIY topiary: floating cup (video)
Lessons: topiary for beginners
If you plan to create more than one souvenir tree with your own hands, listen to the advice of the masters.
Tips for beginners:
- First, create a special folder on your computer, save in it all the photos you like, instructions, every master class that interests you.
- Secondly, stock up on materials. You can build almost anything with your own hands, but you must have the resources for this. A small piece of organza, polymer clay, old sheet music, coins, watermelon seeds, and beautiful spikelets will come in handy.
- Thirdly, purchase or make several blank balls for the crown at once. You will save time, and such a workpiece is reliable, durable, and will not let you down.

Finally, experiment with themes. Beginners are often let down by the color scheme - either too much or a mismatch of colors. You can spot the perfect combination from nature - flowers, leaf color, nuances of landscapes. Use what you see in your work and repeat natural patterns with your own hands.
Lessons for beginners: topiary “Tree of Harmony” (video)
Topiary is a really interesting activity. The infinity of themes and variations, ideas force us to take on new works. And if at first you repeat someone else's idea, then soon other newcomers may be inspired by your creativity.
DIY topiary for beginners (photo)


(18
ratings, average: 4,22
out of 5)
 Recently, topiaries, or European trees, have become increasingly popular. This is a great way not only to decorate your home, give it incomparable comfort and individuality, but also a great leisure activity for all family members.
What does the word topiary mean?
Once upon a time, and to this day, the art of topiary is widely used in park design and denoted a garden with short-trimmed trees framed by garden sculptures. Today, this name also means a small artificial tree, and such a unique miracle is easy to make with your own hands.
Another name for “topiary” is the tree of happiness. The explanation for this metaphor has its roots in the Ancient East. For a long time, the ball in many religions was considered to be the personification of the sun, creation, infinity and perfection. Eastern religions associate sunrise with hope, the beginning of life, spring, childhood and happiness. By giving topiary as a gift, you seem to be giving a piece of life and happiness to someone dear to you. According to the rules of Feng Shui, a tree brings joy to a home.
Topiary is not the personification of any specific plant that exists in nature. This fairy tree embodies the author's wildest fantasies. Its crown can have not only the typical shape of a ball, topiary shapes can be made in the form of a heart, cone, etc.
 Making a European tree is not only a hobby, but also an entire art. However, anyone can make topiary with their own hands. Its height ranges from 15 to 50 cm. The materials used in the manufacture of the tree are extremely diverse; it can be made from any available natural and artificial means: from berries and fruits, dried flowers or spices, to paper, plastic, coins and other materials . You can even make a topiary out of artificial grass.
The minimum basis for making wood is four required components:
- flowerpot or stand;
- the basis;
- trunk;
- crown.
A stand or flowerpot serves as a base for placing the tree. As a stand, you can use not only a flowerpot, but also an unusually decorated jar, cup, glass or other container that matches the general idea.
The basis for the composition is a ball, personifying perfection, or a foam figure of any other shape. For the base figure, you can use other materials at hand. Usually they buy a ready-made base at a craft store, which significantly saves time.
To make the barrel you will need wire (preferably thick). As a rule, the wire is wrapped with twine; braid and decorative tape are also widely used.
Making a crown is perhaps the most interesting and creative moment in the entire work process. There are almost limitless possibilities for realizing the most daring and original ideas and fantasies.
The materials for making the crown are:

Bonsai trees serve as a wonderful home decoration not only in the living room, but also in the kitchen, bedroom and other rooms. A tree that glows in the dark will not only be a decorative element, but will also serve as a practical night light. A European tree made from fresh flowers is a wonderful gift for any occasion.
Gallery: DIY topiary (25 photos)


How to make topiary with your own hands: step-by-step instructions
So, let's make topiary with our own hands. Let's look at the process of making a coffee tree as an example. Topiaries made from coffee beans are very popular not only because of their appearance, but also because of the wonderful aroma of coffee spread around.
Characteristic features of a coffee tree:

Necessary materials:
- any newspaper for creating a form or a ready-made base;
- corrugated paper (preferably brown or a similar shade to the color of coffee);
- threads;
- stick (for accurate and uniform application of glue);
- coffee beans;
- cup;
- colorful pebbles;
- dry twig (for a tree trunk);
- coins (or fake money);
- plasticine.

Topiary made from coffee beans– a wonderful and stylish gift for a man (husband, colleague, etc.).
Ideas for topiary
Ideas for European trees can be taken from the Internet, craft magazines and catalogs, or use your own imagination. There are many options for execution. You can create a whole topiary garden at home. Anything can become a decoration for a tree; you can safely combine various materials, creating unusual shapes for the base, inventing fantastic figures or sculptures for decoration.

Make an original topiary You can do it yourself for any occasion, from New Year's to an anniversary or other celebration. Or you can create works using this technique without any reason, but as leisure for the whole family and a wonderful time together for adults and children.
Topiary technology in landscape design
 The art of topiary finds its wide application in landscape design, decoration of the territory of a country house, cottage, and garden. Initially, topiary art was a technique of curly cutting of trees and shrubs. As a result of such cutting, plants are given any shapes (balls, cones, etc.) or ornaments; from them you can create various figures and entire green sculptures (animals, people, fairy-tale objects or structures, etc.).
Topiary technique and its types
- Ornaments and figures from flowers and plants. It is not difficult to form a certain ornament or figure using a special ready-made topiary frame in which plants are planted according to the plan.
- Green sculptures. Frame or topiary sculptures are a fashionable trend in modern garden or lawn decoration. To create them you need a frame made of strong wire. Its inside is laid out with a mesh with small cells and filled with soil (if the sculpture is large, then sawdust or other filler can be placed inside and filled with soil mixture on top). Seeds, seedlings or the plants themselves are planted in the soil and then cared for in the usual way.
- Niwaki - also a fashionable idea in modern garden and landscape design - is growing a tree in open ground by changing the shape of its trunk or intertwining several trunks. This decorative element has proven itself well in the compact design of a small area. Nivaki made from willow, pine and other trees look great in the garden.
Creating topiary with your own hands at home or on the site is not particularly difficult. Should always start from simpler forms and, improving your technique and art, move on to creating complex figures and compositions for the garden. The main thing, as most garden sculptors note, is patience, love for plants, careful and proper care for them.
At first, topiary simply referred to a garden in which ornamental trees were trimmed short with adjacent garden sculptures. In the current understanding, topiary means an original small tree. If you want to quickly get a small tree with the perfect shape, you can make it yourself.
At least four elements are needed for this craft. Such a small list is just a base, without which a sort of flower globe on a stem will not work.

Required items:
- Pot/stand;
- Trunk;
- The basis;
- Crown.
The main craft is usually a ball. Man has an inherent desire to comprehend perfection, and strict geometry sometimes brings him closer to this. But in the photo you can see other forms of topiary, for example, a heart.
Today, a foam blank is used as a base. In order not to make the ball himself, the master buys several at once in craft stores, and this, of course, simplifies the work.

For the trunk, thick wire is usually taken, it needs to be wrapped with twine (twine is used most often), or with decorative braid or ribbon.

Flower ball for topiary (video)
Making your own topiary: the basics step by step
The most interesting stage of work, where great opportunities open up, is the manufacture of the crown. Paper is often used, from corrugated paper to multi-layer napkins. Creating such a crown requires care.

Fabric crafts are also interesting; in the photo you can see all the nuances of this work. The now popular felt is widely used in the creation of topiary; cotton and satin ribbons are also used.
The fabric crown will be complemented by beads, seed beads, and buttons. Whatever the crown is made from, the most interesting works can be made from pistachios. European wood (as these products are also called) turn out to be very natural. True, you will need a lot of pistachios, unless you are planning to make a mini-tree.

In addition to pistachios, coffee beans are actively used. This technique is in such demand because it can kill two birds with one stone. The bonsai tree will not only be beautiful, it is important that it also emits a special aroma.
DIY thread topiary
A separate story is topiary made of different thicknesses of threads. Usually the threads serve as the basis for the future crown. To make such a tree, you need to wrap a balloon with threads, and it is important that the threads sit on the glue. The balloon is then deflated (just poke a pin through it) and you are left with a round, porous figure of thread. Such a thread globe. Just wait until the glue dries!

Other threads can be used to decorate the trunk of a tree. You should not use the same threads from which the globe is made. The structure of such thread structures is used not only in the creation of topiary. This is often how a lamp is made - quickly and easily.
DIY topiary base (video)
Topiary made from coffee beans: fragrant decor
Coffee beans themselves are an excellent decorative material. In their color and texture, they are not inferior to the decor made of glass beads, beads, and even the incredible aroma is associated with the benefits of coffee.

There is also such a fashionable type of coffee topiary made from coffee as a coffee gentleman. This tree has handles, a butterfly or a whole tailcoat, and a cylinder on the head-crown.
Coffee topiary is characterized by:
- Selection of grains - large and beautiful ones go to the upper layer of the crown, and small and chopped ones to the lower layer;
- Instead of a pot or vase, you can use a beautiful coffee cup;
- Chocolate candies can complement this topiary.
The grains can be spray painted or varnished.
Coffee tree (photo master class)
The main stage of making the base for the crown is already known to you. The crown may not necessarily be in the shape of a ball. If a “heart” topiary is planned, the base is made using a cardboard template covered with crumpled paper or cotton wool.


Napkin topiary: delicate flowers
Modern paper napkins are more of a decorative product than a household one. The structure of the napkin and the pattern inspire craftsmen to widely use these same napkins. Including in the manufacture of topiaries.

How can you use napkins in this case:
- Make flowers, buds, roses from fragments of a napkin, and then create compositions from them;
- Cover the smooth base ball for the crown with the top layer of a napkin (decoupage principle), cover with a layer of varnish;
- Creating numerous miniature lumps from a napkin and pasting these lumps over the base ball to form a textured crown.
Napkins are also a good material for decorating a tree trunk or a pot. And here you will need to use decoupage techniques. New Year's topiaries made from napkins and textured Christmas trees are especially elegant.
DIY topiary made from napkins (video)
Topiary made of pine cones: New Year's decoration or memories of autumn
This topiary will be an excellent winter decoration, and pine cones are somehow related to autumn decor. Most often, the cones themselves are subjected to decorative processing. So, for topiary they are often painted with golden spray paint (or silver). And with the help of a simple bleach, ordinary buds can be turned into snow-white without any coloring.

Pine cone topiary is most often a tree with a round crown covered with cones. Sometimes the crown can be heart-shaped. New Year's topiary can be made in the form of a snowflake from cones. In this case, it is advisable to cover the snowflake with artificial snow. This can be ordinary coarse sea salt fixed with PVA glue.
As an autumn craft, this topiary also includes chestnuts, acorns, nuts and leaves.
Cone decor: tree of happiness (photo master class)
Let's take a closer look at the process of making a tree of happiness from pine cones in an autumn theme. A foam ball will be used as the base, which can be replaced with a homemade ball made of any material.


Product made from satin ribbons: DIY tree of happiness
Satin ribbons are an inexpensive and accessible material that can be used at different stages of topiary making. Most often, ribbons are used as additional decor. They are tied around pots, trunks, and bows made of satin ribbons complement the crown.
But this type of topiary is also popular, as a souvenir tree with flowers made of satin ribbons.

The principle of creating such a tree is simple:
- A bud is formed from satin ribbons of different colors, the components of which are sewn together with hidden seams;
- The required number of flower buds is made, which are fixed with hot glue on the base ball;
- The trunk of the tree is tied with a satin ribbon or a combination of both;
- The pot can also be tied with a thin ribbon.

The video master class will show the process of making a tree from ribbons in more detail.
Topiary made of satin ribbons (video MK)
Autumn topiary: memories of the golden age
An autumn tree or a souvenir topiary decorates the house like nothing else, if you want to bring accents of the lyrics of autumn into it. Most often, natural materials are used, which can be found literally under your feet.
Cones, chestnuts, acorns, dried flowers, berries, rowan and, of course, leaves are actively used.

This type of topiary is popular as a tree with a crown of roses made from leaves. To prevent the leaves from wilting, they can be soaked in a glycerin solution. True, this process is not so simple, if only because for two to three weeks glycerin will be absorbed into the leaf through a slightly cut twig. And then the leaves will dry for another three weeks.
DIY topiary “School tree” (video)
Sea topiary: souvenir made from shells

Topiary can be made as follows:
- Cover the crown with beautiful shells, decorating such a ball in one place with a decorative starfish;
- Wrap the trunk with a satin blue or turquoise ribbon;
- The pot can be a souvenir mug bought just on vacation, and if there is some kind of symbolic inscription on it, even better;
- You can throw smooth pebbles or sea sand into the pot.
Instead of a round crown, there may be a heart-shaped crown. And this, in turn, could be a photo frame where a canvas of shells frames a photograph from a seaside holiday.
Topiary in a marine style (photo master class)
MK with step-by-step photos will show you how to make topiary from shells in detail.


Topiary made of corrugated paper
Corrugated paper is cheap, and the number of handicraft items where it can be used is huge. Making topiaries also could not do without the use of corrugated paper (or crepe paper).

Having made the required number of flowers from corrugated paper, they are glued to the base ball with a hot-melt gun, forming a flower crown.
Corrugated paper has the most wonderful property - it is flexible and stretches well, making the petals incredibly lifelike.
Master class: corrugated paper topiary (video)
Topiary “Money Tree”: how to attract financial well-being
The topiary itself is often called the money tree, although it was originally considered the tree of happiness. But you can also turn such a lucky souvenir into a money symbol - for this you use either coins or banknotes (souvenir, finite).

Coins can become a beautiful crown decoration. You just need to take ten-ruble coins that appear to be gold. They do not need to be additionally decorated, varnished or undergo other procedures. Coins are glued on according to the principle of scales, first one coin, then two more on top of it, so that the first one is in the middle. And around these three coins others are stuck.
The money tree of their bills also looks great, but the bills need to be presented gracefully. Buds, rolls, “birds”, etc. are formed from them. This money tree is an excellent gift option for a young family that has yet to build their family budget.
Money tree: topiary made from coins (photo master class step by step)


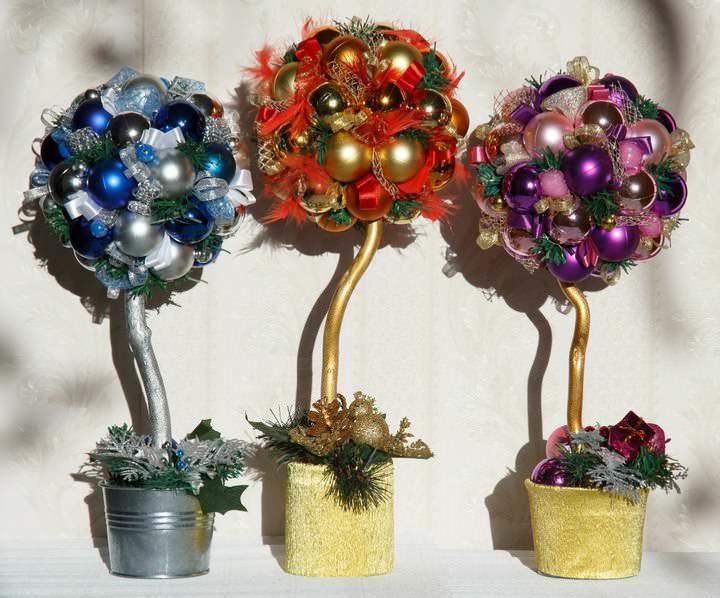
New Year's topiary: decorate the house for the holiday
New Year's souvenir trees are special topiaries that can be made from a variety of materials. Most often, topiaries are made in the form of a Christmas tree, that is, the usual round crown is replaced by the shape of a Christmas tree.
Cones are used as materials for New Year's topiary:
- Cones– both in natural form and decorated;
- Tulle or organza, from which you can make so-called pounds;
- Felt- in itself, in its texture, which is an excellent decor;
- Sequins, from which “Christmas tree scales” can be created;
- Textile;
- Christmas tinsel and sweets;
- Chocolate candies and beautiful wrappers.

New Year's topiary is a special decor. The use of rhinestones, beads, bugles, buttons, braid and satin ribbons is welcome. As a pot, you can use cups that are decorated with cotton wool, New Year-themed napkins, tinsel, etc.
Master class: New Year's tree of happiness (video)
Other options: what topiary can be made from
Almost anything can make a great decorative base for topiary. You can combine materials, create eclectic trees, etc.

Examples of topiary:
- Topiary made of buttons. Buttons of different sizes and colors can become a crown for a tree. They are easy to glue, easy to work with, and assembling the buttons is not at all difficult.
- Paper rose topiary. Paper roses from old sheet music (many people have collections lying around on the mezzanine) look very beautiful - this is vintage, which is so relevant now.
- Pistachio topiary. Pistachio shells, both decorated and natural, can decorate the crown of a tree.
- Pasta topiary. Pasta is an excellent material for decoration. They are easy to paint, varnish, and glue together. All that remains is to choose the pasta of the desired shape.
Sometimes not the most ordinary materials complement traditional topiary.

Unusual topiary design
European trees serve as excellent home decorations. For the kitchen, the living room, and other rooms, such trees will serve as natural decor. And e If the material from which the topiary is made is difficult to surprise anyone today (although it is possible), then it is definitely possible to impress with the form.

Topiary Ideas:
- Rowan bonsai. Autumn craft, elegant, natural, simple to make. Rowan has a beautiful texture and color that can always be complemented with other autumn vegetation. To build such beauty yourself, watch the video master class. A red rowan tree is an ideal autumn interior gift.
- Heart. Topiaries made from burlap and beads in the shape of a heart look great. Often such topiaries are used as an accessory for themed photo shoots.
- Bonsai made of lush fabric. And this tree will become the decor for such celebrations as weddings. You can build many mini topiaries, the creation of which does not take much time.
- Tree-lamp. A cozy decoration for the home - a cute option for both the kitchen and the bedroom.
- Topiary for birthday. WITHToday, topiaries are popular not with a crown ball, but with numbers indicating the number of years they have turned. You will get two trunk-stems, on each of which a number “sits”. For example - 30. This could be the same topiary made from coffee beans, with crowns with numbers. Well, the pot in which such an unusual tree grows is decorated in an appropriate way for the birthday.
- Poppy flower made of coffee and burlap. A beautiful topiary is made from coffee beans and fabric, which together can make up a poppy flower, where the grains are the core and the fabric is the petals. You can use crepe paper instead of fabric.

You can create a real mini-garden from such trees at home with your own hands. You can take pictures from the Internet, video instructions, and kitchen decor catalogs as a basis.
Express topiary: master class for beginners (video)
DIY topiary (photo)


Topiary means “European tree” or “tree of happiness” - a popular interior decoration that symbolizes well-being and prosperity in the home. This art came to us relatively recently. Topiary is a small tree with a crown. The composition is created mainly from natural materials and is a decoration for any interior.
Creating an unusual topiary is possible only with the help of original materials and ideas.
Such topiaries can be:
- Made from goose shell, decorated on one side with small bright beads or artificial flowers;
- Feather boa;
- From various gears, nuts and bolts painted with golden spray paint;
- From satin ribbons in the form of petals, when the result is a dahlia flower from the crown;
- From pasta. Moreover, they can be painted in bright green or blue;
- From dried tangerine peel.

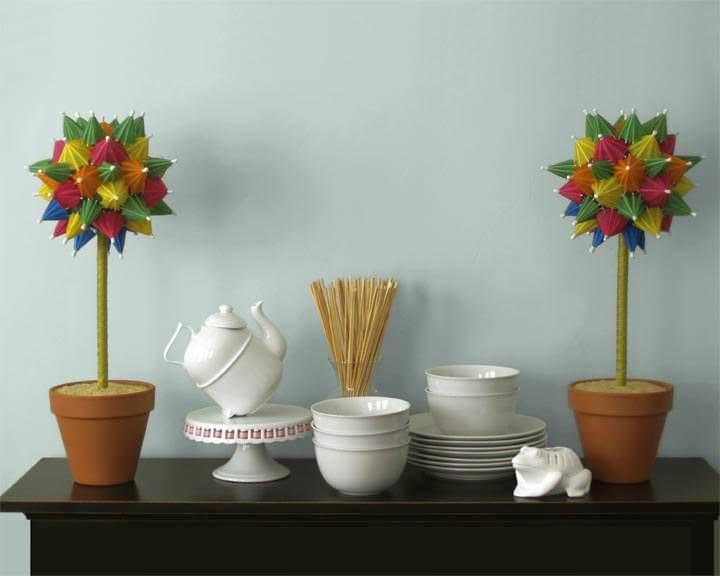
A creative idea for an unusual topiary is to make small pin cushions. Additional decoration includes needles, pins, buttons and skeins of thread. This is a kind of pincushion for the most creative craftswoman.
The trunk and stand in skillful hands are transformed into unusual and original topiary elements.
Pictures of unusual topiaries can be viewed on the Internet.
Where to start for a beginner: simple topiary
Making topiary from pistachios
The original idea for topiary is made from pistachios.

Basically, two techniques are used with pistachios:
- First. A flower is made from the shell by gluing it together. Basically, in the composition there are three of them, not very large, or one, but more impressive. In this case, twine is used.
- Second. Glue the broken shell onto the ball.
In both cases, the pistachios can be left as is, which is quite nice, or painted in the desired color.
For work, it is better to use a whole and strong shell.
How to make topiary at home from rowan
Topiary made from rowan berries is a very interesting idea for children's creativity. Making crafts at home from small natural materials develops a child’s abilities and motor skills well.

Necessary materials:
- Wooden or plastic stick;
- Rowan branches;
- Leg-split;
- Packing of stationery pins;
- Glue and scissors;
- Styrofoam ball.
- Flower pot;
- A piece of foam.
Let's start work. We cut out the foam to the shape of the pot and place the wrapped stick with twine on the glue in the center of the stand. We attach a foam ball to the top of the stick and secure it with glue. We wait until the product dries. We begin decorating the ball with berries. To do this, we pierce each berry with a stationery pin and stick them into the crown tightly to each other.
It is better to pre-dry rowan berries, as they shrink in size when dried.
White foam plastic can be pre-painted with red paint. You can decorate the base of the pot with dried leaves and pine cones.
Topiary: how to make it quickly from coffee beans
Making topiary quickly and efficiently means thinking about the idea in advance and preparing suitable materials. Topiary made from coffee beans is very simple and quick, but tasteful.

You will need:
- Coffee beans;
- Strong wire and thick thread for the barrel;
- Styrofoam ball (store bought);
- Plaster and water to strengthen the stand;
- Brown pot;
- Glue.
The longest and most elaborate process of work will be gluing the grains onto the ball. Moreover, you can glue them on any side. Next, a trunk is constructed according to the usual scheme, it is mounted on a ball and immersed in the diluted plaster of the pot.
The ball must first be painted dark brown.
You can decorate such a tree with a cinnamon stick. The aroma in this case will be even more bewitching.
You can learn about other types of topiary made from coffee beans at
Globe-topiary: DIY technique
Additionally:
- The frame is made of wire wrapped with twine;
- The ball is pierced right through with a stick;
- The crown is covered with twine, simulating axles.

A globe in such an interesting design will decorate a student’s desk or any work surface.
Twine can be made lighter by soaking it in a chlorine solution.
We make topiary from threads with our own hands
A topiary with a transparent crown made of threads looks quite unusual.

Topiary made from threads is made like this:
- Inflate a balloon of the required size and wrap it with thread previously soaked in glue. Wait until the PVA dries, pierce the ball with a needle and remove it through the crack.
- Prepare a wire topiary trunk so that the sphere on top is held firmly.
- Fill the prepared pot with diluted plaster and place the trunk in the center until completely dry. Then wrap the trunk with threads or tape.
- Secure the crown with hot glue.
A beautiful thread topiary can be decorated with additional decor, the ball with flowers, and the trunk with beads strung on a thread. Plaster can be hidden with the same beads or thread of a different color and thickness.
By wrapping the ball with moistened threads not completely, you can get a different shape for the crown.
Making topiary for the kitchen with your own hands
The kitchen is the only place in the house where you can place absolutely any topiary.
But still the topic is closer:
- From plastic fruits, berries or vegetables:
- From coffee or other beans;
- From pasta;
- Of bright colors;
- From nuts and acorns;
- From egg shells;
- From onion and garlic heads;
- From sweets.

A good idea would be sisal decorated with decorative plastic exotic fruits.
Very often, topiary for the kitchen is decorated with various spices, the aroma of which has a beneficial effect on appetite.
The “floating cup” topiary is most compatible with the overall atmosphere of the kitchen.
DIY floor topiary: what is it
Outdoor topiary is widely popular. The manufacturing technique is similar to the topiary we are already familiar with, the only difference is its larger size.

Additional tools for making outdoor topiary:
- Wire cutters;
- Construction knife;
- Gun with liquid glue.
The floor topiary is constructed taking into account the size of the room, so that when placed on the floor, the tree of happiness blends harmoniously with the overall interior. This topiary looks good next to a painting.
The longer the stem of the flower on the ball, the more voluminous the sphere looks.
It is necessary to pay special attention to the weight of the finished product, and thereby take into account the size of the stand and the amount of gypsum in it.
DIY mini topiary: where to start
You can learn the technique of making a tree of happiness by making a smaller version with your own hands - a mini-topiary. Such a product will look beautiful as a souvenir on a shelf or will be an original surprise for a holiday.

Ideas for a mini topiary:
- You can use any perfume cap, candle cups or deodorant caps as a stand;
- A skewer, toothpick or lollipop stick is suitable for the barrel;
- The ball will be a tennis ball or an antiperspirant ball;
- The decor can be anything that is in the house;
- You can secure the tree with plasticine or putty. This material is more than enough to hold such a lightweight product.
A small topiary is made much faster and its costs are minimal.
The finished tree has a height of no more than 20 cm.
How to make a topiary bonsai with your own hands
Additional decor for the pot can be pieces of moss, and the ball can be decorated with several blooming flowers.
Making a topiary lamp with your own hands
Creativity and enormous creative potential made it possible to transform the topiary into a real lamp. The topiary lamp fits harmoniously into the interior of any room.

To make a topiary lamp you will need:
- Ready topiary;
- Light;
- The wire.
We probably won't. Let's focus on turning it into a lamp. Everything is very simple. The only thing is that you need to lead the end of the wire through the tree trunk in such a way that when connecting the light bulb it does not look out of the sphere. Accordingly, the wire should be carefully secured.
It is rational to use a homemade sphere made of threads as a crown. In operation, the lamp will transmit additional light through the void between the fibers.
Making a tree lantern out of a faux pumpkin has become a popular trend. This product decorates the room all year round.
How to make topiary with your own hands (video)
Topiary can be made from a variety of materials; there are no restrictions on the color range in such a composition. There are no specific rules or instructions regarding the appearance of a tree. It all depends on the creativity, ideas and boundless imagination of the creator. Caring for such a miracle tree is very simple, just brush off the dust periodically and protect it from direct sunlight.
Examples of hand-made topiary (photo)


