Do-it-yourself columnar foundation step by step. Do-it-yourself columnar foundation: step-by-step instructions. Advantages and disadvantages of columnar foundations
The foundation is the support of the entire house; the durability of the entire building depends on its design and strength. When choosing the type of foundation for country houses, our compatriots play it safe and lay a strip foundation. You can easily verify this by taking a tour of the gardens. But such measures are completely unnecessary. For light buildings, such as wooden, frame, frame-panel houses, a column-type foundation is more suitable. In addition, indications for its use are soils supersaturated with moisture, sandy soils, peat, swampy soils and those where frost heaving forces can push out or damage the strip foundation. You can build a columnar foundation with your own hands in an extremely short time, without involving heavy equipment and a team of workers.
A columnar foundation consists of pillars - supports buried in the ground and protruding outward. The top level of the pillars must be the same. A grillage is installed on top of the pillars to connect the supports and distribute the load evenly. The pillars must be placed at each corner of the building, as well as at the intersection of walls and in places where the maximum load is applied.
The material for the pillars can be wood, brick, concrete, concrete blocks, asbestos-cement or metal pipes, as well as rubble stone.

Wooden pillars Today they are used extremely rarely, as they are short-lived. But under light wooden buildings or terraces it is quite acceptable to install a columnar foundation made of wooden posts. The diameter of such pillars should be 0.15 - 0.2 m. Before deepening, they must be treated with special preparations and impregnations that prevent rotting and prevent combustion. Bitumen mastics can be used as a waterproofing material.
Iron ore brick, fired in a kiln, is used for shallow or non-buried columnar foundations. The width of the pillar must be at least 0.38 m.
Concrete reinforced pillars are the most common and reliable option for a columnar foundation. They can be either monolithic or constructed from ready-made concrete blocks. The width of the pillars should be 0.4 m.
Asbestos-cement or metal pipes are used for arranging pillars as permanent formwork, since reinforcement is inserted inside them and concrete is poured.
Depth columnar foundation is calculated depending on the structure of the soil, the level of groundwater and the level of soil freezing. A foundation buried 0.4 m into the soil is considered shallow. Recessed - immersed 0.15 - 0.5 m below the freezing level.
Very often, a columnar foundation is installed in areas where the soil freezes 1.5 - 2 meters deep, since the construction of a strip foundation in this case is simply unprofitable. The lower level of the column is buried 15 - 25 cm below the soil freezing level.
The distance between the pillars can be from 1 to 2.5 m, but spacing more than 3 m is not recommended.
As grillage you can use a strong beam. If the structure is wooden, then it will act as a mortgage crown. But monolithic concrete grillage poured into wooden formwork is gaining more and more popularity.
The grillage of a columnar foundation can be high (above 35 - 75 cm above ground level) and low (lying on the ground).
A very important design feature of columnar foundations is that it is impossible to install a basement in the house. Sometimes, to enclose the space between the pillars, a fence is formed, which is smoothed out of brick or stone, but is not connected to the foundation pillars, so as not to disrupt its integrity in case of movement. It is very important to arrange ventilation in the enclosure to ventilate the underground space. But collection is not always done. In frequently flooded areas, columnar foundations are erected to a high height above ground level, which can range from 1 to 2 m. In this case, the house remains completely “hanging” in the air on pillars.
Columnar foundation: drawing, calculation and diagram
Before starting any work related to the construction of the foundation, it is imperative to stock up on design documentation. It is better to entrust the creation of this documentation for the house to special architectural companies.
The columnar foundation diagram looks something like this:

The first step is to calculate the columnar foundation to determine the number of pillars, their material, laying depth, arrangement locations, width, and more. Calculations will require soil characteristics, groundwater level, frost heaving forces, soil freezing level, building material, its height and number of storeys, type of floors, roofing material, loads at each key point of the building, and more. For independent calculations, there are corresponding online calculators on the Internet for calculating columnar foundations.
All dimensions obtained for a columnar foundation are entered into the design documentation, where all characteristics, material and much more are indicated.
DIY columnar strip foundation

Recently, the so-called lightweight foundation for modern one- and two-story cottages has become popular, which consists of pillars buried below the freezing level of the soil, and a non-buried strip foundation connecting these pillars. It won’t be easy to make such a foundation yourself; it’s better to call friends for help and order a ready-mixed concrete mixer to make the structure durable.
Excavation
Before making a columnar foundation, it is necessary to prepare the site for construction. To do this, remove excess soil and eliminate unevenness. If the top soil is clayey, you will have to remove most of it and fill it with sand.

Next, you need to mark the area. Using construction thread, we mark the site according to the attached drawing. We stretch the thread in two lines parallel to each other, with a distance equal to the thickness of the future strip foundation. We control the angle of intersection of the threads and the angles of the future structure; they should be equal to 90 °. We mark the places of intersection and junction of walls, as well as the corners of the building, places with the greatest load.
Throughout the marked area, we remove 30 - 40 cm of soil where the strip foundation will be. We make the width 7 - 10 cm larger so that there is room for the formwork.

According to the drawing of the columnar foundation, using a hand drill we make holes where the pillars will be. The diameter of the hand drill is 150 mm, 200, 250, 400 mm. If the depth of the pillars does not exceed 1 m, then additional fixation of the walls from crumbling is not necessary. If the depth is greater, then you will have to form supports from boards so that the soil does not crumble.
We fill the bottom of the wells with sand, a layer of 10 cm.
For the last time, we check the location of the wells along the axes and the evenness of the future foundation.
Arrangement of pillars
We will use concrete to construct the pillars, but to waterproof it, we will use a little trick.
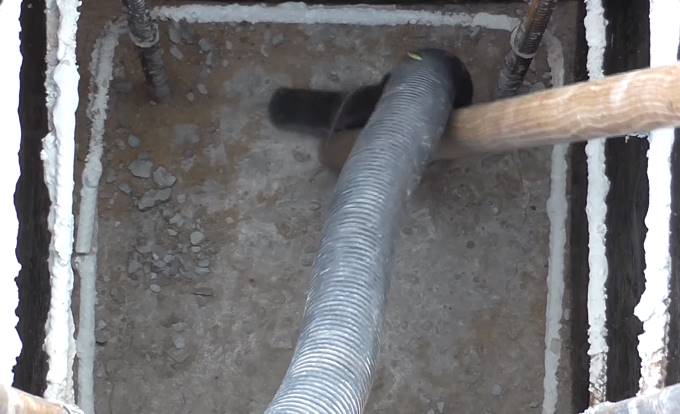
From roofing felt, twisted in two layers, we form a pipe of the required diameter. We glue the connections with tape, and also tape the pipe around the circumference. We insert the structure into the well until it touches the ground.
We knit and weld a reinforcing frame from a reinforcing rod 10 - 14 mm in diameter and 6 mm wire. We insert it into the well. The top of the rods should protrude from the well by at least 15 - 25 cm.

We begin to fill the pillars with concrete. To do this, first pour 20 - 25 cm inside the well and lift the roofing felt pipe so that the concrete below spreads and forms a base. Then we fill the well to the end with concrete, forming a pillar. Using an electric deep vibrator, we shake the concrete so that there are no air bubbles or voids left in it.
While the concrete in the pillars dries, let's take care of the strip foundation.
Arrangement of a lightweight strip foundation
We weld and knit a frame from reinforcing rod and wire to reinforce the strip foundation. Be sure to weld it and screw it to the rods sticking out of the pillars.
The rods will be located along the foundation strip, and the wire will be reinforced in the transverse direction, forming horizontal jumpers.

We install the formwork for the strip foundation. To do this, we use boards 10 - 15 cm wide and 4 cm thick. Instead of boards, you can take chipboard, plywood or iron sheets. When the formwork is knocked down, we lay waterproofing material inside. It is best to use modern membranes or polyethylene film, which will also be needed to ensure that concrete does not spill out of the formwork through the cracks.
We fill the strip foundation with concrete. For simplicity, it is better to order a mixer machine to fill such a large space. We also shake the concrete with a vibrator. When the concrete gains its strength, after 20 - 28 days, the formwork can be removed and all the necessary work on waterproofing the foundation can be carried out. Then we fill the remaining trenches with soil.
For more information about how such a strip-column foundation is made, video:
Important! Many experts are extremely negative towards columnar-strip foundations, insisting that the foundation should be either columnar or strip. Only in this case will it fully perform its functions and not interfere with movements in the ground. Despite this, many construction companies continue to equip a combined foundation. So it's up to you to choose.
DIY columnar foundation

For comparison, let’s consider the option of arranging a purely columnar foundation with a high grillage. Its arrangement is advisable for light buildings on sandy soils.
Excavation
We mark the site, as in the first option. Then we remove fertile soil from the site by 15 - 25 cm. In the corners and places where walls intersect, we drill wells 0.6 m deep. Better yet, we dig square-shaped pits in the place of future pillars by hand.
We pour a 10-15 cm layer of concrete at the bottom of each pit under the pillars. It will serve as a cushion for us. When the concrete has dried, you can begin to form the support pillars.
Construction of a columnar foundation
For the pillars we will use iron ore brick, carefully baked in a kiln. We lay out a support pillar with brickwork, 38 cm wide and 35 - 45 cm high above ground level. The bricks can be placed in a closed loop, leaving free space inside. Inside the empty space we form a reinforcement frame, tie at least 1 - 3 rods and insert them. Then fill it with concrete.

We check that the pillars are at the same level. Once the concrete has dried, the pillars can be waterproofed.
We fill the trenches with soil. We arrange a grillage on top of the pillars. It can be done using wooden rand beams. The edges of the beams must necessarily rest on the pillars and be connected to each other with a tongue-and-groove joint.
The grillage can be made of concrete. Then it is necessary to install formwork from wooden boards, weld a frame made of reinforcement inside and fill everything with concrete.
The columnar foundation technology allows the pillars to be made from asbestos-cement pipes. They are lowered into the well, then concrete is poured inside. Raise the pipe so that the concrete spreads, and then add concrete further, not reaching 10 - 15 cm from the top of the pipe. When the mortgage crowns of the house are connected to the foundation, they will need to be secured to the pipes using anchors and corner joints.
The construction of a columnar foundation allows you to significantly save on materials and a team of workers, since all work can be completed independently in a matter of days. Such a foundation can be safely built for wooden houses, bathhouses, technical buildings, terraces, verandas, gazebos, garages and other buildings whose weight is not enough to load the strip foundation. By the way, if you built a columnar foundation in the fall, it is not advisable to leave it unloaded for the winter. Therefore, concrete slabs are installed on top or they try to build the entire building before the onset of frost. Otherwise, during the winter, the forces of frost heaving may push the pillars out of the ground, and their location will no longer be even. It will be easier to dig them up and make a new foundation than to correct the consequences.
Do-it-yourself columnar foundation: video instructions
The choice of the type of foundation for a cottage or country house will primarily depend on what material the building itself is planned to be constructed from. For example, relatively light buildings can be erected on a columnar foundation. In addition, this type of foundation is suitable for unstable swampy, peat, sandy or waterlogged soils, as well as for regions with deep freezing.
A columnar foundation can be built with your own hands in a relatively short period of time. Moreover, most often this does not require the help of any special or heavy equipment.
A columnar foundation is most often used for various wooden buildings - this could be a frame cottage, a gazebo, a bathhouse, as well as outbuildings, such as, for example, a barn or a chicken coop.
It is not particularly recommended to raise brick or stone buildings on a columnar foundation, since if they are too heavy, the supports may sag, which will lead to deformation of the walls, and subsequently to their destruction. However, there are special technologies that are used in industrial and residential construction, most often in regions with permafrost. But it is precisely in these cases that special approaches and specialized equipment are required - such methods will not be considered within the scope of this article.
There are several types of columnar foundations. It is the design of the device that unites them, and what makes them different is the material used for the construction.
- A monolithic reinforced concrete structure can be called the most durable and reliable for the construction of residential buildings of all existing columnar foundations.

This option has the highest compressive and tensile strength (of course, with proper reinforcement), which is very important when building a structure on unstable, moving soils.
On a monolithic foundation, it is permissible to erect not only one-story, but also two-story wooden houses.
- A brick columnar foundation can be called the most widespread from this type of base. It should be noted that such a construction, built from high-quality materials, can last even a hundred or more years - this is evidenced by the numerous monuments of antiquity in Russian and European cities. True, in order to achieve such a “longevity” for this building, you need to choose exclusively baked bricks and only of excellent quality.

Brick columns can be solid or with a “core” filled with concrete
This type of foundation is also suitable for building a house from one to two floors when building on dense soils. Brick foundation supports are usually given a cross-sectional size of at least 400 × 400 mm.
- The foundation of blocks, which can be made of different materials, has the same qualities as a brick structure. However, its reliability and durability will depend on the quality and type of material used.

Columnar foundation made of blocks - akin to the brick variety
Concrete blocks are considered the most durable, capable of withstanding heavy loads.
- A columnar foundation made of rubble stone is not recommended to be installed on the slopes of a hilly area, as it will have low stability on moving soils.
- The columnar rubble concrete foundation is quite reliable, and can be done in different ways - it is concrete mixed with rubble, ordinal laying, or poured into a well made of rubble.

Concrete, falling between the stones, reliably holds them together, making the structure strong and capable of withstanding high loads.
- Small wooden buildings can be installed on a foundation, the supports of which are also made of wood that has undergone special treatment. Houses that have stood for tens and hundreds of years prove that properly treated wood can last quite a long time.

At present, however, due to the fact that more reliable materials for the foundation have appeared, wood is used less and less for this purpose. Although for extensions to the house, such as a veranda or terrace, wooden posts with a diameter of 150 ÷ 200 mm are ideal. However, we must not forget that in order for them to last for a long time, before digging in they are treated with antiseptic impregnations and covered with waterproofing materials - bitumen mastics, onto which roofing felt is fixed.

- A columnar foundation can be made of asbestos pipes of small diameter (about 150 mm) if a light wooden structure will be erected on it, and 250 ÷ 400 mm if the structure is planned to be quite massive. Asbestos pipes of large diameters can become a kind of ready-made formwork for pouring support piles with concrete and strengthening them with reinforcing bars.

- Another option for a columnar foundation can be a structure made of metal piles that are screwed into the ground. This method of arranging the foundation for a building is good because the pile goes through all the unstable layers, and then is screwed into dense layers of soil - this is what allows it to securely anchor there. On such a foundation, a wooden structure can be erected, installed on both flat and fairly rough areas of the territory.
Types of columnar foundations by degree depth
In addition to varieties based on the base material of manufacture, columnar foundations are divided according to the degree of “immersion” in the ground relative to ground level. Yes, there is shallow and buried types of foundations. The choice based on this criterion directly depends on the characteristics of the soil on the site.

Shallow option applies if available fine-fragmented, sandy and rocky soils with deep groundwater. Foundation columns of this type are installed to a depth of only 650 ÷ 700 mm. This should be quite enough, since the soils in which they are immersed are little susceptible to displacement.

The piles of the columnar recessed foundation go 1500 into the soil thickness — 2000 mm and even more. They are usually used in areas with deep soil freezing, which exceeds 400 ÷ 500 mm. In addition, such foundations are more suitable for unstable moving soils.
The distance between foundation pillars is usually from 1000 to 2000 mm.
Basic columnar foundation design
The columnar foundation has a fairly simple overall structure.

- At the base of the columns, a 100 ÷ 200 mm sand layer is laid and compacted. Sand is a kind of drainage that helps remove moisture from the foundation columns that can accumulate in the soil.
- Next, a concrete solution is laid on top of the pillow, which forms a monolithic slab with an average thickness of 400 ÷ 500 mm.
- Next comes, in fact, the columnar support itself, which needs to be strengthened with reinforcing rods - this will need to be done even if the columns are built from stone or brick. The second important action with the support is to ensure its reliable waterproofing.
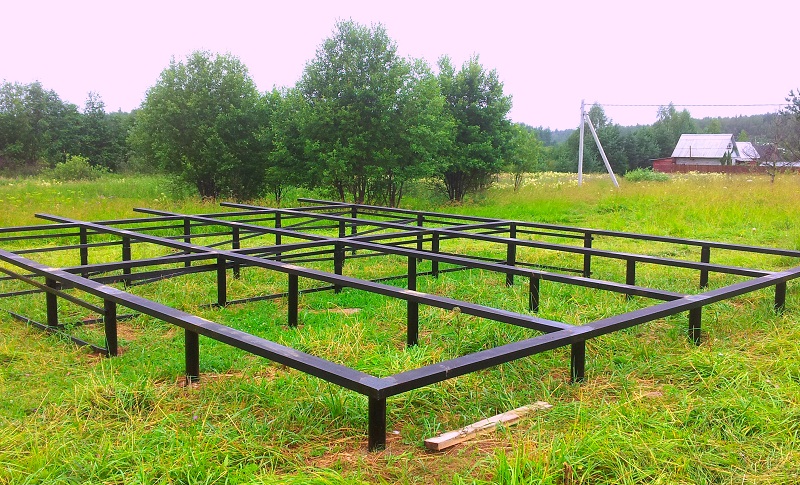
- The columns should be raised one level above the ground, and a grillage or other belt connecting the supports should be placed on top of them, which evenly distributes the load on the entire structure of the columnar foundation.

The grillage is often made of wooden beams with a cross-sectional size of 150 × 200 or 200 × 200 mm. For wooden houses or outbuildings, the grillage can simultaneously become a foundation crown for future walls.
In addition, on a columnar foundation made from any ofmentioned above materials, in addition to wood, a reinforced concrete grillage can be installed. It is made by constructing a structure in which a reinforced structure is laid and then filled with concrete.

The grillage can practically “lie” on the ground, becoming similar to a strip foundation
The grillage can raise the lower edge of the building to a height of up to 800 ÷ 900 mm above the ground, or it can be located only 300 ÷ 350 mm from the ground or even “lie” on the surface of the ground. In the latter case, from the outside it will look exactly the same as the strip foundation.
- The disadvantage of a columnar structure, which raises the house above the ground to a considerable height (about 1000 ÷ 1500 mm), is that it is impossible to build a full-fledged basement under the building. However, sometimes home owners find a way out of the situation by installing a fence between the foundation pillars, which should not be connected to the foundation by the reinforcement structure. A fence is an inter-pile wall made of slabs or bricks, and sometimes simply knocked together from wood.

Interpile wall - fence
When installing it, it is necessary to ensure normal ventilation in the underground space, which will not allow the walls and floors in the house to become damp. Therefore, ventilation holes must be made in the built-in enclosure, which are “dressed” in grilles or deflectors in order to protect the semi-basement from the penetration of small animals, birds, insects, etc.
- Columnar foundations are often used in areas where a high risk of flooding due to river floods is common. In this case, the pillars can go into the ground to a depth of 2000-2500 mm, and rise above it to the same height. Taking into account all the features of the area, it will not be possible to build a basement under such a house, and it makes no sense, so there is no need to build a fence.
Calculation of a columnar foundation

The first step is always, even before the start worksbypreparing the site for installation foundation, planning is underway, that is, drawing up an appropriate project. This issue definitely requires a professional approach. In drawing up the project, it is necessary to involve a special organization engaged in architectural calculations, taking into account a whole range of initial data - from local climate and soil characteristics to the specific wishes of the customer.
Of course, the basic data for starting design will be the total area of the building and its total estimated mass, the location of the proposed construction. Geodetic survey and geolocation of the object on the ground are required. In addition, designers will take in:
- Specific features of the soil at the site of construction of the building.
- Location of groundwater aquifers and their depth.
- The freezing limit of the soil, the degree of its swelling during freezing.
- The number of floors in the building being built and its total height.
- The main materials from which the building is supposed to be constructed, including types of floors and type of roof.
- All possible additional loads that will fall on each key point of the foundation.
As a result, the number and exact placement of support pillars, the material of their manufacture, installation technology, laying depth, protrusion height above ground level, type of grillage and, possibly, other necessary data must be determined.
Of course, you can try to carry out the calculations yourself, using the specialized ones available on the network. online calculators, which are intended to determine the parameters of foundations of various types.

However, you should not rely too much on such capabilities, since such software still cannot take into account all the specifics of a particular construction site. But specialists working in this region probably know the features of this area and will certainly make the calculations more accurate. Moreover, with professionally prepared design documentation it will be much easier to carry out all procedures for registration and approval of other registration and permitting documents for construction.

Video: calculation and construction of a pile foundation for a frame house
Preparatory excavation work
- The first of the activities preceding the installation of the foundation structure is the preparation of the site and marking for its installation.

To do this, based on the drawn up project, using reference points, the area intended for the construction of the building is first precisely limited. This place is immediately marked with twine and pegs. Moreover, as a rule, two parallel threads are stretched, which immediately determine the width of the future foundation. The angles at the intersection of the threads must be straight - this is best controlled using a surveying tool. If this is not the case, you need to very carefully check the perpendicularity and parallelism of the lines. Be sure to compare the length of the diagonals of the rectangles - if it is the same, then the marking was done with high quality.
- Next, a fertile layer of soil 150 ÷ 200 mm thick is removed from the intended area.
- Then the installation locations for the foundation pillars are determined, also in strict accordance with the dimensions specified in the design documentation.
- After this, using a manual or mechanical drill, holes are drilled at the designated points. The diameter of the selected wells is also indicated in the project - it can be from 150 to 400 mm.

- Provided that these holes are drilled to a depth of 800 ÷ 1000 mm, fixing their walls will most likely not be required.

- In the event that the foundation is deeper, it will be necessary to make supports for the walls to prevent the soil from collapsing.
- If the pillars are square in cross-section, then the drilled holes are expanded using a bayonet shovel to the desired size.
- Next, sand is poured into the bottom of the dug wells in a layer of 100 ÷ 200 mm, moistened and compacted well.
- 150 ÷ 170 mm of coarse concrete mortar is poured onto the sand cushion, which will become a reliable base for the pillars and will not allow moisture from the mortar to be absorbed into the sand and soil.
How to install columnar supports
When the holes for the pillars are prepared, you can begin to manufacture the supports themselves.
In the context of individual construction, not all of the structures mentioned at the beginning of the article are used equally often. It is worth considering the most affordable ones for self-installation and therefore the most popular of them.
Support pillars made of bricks or blocks
- Formwork made of roofing felt is installed in the prepared pit; it can be arranged in either a round or square pit. The same roofing material will subsequently also play the role of a waterproofing agent.
- Next, a reinforcement structure is lowered into the pit, which should be level with the ground surface.
- Then, a concrete solution made from cement and gravel or medium-fraction crushed stone is poured into the pit.
- The pit is filled completely, the solution is leveled on top and left to harden and harden. This will take at least 8 ÷ 10 days.
- Then, two or three layers of roofing material are laid on the resulting concrete column - it will become a reliable waterproofing for brick or block masonry.

- Brickwork is laid on top to the required height of the support. The column can be lined with a well - in this case, its internal hollow part will subsequently be filled with concrete. Another option is when the pillar is made entirely of brick.
In exactly the same way, pillars are erected from small concrete blocks.
Monolithic foundation reinforced concrete pillars
This option for making concrete pillars is produced slightly differently.
- Roofing material, rolled in two layers into a pipe, is installed in a round prepared hole. The height of the pipe must correspond to the level to which the foundation must be raised.

- To ensure the stability of this unique roofing felt formwork, it can be installed in a light metal mesh, also rolled into a pipe. Stability is needed so that the structure, after pouring concrete into it, can be shaken and released air bubbles that entered the solution during the mixing process.
- A reinforcement structure is installed into the resulting formwork, and then concrete made from gravel and cement is poured on top of it.

- If a concrete belt is placed on top of the concrete pillars - a grillage, then the reinforcing bars should be higher than the foundation pillars. This is necessary for connecting the reinforcement parts of the pillars and the grillage reinforcement system.

- Before installing the formwork for the concrete belt, the supports on top must be treated with bitumen mastic, which will create additional waterproofing for the columns.
Video: pouring concrete pillars of a pile foundation
Asbestos cement pillars
A columnar foundation can also be constructed from asbestos-cement pipes, which are installed on a concrete pad, just as in the previous case, where roofing felt was used. However, the process of filling columns here has its own characteristics.
- For stability, two holes are made in the lower part of the pipe, which will be located in the pit. A piece of metal rod is passed through them, and then an asbestos pipe is installed in the pit and covered with crushed stone around it so that it covers the fittings sticking out on both sides. The pipe is given a perfectly vertical position.
- Then one-third of the concrete solution is poured into the pipe formwork.
- After this, you need to install fittings in the middle of the pipe, in the poured uncured solution - this can be one or several rods.
- Next, the solution is poured to the top of the pipe and leveled from above.

- Around the pipe you need to immediately fill the entire space with loam or the soil that was selected from the pit. All this backfill is carefully compacted.
Metal piles
Metal piles can be screwed into a pre-arranged hole made with a hand drill, but the piles go much deeper into the ground. For such a foundation, you do not have to prepare a hole by filling it with sand and pouring a concrete pad.

Sometimes piles are screwed directly into the soil surface, without first digging wells. But in any case, you can’t cope with screwing in piles alone; you will need at least one assistant.

- When screwing in piles, their verticality is constantly monitored. The piles are screwed in until the design depth is reached.

- Once all the piles have been screwed in, they should be filled

- To make this operation easier, a special funnel is installed in the pipe, and the solution is poured into the cavity through it until the pipe is filled to the top.
- Once filled, the concrete should set and harden.
- Metal platforms can be welded on top of the finished piles, onto which a wooden grillage is fixed.

- Another option for a grillage can be metal lintels - they become a belt that connects the piles into a single structure. They can be welded not only on top of the installed pillars, but also at ground level, which gives additional rigidity and reliability to the entire foundation.

Another option is a metal profile welded between the supports
Screw-in piles are convenient for use on heavily crossed areas where it is necessary to bring the foundation pillars to the same height, since they can be adjusted - raised a little or lowered lower.
Video: foundation on screw metal piles
Pile foundation grillage
The grillage or lintel, which is laid on top of the foundation pillars, is both a connecting element for the entire structure and a reliable support for the construction of walls.
On any type of columnar foundation, you can lay wooden lintels made of powerful timber, a reinforced concrete structure or a grillage made of rolled metal.
The jumpers are secured in different ways, depending on the material used to make the posts and the grillage itself.
- Wooden lintels are most often secured using anchors.
- A metal belt (channel, I-beam or angle) is attached either by welding seams or powerful bolts.
- Reinforced concrete belt With secured with the help of common reinforcement, previously installed in the column and passing through the grillage, where it is twisted with wire with the reinforcing grid of the lintel itself.

So, the conclusion. WITH A column foundation is much more economical to construct than a monolithic or strip foundation. In addition, it is quite possible to build it on your own. If you decide to make a light extension to your house in the form of, for example, a veranda or terrace, then you simply cannot find better and simpler foundations for them than a columnar foundation.
The choice of foundation for a house or other building is influenced by many factors. For each specific case, a different foundation design can be used. In first place in terms of frequency of use is the strip structure; for unstable soils, a pile foundation is common. It is quite simple to build a columnar foundation with your own hands, which in some respects is not inferior to the listed foundation options. This design has its own variations and nuances in the bookmark. Each of these points will be discussed in the article.
Benefits of the solution
During the use of this type of foundation design, users and builders managed to compile a certain list of positive qualities that were identified. Among them are:
- possibility of independent design;
- relative simplicity of calculations;
- possibility of use on various types of soils;
- Possibility of use in areas with level differences;
- the ability to avoid site planning;
- high construction speed;
- long service life;
- relatively low project cost.

Perhaps these nuances do not apply to all types of columnar foundation designs, but for a classic structure with a concrete grillage this is exactly the case. There are also disadvantages, of which there are significantly fewer. One of them is the impossibility of constructing heavy buildings whose walls are made of brick. The latter is capable of exerting significant pressure on the base, which often leads to destruction. This occurs due to shrinkage, although on an industrial scale this foundation design is used for brick buildings on soils with permafrost. Another unpleasant point is the inability to build a basement or garage directly under the house, since a foundation of this type does not provide for laying a monolithic structure to a great depth.

Note! Columnar foundations are most often used for the construction of structures that use gas-filled blocks or are made using frame technology. Construction of buildings made of rounded logs is also allowed.
Types of designs

The design of a columnar foundation will largely depend on the specific building it will be used for. If we are talking about an ordinary gazebo, then its dimensions will be significantly smaller than those needed for a bathhouse or cottage. Based on the material used, the types of columnar foundations can be divided into:
- monolithic with a concrete grillage;
- monolithic with a wooden grillage;
- brick;
- bud-filled;
- rubble concrete;
- wood;
- monolithic from asbestos pipes;
- columnar-pile.
The first design option is the most durable. This is due to the fact that the pillars and grillage are a single structure that is capable of evenly distributing the load exerted on all pillars. This design is more expensive than others, but will last much longer. Such a columnar foundation allows the construction of houses of several floors using frame technology or from logs. The next version of a columnar foundation with a grillage is made using a similar technology. Its pillars are also filled with monolithic concrete with reinforcement, only wooden beams are laid on them, which are the basis for the walls of the structure.

Most often, when they talk about a columnar foundation, they mean the third design option, which is laid using bricks. Unlike previous options, a columnar brick foundation is quite simple to construct and requires relatively lower costs. With good soil quality, as well as the right approach to construction, a service life of several decades can be achieved. Many ancient buildings that have come down to our time are built on this type of foundation. In some areas, on a foundation of this type, it is possible to build a house with several floors.
Note! Other types of blocks can be used as the basis for a brick foundation. In this case, the strength and stability of the base will depend entirely on the quality and strength of the material used.

A buton-filled columnar foundation is laid using brick or stone from old structures. This solution is suitable for stable soils and for areas where there are no level differences, since the stability of such a foundation is much lower than that of the previous options. The base of the rubble concrete structure is also built using the materials mentioned above, but in this case cement mortar acts as a link. The result is a monolithic, but not reinforced structure.

The wooden base of the structure is now practically not used, but it still remains relevant for areas where it is necessary to raise the structure to a considerable height in order to avoid flooding. This applies to warm parts of the world. A similar method was used in other areas, but proper implementation requires special treatment of the wood to prevent rotting and drying out. A wooden columnar foundation is an excellent solution for additional buildings near the house. This applies, for example, to terraces. In addition to antiseptic impregnations, wood is also coated with waterproofing material. As the latter, bitumen mastics are often used.

Another interesting design option is a foundation made of asbestos pipes. Most often, it is manufactured using a solution similar to a monolithic columnar solution. In this case, the pipes act as formwork, into which reinforcement rods are inserted and concrete solution is poured. Usually a pipe with a diameter of 20 cm or more is used. A column-pile foundation is made using screw or other types of piles. In the first case, no special equipment will be needed to build the foundation, except for a concrete mixer. Screw piles can be installed in place by a small crew of three people.

The advantage of this solution is the greater stability of the structure base. This is due to the fact that the pile is immersed to a considerable depth, which passes the freezing level and reaches dense layers of soil, where fixation is carried out. The design with screw piles can be used for a log house or a frame house. If we are talking about bored piles, which are intertwined with a metal frame with a concrete grillage, then such a foundation is used when constructing houses from blocks.
Varieties by depth

The difference between foundations is made not only by the materials that are used to lay them, but also by the depth to which the foundation is mounted. To put it simply, then, as with strip foundations, there are two types:
- shallow;
- buried.

In the first case, the immersion is usually 50 or 80 cm, which somewhat reduces the cost of equipping the base itself. Such a supporting structure is used for buildings that are light in weight. The recessed design involves the use of supports that go into the ground by 150 or 200 cm. Which depends on the level of freezing. This design is more preferable for areas where the presence of heaving soils or high instability of the upper layers is observed. In addition to the depth of the foundation, the height at which the grillage is located also differs. In this regard, the following are distinguished:
- aboveground;
- ground;
- buried.

Above ground foundation design options are great for those cases where the upper layers of the soil are characterized by a high degree of heaving. If the grillage is laid directly on the ground, then there is a possibility of distortion or damage. In the case of the construction of an above-ground version of the design, the pillars are made higher in order to raise the grillage to a certain height. The disadvantage of this solution can be considered the need for additional floor insulation. This is due to the free ventilation of the space under the house. Usually the sidewalls are closed and leave only small vents for ventilation.

The ground version of the structure is built on a prepared bed of sand and gravel. It is placed so that it is flush with the surface. On the one hand, this eliminates strong blowing, as is the case with the above-ground version of the design, but on the other hand, for such a design, the need arises for the correct approach to waterproofing. The shallow version of the column foundation is very similar to the similar strip foundation, but in addition, supporting elements are prepared in the trench in the form of pillars or piles, which are recessed to a considerable depth. The second and third options are often implemented using a concrete grillage.
Basic Concepts
Almost all types of columnar foundations have one principle by which they are arranged. Certain nuances are important to consider in order to achieve success. Among them:
- pillar pillow;
- heel support;
- column design;
- arrangement of columns;
- grillage device.
If we are not talking about pile supports, then preliminary backfilling must be done under the posts. For these purposes, medium-grained sand is usually used. The thickness of the pillow itself depends on the amount of moisture in the soil, as well as the expected weight. It can reach 30 cm, and the minimum permissible value is within 10 cm. If additional drainage is required, then an additional layer of crushed stone is laid under the columns, which allows water to pass through faster than sand. The functional purpose of such a pillow is to uniformly distribute pressure, as well as reduce the level of humidity under the posts.
For monolithic columns, which are made by pouring, soles are made, which are a small concrete slab with a thickness of up to 50 cm. It is wider and longer than the supporting column in order to increase the interaction area. The next nuance of such a foundation is the need for reinforcement. If we talk about a monolithic foundation, then there are no questions regarding reinforcement, but this also applies to other options. Only in this case is external reinforcement carried out, which eliminates the deformation of the columns. To prevent moisture from rising to the grillage and the building, it is necessary to approach the issue of waterproofing correctly.
It is important to correctly determine the number of columns in the foundation and distribute them throughout the area. This will determine how the load will be distributed. The projection of the posts above ground level will depend on the placement of the grillage, as well as the topography of the site. In some cases, owners of houses on columnar foundations prefer to make a fence. This is an additional concrete structure that is placed between the columns to cover the underground space. Reinforcement is also required for it. The fence for the columnar foundation further strengthens the entire structure.
Note! In areas where flooding is possible, the height of the pillars can reach up to 2.5 meters above ground level. The calculation is based on the maximum level to which the water rose in the area.
Self-calculation

The key to successful completion of the construction of the structure is the calculation of the columnar foundation and preparation of the project. They begin even before the process of preparing and planning the site for the foundation. It is better if a professional in his field provides assistance in drafting the project. Thanks to this, it will be possible to take into account all the nuances that relate to the soil and the expected load. The wishes of the customer are also taken into account. The main initial parameter for drawing up a design project is the area allocated for the building. The next important indicator is the mass of the structure. To correctly draw up all the documents, you will need a geodetic survey of the area and linking the future structure to a specific site.

During the design, the following points will also be taken into account:
- soil specifics;
- proximity of aquifers;
- soil freezing level;
- number of floors;
- materials for construction;
- possible additional loads.

The first and second factors will determine the required depth of columns or piles for the foundation structure, as well as their level above the ground. The third factor is necessary to determine below what depth the supporting elements of the foundation should be located. The number of floors affects the number of supporting elements, as well as the choice of material for construction. Additional loads that may be caused by wind, changes in soil or precipitation are taken into account. All these factors give a clear understanding of the number and parameters for the pillars of the future foundation.

With sufficient experience, you can try to perform the design work for the structure yourself. To do this, you will need to collect all the data relating to a specific area. They can be found on the official websites of various services or obtained directly from the services. When taking readings, knowledge of many formulas will be required. But even the use of online assistants may not help, since important factors that can only be assessed while staying at a specific site will be missed. If you turn to specialists who have already performed dozens of calculations for a specific region, you can be sure that they have a good knowledge of all the nuances of the soil in the area. In addition, professional services involve the issuance of specific documents that will be required when obtaining the necessary permits for construction.
Construction process
Each foundation design option has its own construction nuances, so it’s worth considering step-by-step instructions for several options. The first of these will be a monolithic columnar foundation.
Monolithic option
After drawing up the design design, it’s time for practical work. The first step is to prepare and mark out the area for a monolithic columnar foundation.

As you can see in the photo above, it is necessary to pre-mark the area where the structure will be located. To do this, the corners of the building are marked with pegs. A well-marked rope or twine is stretched between the latter. Particular precision of angles is not required, since the marking of the structure is carried out for preliminary preparation of the area for construction.

The next step is to remove the top layer of soil along with the vegetation that is located on it. To make work easier, you can compact the area to make it easier to move around.

When the preliminary stage is completed, you can move on to more precise marking of the foundation structure. To do this, the corner pegs are placed exactly in their places, and the distance between them is checked. It is also necessary to determine whether the diagonals of the resulting figure of the future foundation structure are equal. If they do not match, then it is worth finding out which of the corners has the wrong angle and moving one or more columns.

In accordance with the developed project, markings are applied to the columns that will be installed later. For these purposes, additional stakes and ropes are used. The latter are stretched in places where rows of columns will pass. The photo shows that the string, which is stretched in the middle, marks the edge of the pillars of the foundation structure. Simultaneously with this procedure, notes are made on where exactly the columns for the foundation will be located.
If you pay attention to the photo above, you can see that the master specifically marks the boundaries of the pit for the post. To do this, four pieces of reinforcement are driven in along its edges, which makes orientation easier during digging. You can start with it immediately after marking a specific element of the foundation structure. This can be done mechanically or manually. Everything will depend on the quality of the soil that exists in a particular area. A square heel with a side size of 40 cm is considered standard, but in certain cases it can be increased to 80 cm. It is this size plus the gap for the formwork that the foundation pit for the column should be.

The distance between individual pillars of the structure can vary from one to three meters. When the pit for the foundation column is ready, it is necessary to waterproof the lower part, where the heel of the supporting element will be poured. In the photo above you can see that for this purpose a polyethylene oilcloth is laid on the bottom. The density of the oilcloth should be 200 microns. It is located with a twist on the walls. Additional waterproofing and at the same time formwork for the structure is bikrost, roofing felt or similar material that does not have powder. Waterproofing can be fixed to the wall using nails or other fasteners. Subsequently, it will be pressed down by concrete. The height of such formwork should be equal to the height of the heel, which will be poured under the column.

The next step in constructing a columnar foundation structure is the preparation of reinforcing elements that will be poured with concrete. For these purposes, rods with ribs that have a diameter of 10 mm or more are used. It is necessary to calculate the elements in such a way that the heel is larger in size, and the vertical reinforcement corresponds to the post. The height of the reinforcement must be sufficient to combine the pillars with the monolithic foundation grillage, which will be poured later.

To make it easier to bend the reinforcement, you can make a similar device to the one shown in the photo above. For this, two metal corners are used, which are screwed to the wall. Moreover, their length is equal to the length of the element that will bend. The distance between the two strips is equal to the diameter of the reinforcement that is used for the foundation. To make it easier to bend the rods, you can use a metal pipe as a lever.

To make the crate easier to assemble, stands are made, as shown in the photo above. A support is screwed to the vertical plane, in which notches are made at a distance of reinforcement bars that will be embedded in the column. Additionally, a stand is made, which can be rearranged depending on the length of the reinforcement. She can be seen on the right.

After this, the horizontal structural elements are distributed at an equal distance. To do this, use a tape measure or other device. The next step is to lay two more vertical posts, as seen in the photo above. To fix the structural modules together, it is necessary to use a binding wire that securely clamps them in place. For knitting, you can make a small hook yourself, which will simplify the task.

Reinforcement under the heel is performed separately and is represented by a small square in which rods are laid perpendicularly, as shown in the photo above. They are tied at all intersection points to ensure reliable fixation.

Next, preparation of the support stands of the structure is carried out, which will raise the reinforcement under the heel and under the column a short distance from the ground. This is necessary so that the element is filled with concrete mortar and from below.

The reinforcement for the heel structure is installed on plastic legs, and the reinforcement for the posts is fixed on top. All elements are tied together with knitting wire. So that it turns out as shown in the photo below.

Once the reinforcing elements for the columnar foundation structure are ready, formwork is manufactured for each column. An OBS board with a thickness of more than 12 mm is perfect for this. If you take a material with a smaller thickness, it will bend under the pressure of the concrete solution. To properly reinforce a columnar foundation, concrete must cover the mesh by at least 5 cm on each side. This means that the length and width must be 10 cm greater than the reinforcing elements. The height can be 5 cm greater.

To fasten the walls of the formwork under the posts together, hangers for a plasterboard profile are suitable. In this case, the middle part of the structure is cut out and only perforated strips remain, which are bent into the corners, as shown in the photo below. They are screwed to the walls and combine them into the required structure.

When all the elements are ready, they are assembled into a common structure, which will ensure high-quality pouring of the foundation.

In order for the OSB structure under the foundation columns to have a sufficient water-repellent effect and not to swell under the influence of moisture from the solution, it must be covered with cold-prepared bitumen mastic. This is done both externally and internally.

The next step is to install the armored belt under the foundation structure in the prepared pits.

It is necessary to place the frame exactly in the middle of the prepared pit so that the concrete solution can freely and evenly fill the space around the structure. In addition, the structure must be exactly vertical and level. To achieve this, you can resort to the trick, which is shown in the photo below.

A regular bubble level is used to achieve a vertical position of the structure. After that, the reinforcing base is tied to an additionally laid beam so that there is no displacement during pouring. The beam is fixed with weights in the form of bricks or other devices.

In this way, the installation of all elements that are responsible for the stability of the structure of the columnar foundation is carried out.

Next, concrete is mixed for the foundation structure. The columns will be filled in stages. The first step is to fix the heel of the column under the foundation. It is enough to knead for each heel. The mortar for the foundation structure can be laid with a shovel. Its level will be equal to the height of the prepared waterproofing. To evenly distribute the concrete in the heel under the foundation, you will need an electric vibrator. It is lowered into the mortar to fill any voids and remove air that can weaken the structure of the foundation post.

It remains to wait for the time during which the heel under the foundation column will gain strength. As soon as this happens, you can begin to install the formwork for the column, which was prepared from OSB sheets. The formwork is set in such a way that the reinforcement is located in the middle.

If you pour concrete into the formwork without fixing it, this will lead to displacement of the formwork and a violation of the foundation structure. Therefore, it is necessary to perform backfilling, which will fix the formwork under the foundation column. When performing backfill for the foundation structure, soil may get into the column form. To prevent this from happening, the upper part of the formwork structure under the foundation is covered with a thick film, as shown in the photo above.
Additionally, it is fixed to the formwork using a construction stapler so that the oilcloth does not move during operation.

For backfilling, you can use the soil that was taken out during the digging of foundation pits. It is carefully poured between the wall of the pit and the formwork under the foundation column. After that, compaction can be done using a hand rammer, which is easy to make from a log and a small crossbar in the form of a handle.

To protect everyone who will move around the construction site, it is necessary to close the protruding rods with plastic bottles. The latter are easy to find and will do the job perfectly.

To make the backfill dense, you can additionally compact it with water, which will allow the soil to sink under its own weight.
The protective film is removed from the formwork under the foundation column. Small stones remained at the bottom of the structure, as well as other debris that could interfere with good adhesion. To eliminate this, you can remove them using a conventional or industrial vacuum cleaner, the tube of which will be tied to a pole, as shown in the photo above.

Before pouring the next portion of concrete under the foundation, it is necessary to moisten the heel under the foundation, as well as the formwork. This is done for better interaction between the components of the foundation structure. After this, you can fill the column into the prepared formwork. The solution must be compacted with a vibrator to exclude the presence of air in the structure. So that in the process of gaining strength, the column under the foundation does not lose too much moisture, it is necessary to put oilcloth on the reinforcement of the foundation, which prevented the ingress of earth into the column.

After pouring the columns under the foundation, you can begin to dig a trench between the foundation columns. In this case, a trench will be needed to construct a grillage for the foundation. Its depth is calculated in such a way as to place a pillow of gravel and sand in it. The second in this case will be 30 cm, and the first will be enough at 15 cm. In this case, it is also necessary to decide at what level the foundation grillage will be. If it is a little deeper, then it is necessary to go deeper to this level.

The first to be laid is a sand cushion under the foundation structure, which is well compacted. Next, the second cushion is backfilled under the foundation in the form of fine crushed stone. It also needs to be compacted well in order to achieve uniform distribution of the load from the foundation to the ground. For this, a gasoline or electric vibrator is used. It is best to work by placing it perpendicular to the trench under the foundation, so as not to collect rubble along the edges.

When the backfill for the foundation structure is ready, you can proceed to the construction of formwork for the columnar foundation. Wooden beams will be needed. The length of such a beam for foundation formwork should be such that it can be 45 cm immersed in the ground and protrude to the full height of the foundation grillage. To make it easier to hammer the timber into the ground, it must be sharpened from below with an axe, as shown in the photo.

After this, the element is leveled and driven in with a sledgehammer to the required depth. It is necessary to periodically check the level of the structure, as it may go astray. In addition, this will be the key to the correct installation of the formwork under the foundation.

A board is nailed to the installed supports under the formwork. It is necessary to arrange the individual elements for the foundation formwork in such a way that there are no gaps between them.

The foundation formwork board will deform from exposure to moisture, so it must be protected. The easiest way to do this is using plastic wrap. It is fixed to the boards with a construction stapler.

To strengthen the formwork structure, jibs are installed that rest against another rack. Elements are mounted through one rack. The free racks are connected to each other using a knitting wire, as can be seen in the photo below.

Additionally, transverse elements are nailed on top of the structure, which tighten the walls of the foundation formwork together. It is first necessary to lay reinforcement inside, since this will be problematic later.

Note! For reinforcing the foundation, reinforcement with a diameter of 14 mm is used. In this case, the clamps can be made from rods with a diameter of 8 or 10 mm.
The reinforcement that remains protruding from the foundation columns must be bent to intertwine it with the reinforcement for the grillage. It is tied to the rods, which are laid in the formwork using a knitting wire.

When everything is ready, you can pour the foundation with concrete. This is easier to do with a concrete pump, which can be directed along the entire perimeter of the foundation. After pouring, the foundation grillage is processed with a vibrator and leveled with a trowel.

When the foundation has gained a sufficient measure of strength, the formwork can be dismantled and the foundation can be cleared of soil residues. You can clearly see the process of installing the structure of this foundation in the video below.
With brick pillars
This design option is constructed somewhat simpler than the previous one, but it is worth understanding that a columnar foundation made of blocks cannot be used for serious buildings. It is perfect for sheds or arbors, where the weight will be minimal. Marking for this type of foundation structure is carried out in a similar way as for the previous option.

The pits for the foundation columns are constructed with a small margin so that the support pad is slightly larger than the area required to support the blocks. Crushed stone is laid on the bottom of the prepared pit. Its layer can reach 20 cm. It is important to compact the material well. It not only ensures proper distribution of the load, but is also responsible for drainage, which will eliminate the impact of liquid on the laid blocks.

After laying the rubble, sand is poured. Its layer will be ten or more centimeters. It is important to tamp it well and level it in a horizontal plane.

After that, you can proceed to laying blocks. They are leveled and fastened with cement mortar. The second row is laid out perpendicular to the first to ensure ligation of the seams for greater structural strength. On top of the blocks, waterproofing of the foundation is laid in the form of roofing material. It is necessary to prevent moisture from entering the grillage, which can rot from it. A wooden beam with a cross-section of 15 cm is most often used as a grillage for such foundation structures. It is laid along the entire perimeter of the foundation.

At the intersections of the structure, weaving is done using a tenon joint. The photo shows that two beams can also be connected using the half method. In this case, in each of the elements for the foundation grillage, a cut is made to half the thickness and width of the log. After this, the two foundation elements are fixed to each other using a pin or a self-tapping screw with a hex head.
Pile option
The next option for foundation design, which can also be classified as columnar, is a pile foundation with a grillage. For independent construction of the structure, screw piles are suitable, which are easiest to install without additional equipment. Such a foundation is sufficiently reliable and allows it to be anchored in strong layers of soil. This is done quite simply, since piles for such a foundation can be selected in a wide variety of lengths. The only question will be the convenience of screwing them in. In some cases, additional platforms will be required when work begins. But most often such a foundation is installed without them.
The issue of marking for a foundation design based on screw piles at the initial stage is relative. This is due to the fact that during work you should push off from the first pile. Its installation for the foundation is determined by the plan, which indicates exactly how the house should be located on the site. It is necessary to choose any corner of the foundation from which it will be convenient to start work. This pile will be the starting point from which it will be easy to make the rest of the measurements for the foundation.

It will be easier to install the pile if you prepare a small pit for it. Typically, a depth of 30 cm is sufficient for these purposes. The diameter of the pit is made slightly larger than the diameter of the foundation pile. You can dig it out with a garden drill, if its diameter allows this, or with a regular shovel.

It will be easier to install such a foundation if you do not just screw in the pile using a lever that is inserted into the hole, but with a special device. You can rent a pile sleeve, as shown in the photo above. Thanks to the arcs that are located on the sides of the coupling, it is easier to transmit force from the lever, which is in any position. In this case, the immersion of the pile under the foundation proceeds smoothly. Rotating a pile under the foundation through a hole that is located on top is not always convenient, since there may be restrictions on the area of movement around the pile.

As a lever that will be used to immerse the pile into the ground, one pipe will not be enough, since the direction of the force that will be applied with its help can change the position of the foundation pile, which is very inconvenient. To build the structure you will need at least two levers. The length of each is from three meters. In some cases, longer levers will be required to properly install the structure if the pile must lie quite deep.

To make installation of the structure easier, at least three people are required. Two of them act on levers. The third person’s task at the initial stage is to keep the pile in a vertical position. As long as the main part of the pile is on the surface, there is no point in using a bubble level for the structure. This is due to the fact that the pile still has a significant amplitude of movement.
Note! The wall thickness of the lever must be at least 3 mm in order to provide the required force for screwing in the pile.

Screwing occurs clockwise. This can be determined by the direction of the screw at the end of the pile structure. As you can see in the photo, the main load during screwing of the structure for the one who holds it in a vertical position falls not on the hands, but on the shoulder. Hands act as assistants, since it is almost impossible to grasp a pile of such diameter well. The emphasis is supported by half-bent legs and widely spaced legs.

As soon as most of the pile structure is in the ground, it is necessary to increase the force, since screwing will be more difficult. To do this, the levers are extended to their maximum distance so that only a small part engages the coupling arcs.

As soon as it becomes clear that the pile has taken a good position and is firmly held by the soil, you can proceed to the precise vertical positioning of the structure. To do this, you will need a level that can be fixed to the body of the pile with a magnet. The photo shows that the level is located on the pile for a reason. It is placed perpendicular to the two support arms. This is the only way to correctly track the position of the pile. To make monitoring easier, you can use another level, which is installed directly under the lever.

When the level is in place, you need to position the structure in a slightly different way. If in the previous version the pile was held by the shoulders, now it must be leveled with the weight of the body, directing it in the opposite direction from the one in which the pile is tilting. Support is also provided on legs widely spaced and bent at the knees.

The deeper the pile goes, the more effort will have to be made to guide and rotate it. You may have to enlist the help of a few more people, as can be seen in the photo.

When the installation of the first element of the foundation structure is completed, it is necessary to determine the point at which the second corner pile will be located, which is in line with the first. Measurements are best taken at the centers of the circles. This means that the end of the tape measure is installed on the central part of the pipe. The distance to the center of the second pile for the foundation is measured. It will be equal to the total length or width of the house, from which the width of one wall is subtracted. Once the distance is determined, it is necessary to position the foundation piles on the same line. The easiest way for these purposes is to find a common landmark, for example, a fence, and place the foundation structure at the same distance from it.

The second pile is screwed in in the same way as the first. But now it is necessary to monitor not only the vertical level of the foundation pile, but also the distance at which it is located from the first pile. If in the process there is a need to adjust the position of the structure, then you should not act by simply tilting it in the intended direction. The photo shows that the pile must be tilted in the opposite direction to the one in which it is necessary to align the pile. After this, two turns of the pile are made under the foundation, and it is leveled to a vertical position. If this fails to achieve the desired effect, then the operation must be repeated.

When two piles are already in place, you can proceed to the installation of the third. The point of its installation is calculated somewhat more complicated than in the first and second cases. To install the third pile of a columnar foundation structure, you must be guided by the Pythagorean theorem. The width of the building is known, the length is also known, now you need to calculate the diagonal or hypotenuse of the right triangle. To do this, the thickness of the wall is subtracted from the width and length, since the measurement is taken at the centers, and each figure is squared. The sum of the resulting numbers will be the size of the diagonal. The photo shows that one of the ways to mark the third point of the foundation structure is to use two tape measures. At the intersection of the required values, the location of the third pile is located.
Note! If you don’t have two long tape measures, then you can use twine on which the required size is marked.

After determining the location of the third pile under the columnar foundation, preliminary installation of the pile is carried out in the pit prepared for it. Once it is securely in place, it is necessary to re-measure to ensure that the foundation pile is in place. If there are certain errors, then it is necessary to level the foundation pile in the manner described above.

When the installation of the pile in place is completed, it is necessary to further secure it. To do this, the pit that was dug earlier is filled with soil. It is important to compact the latter well so that the upper part of the foundation pile does not become loose.

The fourth pile under the foundation is also mounted using the diagonal and wall dimensions. In this case, all the indicators are known, so you can use tape measures or twine and screw the pile into place under the foundation. Periodically, when screwing the pile into place, it is necessary to check whether the distances at which it should be in relation to other piles are maintained.

The support of the entire structure is ready, now it will be easier to install the remaining piles under the foundation. For these purposes, a string is stretched between all risers. It must be located as close to the ground as possible. It will be easier to operate if two strings are pulled between the foundation piles, which will mark the corridor in which the piles should be located. Each wall is divided into two halves. The resulting size is marked on a stretched string and a pit is dug under it for the pile of the future foundation. This must be done on all four sides of the house.

During screwing, you must ensure that the marked point is in the center of the pile pipe. All foundation piles are immersed to the required level.

Foundation piles will also be required for interior walls. To mark them, you can use the intersection points between the lines of existing piles. To do this, ropes are stretched between the piles, which are clearly visible. At the intersection points, where necessary, a pit is prepared and the pile is screwed in. At the same time, it should be positioned in such a way as not to strain the rope or deflect it. It is important to monitor the level of the foundation pile throughout the screwing process.

The pile should be located at the intersection of the stretched ropes as shown in the photo above. The ropes are tangential, so the center of the foundation pile does not coincide with the center of the pile that will be screwed in.

As soon as all the piles are installed in their places, it is necessary to trim them to a horizontal level. This will allow you to correctly position the foundation even on an inclined area. For this purpose, you can use two tools. One of them is a laser level. It's easier to use. It is enough to position the beam at the required height and project it onto the pile body. After that, markings are applied to the piles for the foundation and trimmed with a grinder.

Another option is to use a water level. Before use, it must be well aligned to eliminate any bends. Further, the container in which the water for the hydraulic level is located is installed on one of the piles. One of the masters lowers part of the tube into the container, and the second creates a vacuum so that water under its own pressure begins to fill the tube.

Next, the functionality of the hydraulic level is checked. Its two ends are connected together and a certain time is waited. After it has passed, the liquid in the two nozzles should reach the same general level. If this happens, then you can proceed to the process of measuring the height for the foundation piles. If not, then you should carefully examine it and identify kinks or places where airing has occurred.
Note! The longer the hydraulic level, the more time it takes for the liquid inside it to calm down.

On one of the corner piles of the foundation, a point is displayed where all foundation piles should be located. One part of the hydraulic level is applied to it, and the second is brought to the next corner pile. As soon as the water level calms down, you can make a mark on the pile, along which cutting will be performed. This way the mark is transferred to all corner piles of the foundation.

To mark the line over the entire area of the foundation pile, it is necessary to make a pattern from a plastic pipe, which will be cut on one side for ease of installation on the pipe. Using a marker, draw a circle.

To transfer the marking line to the rest of the piles, which are in the middle of the foundation structure, it is necessary to pull a strong fishing line along the marks on the extreme piles. It will be the indicator of the required line. After this, marking is carried out with a marker at the selected point. Using the prepared pattern, a line is drawn over the entire area of the piles.

As soon as the marking of the piles for the foundation is completed, you can proceed to trimming all the elements along the drawn lines.

The next step is to fill the installed screw piles for the foundation. This is not done with concrete, but with an ordinary cement-sand mortar in a ratio of three to one. The solution must be liquid enough to fill the pile cavity. The purpose of this procedure is not to impart additional rigidity to the foundation, but to prevent the exposure of the internal walls of the pile to oxygen, which could lead to corrosion and destruction of the foundation. Filling is not done to the very top. It is necessary to leave a gap of 10 cm. It is filled with a dry mixture, which can be purchased ready-made.

The next step is to install the head on the pile. It must be located on a horizontal surface. The purpose of the head is to hold the grillage on which the walls will be fixed. The head is welded to the pile so that the fixation is as reliable as possible.

Welding seams are cleaned and coated with paint, which will protect them from corrosion. A video of the complete process of constructing this type of foundation is below.
Summary
As you can see, the columnar foundation is a fairly common design. It is an indispensable option when it is planned to build a small lightweight building. The last one can be a rounded log or frame. When laying the foundation, it is important to take into account all the features of the soil, as well as other parameters that were described in the article.
The foundation is an important element of any bathhouse, which ensures its durability, wear resistance and reliable operation.
The choice of the most suitable type of foundation is carried out at the planning stage of the future structure.
A standard columnar foundation is the best option for the construction of lightweight bathhouses - panel, frame, wood and foam blocks.
Building such a foundation with your own hands is quite simple; our step-by-step instructions will allow you to follow the step-by-step execution of the work.
Key Features
The columnar foundation, made for modern lightweight frame-type baths weighing up to 1000 kg/cubic m, is characterized by simplicity, accessibility and low cost of arrangement.
The support-column foundation has significant advantages that distinguish it favorably from other types of foundations:
- The design and calculation of a columnar foundation can be done on your own, without the use of additional equipment or the involvement of third parties;
- A foundation of this type can be installed on any soil with a low level of heaving and deep groundwater;
- Laying the foundation is possible in areas with significant differences at different points;
- The construction of a columnar foundation is carried out in a short time. Minimum period – 14 days;
- High strength and durability of the finished structure is ensured (the minimum service life of such a base is 50 years);
- Low cost of consumables and construction work.
Among the significant disadvantages are the following factors:
- The base is not suitable for the construction of heavy structures made of brick, concrete, cinder block;
- This type of foundation is not recommended for bathhouses equipped with basements;
- To protect against increased moisture, additional installation of a waterproofing layer is required.
Types of columnar foundations
The columnar foundation for a bathhouse or a residential building structurally consists of special supports (pillars) installed in the ground at a level of up to 155 cm with a protrusion from 0.25 to 0.55 m in the ground part.
Installation of supports is carried out at the corner points of the structure, as well as at the junction of walls with partitions. If there is a slope at the construction site, it is recommended to install additional supporting elements up to 3.6 meters long.
The main elements can be located at a distance of 150 to 300 cm from each other.
A distinctive characteristic of such a base is the arrangement of a grillage - a special system consisting of rand beams and strapping supports. It is designed for uniform and safe distribution of mechanical load on the finished base.
For frame and wooden baths, beams or logs made of wood are used as strapping elements; for concrete and brick structures, channels and beams made of metal are used.
Before you build a columnar foundation with your own hands, you should determine the type of landscape and the technology for constructing the structure. This affects the choice of building materials for the foundation and its depth.
Basic building materials
To build foundations of this type, the following materials are used:
- Pipes made of asbestos cement, metal and plastic;
- Blocks;
- Frost-resistant brick;
- Stone;
- Iron and rubble concrete;
- Tree.
When choosing a certain type of material, it is important to correctly calculate the bearing capacity coefficient, on the basis of which a suitable support section is determined.
For structures made of concrete and blocks, a support with a cross section of 45 cm is sufficient, for concrete and rubble - up to 65 cm. When using pipes with a diameter of up to 35 cm, it is additionally recommended to strengthen the hollow structure with a frame made of fine reinforcement and concrete mixture.
Laying depth
A similar parameter is determined by the design and technical features of the future foundation, as well as the geological indicators of the soil.
According to the depth of laying, a columnar foundation for a bathhouse can be:
- Buried - the level of the bookmark is below the permissible mark of possible freezing of the soil;
- Shallow - depth ranges from 45 to 75 cm from the top soil level;
- Non-buried - located in the upper part of the soil. At the installation points of the supports, the top layer of the earth is removed and filled with non-metallic type material.
According to the construction technology, foundations can be monolithic or prefabricated.
The most popular options for monolithic foundations are:
- Columnar strip foundation. It is intended for the construction of frame-type structures and wooden buildings - residential buildings, gazebos and baths. It is characterized by simplicity of arrangement and reliability of operation. The basis of the foundation are special holes in the ground, where the reinforcement is installed and the concrete mixture is poured. The finished column can withstand maximum loads of up to 16 tons;
- Reinforced concrete columnar foundation. Possesses the increased durability, wear resistance and the good bearing ability. It is built from asbestos-cement and metal pipes, installed on a protective cushion of sand and gravel. To increase strength, a reinforcing belt is made.
A monolithic columnar foundation is a fairly practical and economical option that is suitable for the construction of country houses and baths.
We offer you a complete technical manual that will help you make a columnar foundation with your own hands in a short time.
Preparatory and design work
At the preparation stage, the future columnar foundation for a bathhouse and a house requires the correct calculation of the bearing capacity of the structure along the cross-section of the supporting pillars.
For a monolithic structure, the minimum permissible cross-section is 25 cm. To increase the stability of the structure, it is recommended to expand the base of the pillars with special ledges: for a height of up to 60 cm, the width should be 120 cm. The permissible pitch for installing pillars is up to 2 meters.
Next, the site is prepared for construction - garbage removal, cutting off the top layer of soil to a depth of 22 cm along the perimeter of the future bathhouse. In this case, it is recommended to make indents from the perimeter of the base up to 200 cm.
The second stage is carrying out horizontal adjustments to the level of the site with the elimination of existing flaws - holes, mounds, hills, crevices. For this, a mixture based on gravel and sand is used.
Marking for support pillars and their installation
The third stage is preparing the marking of the area for the installed support pillars. It is carried out as follows:
- Arrangement of cast-offs - installation of support pillars in the corners at a distance of up to 200 cm from each other. The same scheme is used to move the remaining supports in accordance with the approved development plan;
- Tensioning ropes along the external axes for each load-bearing wall, as well as along the internal axes for partitions;
- Checking the accuracy of diagonals for all internal and external walls.
Installation of pillars requires the preparation of holes, which can be dug manually or using specialized equipment. The depth of the holes is 20 cm, width is up to 50 cm.
Arrangement of sand cushion and reinforced frame
The fourth stage is arranging the pillow. To lay the pillow, a non-metallic and practical material is used, which acts as a support for the future foundation. The pillow manufacturing technology is as follows:
- A layer of dense fine sand – 15 cm;
- The layer of crushed stone of the middle fraction is 18 cm.
Each layer of the pillow is carefully compacted and moistened with water. When constructing a monolithic structure, it is additionally recommended to fix the cushion with a cement-based solution.
The reinforced frame provides additional rigidity, wear resistance and reliability of the finished structure. It is based on hollow pipes made of asbestos cement and metal, which are immersed in earth holes.
A reinforced frame is inserted into the cavity of the pipes and then filled with concrete mixture. When pouring concrete, vibration is required.
The vibration process serves to eliminate air voids and increase the strength of the supports. Reinforcement is performed in the longitudinal direction using A3 reinforcement with a diameter of up to 14 mm. Installation of horizontal jumpers is carried out in increments of 18 cm. For this, metal wire with a diameter of 7 mm is used.
To increase the strength of the finished structure, the base of the pillars is equipped with a monolithic or metal grillage. In such a case, the reinforcing bars should rise above the foundation at a minimum distance of 15 cm.
Waterproofing protection and backfill
To protect the foundation (ground and underground parts) from the effects of precipitation and groundwater, installing a waterproofing layer will help. For this, modern moisture-resistant mastics, rolled roofing felt and thin membranes are used.
After completing the waterproofing work, the cavities between the walls of the earth holes and support beams are filled. For this, regular soil or a mixture based on gravel and sand is used.
Backfilling is carried out in stages, with each previous layer being carefully compacted. The depth of one layer does not exceed 30 cm.
The fence is the base of the bathhouse, which performs aesthetic and protective functions - it improves the appearance of the facade and protects the structure from the penetration of cold and dirt.
The optimal pick-up height is 40 cm.
To ensure natural ventilation, air holes are provided in the intake - vents. In addition, all necessary communications are laid there.
For the construction of the fence, it is allowed to use any building materials - brick, natural stone, cinder block. The finished structure can be faced with tiles, porcelain stoneware, decorative plaster, a ventilated facade, siding or ordinary roofing felt.
Before starting work on arranging the fence, it is recommended to make a cement screed 20 cm thick, which will provide the walls with reliable support.
The columnar foundation is reliable, durable and wear-resistant. Even a beginner can organize the work on its construction.
This foundation technology is successfully used in the construction of bathhouses, residential buildings, technical and utility buildings.
Columnar-type foundations are most suitable for the construction of small and light buildings - garden or country houses, outbuildings, outbuildings, etc. This type of foundation is most suitable for self-construction and saving construction costs, because compared to strip foundations, columnar supports are several times cheaper. The advantage of this design is that there is no need to rent special equipment for excavation work. Meanwhile, it even requires much more labor and financial investments. In addition, a columnar pile foundation can be installed on any type of soil, including rocky, heavily moist or weak ones.
Concrete, as in the case of mortar for brick supports, must gain strength within 2-3 weeks before the grillage and walls can be built on the pillars. A support made of pure concrete is poured into formwork installed in the well and pre-reinforced. On difficult ground or for a heavy building, the support is equipped with a widening - a concrete “sole” or “fifth”.

Advantages and disadvantages of columnar bases
Advantages:
- The cost of materials and construction is 50-75% cheaper than MZLF or other types of foundations;
- Practical guidance for arranging a columnar foundation involves almost no excavation work, with the exception of a few shallow wells;
- All construction work can be carried out by one person - without assistants and special equipment;
- In terms of time, the arrangement of supports can be carried out separately: all the pillars do not have to be erected at the same time, and even one support can be built in parts;
- The columnar foundation puts much less pressure on the ground - pressure occurs only at the points of penetration of the supports, and this property is actively used in areas with difficult soil.
Flaws:
- The main disadvantage is that you cannot make a basement in the house;
- The columnar type of base can only be used for small and / or light buildings;
- For a brick house, such a foundation can only be built with deep immersion of the pillars - more than 1.5 meters. However, with such a depth of immersion, it is easier to lay a pile foundation from ready-made piles, since piles can simply be driven into the ground, even the most moist or heaving, to any depth. Also, on difficult soils, it is more reliable than a strip foundation, with the use of which a basement can also be equipped in a house;
- It is not recommended to build houses made of foam or aerated concrete on columnar supports, since lightweight cellular concrete does not withstand bending loads well, and even in the early years, cracks and other deformations may appear on the walls of the house.

The main advantage that a do-it-yourself columnar foundation has, step-by-step instructions and technology for manufacturing supports are described above, is the construction of housing on heaving soils, which is not permissible for MZLF. Heaving forces act only on the heel of the support, which is significantly smaller in area than the base of the concrete strip, and cannot affect shrinkage and other deformations of the building structure. The ideal columnar foundation is one in which the supports are immersed to a depth below the freezing point of the soil in the region.
To facilitate the immersion of pillars to such a depth, TISE technology is often used, which consists of minimizing labor and financial costs. When using this environmentally friendly technology, columnar supports are built deep in the ground, and the grillage is a monolithic concrete strip, which is built using the technology of constructing a conventional strip foundation, and has only one difference: all construction operations are carried out not in a trench, but on the ground. This original approach to solving the problem of a reliable foundation provides the required protection from the effects of heaving.
But even when using TISE technology, the properties and characteristics of the soil on the site are taken into account: if the relief has significant differences in height (≥ 1.5-2 meters), then the columnar foundation is considered ineffective and unreliable even for light buildings, since the stability of the building as a whole decreases .

Calculation of columnar foundations
It is, of course, better to entrust design work to specialists. But it is quite possible to carry out calculations, for example, for the construction of a light building on a summer cottage.
But for this you need to know a few important data:
- the average depth of soil freezing in the climatic zone in which construction is planned;
- hydrological situation: groundwater level and the likelihood of flood or seasonal fluctuations;
- climatic features of the region and, above all, the amount of winter precipitation, which creates additional load on the structure of the house;

The results will depend on:
- at what depth should the supports be laid - it must be taken into account that it is preferable to place the lower edge below the freezing level, and the pillars should rise above the surface to a height of 0.2-0.5 m;
- section size, which is also determined by the material chosen for construction;
- the number of supports and the distance between them. Columns must be installed under each corner connection of load-bearing walls: external and internal, as well as under house structures whose length exceeds 3-4 m. Local supports must be installed under terraces, stoves, porches, which are independent of the main structure, that is, not combined together with them one grillage.
Step-by-step instructions for building a columnar foundation updated: February 26, 2018 by: zoomfund