Making baskets from willow twigs. How to weave a basket from a wicker with your own hands. Weaving a fence: step-by-step instructions
There is nothing difficult about weaving baskets from wicker for beginners. How I would like to have handmade items at home! A variety of baskets are still widely used in everyday life. A picnic, a hike in the forest, or simply a beautiful gift design - all this is necessarily accompanied by such household items. So why not learn how to make baskets with your own hands instead of buying monotonous models in stores? From vines you can create a huge number of unique creations that will delight the eye and warm the soul.


First steps in weaving
So, first you need to prepare the necessary material for work. How to choose the right rods for work, prepare and store them is described in detail in this article.

But specifically for working with baskets, you should choose willow twigs that are orange, purple or red. Also, the branches should be flexible enough so that they do not break right in your hands when weaving. Blackberry branches are also great for weaving. It is better to collect them in winter, make sure that they are not too long and not too thick. The rods for weaving baskets must be cleared of bark.
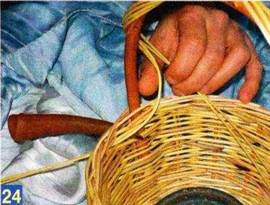
Illustrative examples of making baskets
In order to weave a basket correctly, it is best, of course, to learn from a clear example. There are a lot of video lessons on weaving baskets from wicker. With the help of some of them you can make a beautiful thing without any experience. Here are lessons that will help you quickly understand the tricks of weaving baskets:
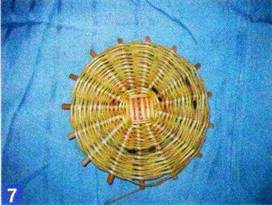
Weaving a round bottom:
Here is another example of basket weaving:
Where to start weaving a basket
As mentioned above, weaving starts from the bottom. The bottom of the basket can be round or oval. Weaving the bottom of a wicker basket can be divided into three stages.
Round bottom 5x5:
1. You should start with a cross, which will use 5 twigs for the longitudinal side and 5 twigs for the transverse side. The sticks must be the same size. Cut a hole in any of these 5 sticks:

We connect the remaining 5 sticks together and insert them into the resulting hole:
With 
The result was the necessary cross, the base of the bottom.
2. Next stage: braiding the cross. To do this you will need 2 long and thin twigs. We insert them into the cut and braid the cross.


3. After the braiding of the cross is completed, braiding should continue, but using the “two-strand rope” technique.


After weaving the first layer using the method indicated in the figure, we continue further, only after one twig.

It is necessary to carefully ensure that the twigs that we braid are at the same distance from each other.
Here's a detailed video tutorial:
The bottom is ready, let's start the second stage
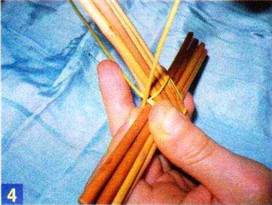
So, the finished bottom is in your hands. Now you need to figure out how to weave the walls of the basket. To do this, we will need longer rods for the frame of the basket, they are also called racks. They are carefully inserted into the bottom using an awl.

After all the posts are inserted, you need to weave another row to secure them. Next, we place a weight on the bottom - it can be a container or something else heavy. The main thing is that the load is smaller in diameter than the bottom of the basket. We collect all the racks into a bundle and tie them together.
People have been weaving from vines since ancient times, only at first they wove from grapevines, which is why the name came about - weaving baskets from high-quality vines, although you can use twigs and other plants (raspberries, blackberries, currants) for weaving, which will be more pliable for beginners. Then man found a more flexible and durable plant - willow. Willow twigs are flexible and do not break like a vine, so large objects, furniture (sofas, tables, shelves, bookcases, chairs), as well as smaller products, boxes, baskets, bread bins, dishes, vases, figurines are woven from it. , photo frames and much more, for which only your imagination is enough.
Many saw wickerwork and some of them also wanted to get such a household item for their own use. Therefore, the question often arises about how to weave large and small baskets from wicker. Weaving it with your own hands is possible and not at all difficult, you just need to stock up on time, patience and materials for weaving.
Photo lesson on weaving baskets from wicker for beginners
Preparation
For beginners in wicker weaving, it will be more useful to prepare the material yourself, i.e. It is necessary to cut one-year-old twigs in large quantities and with a reserve, because for beginners twigs break more often during work. You need to cut off thin twigs with a sharp knife or pruning shears, leaving 3-4 more buds on the branch so that the branch can continue to grow.
Before cutting a large number of vines from a certain bush, you need to check the flexibility of the first cut branch, i.e. you need to bend it in half from the thick end, if it is not cracked, it means it fits and you can cut it further.
To ensure that the vine in the finished product does not change color, it should be soaked, preferably in running water (up to 1 month), steamed in hot water (1-2 hours) or boiled in boiling water (up to 20 minutes), peeled from the bark, and then dry it on a flat surface so that the color is uniform and without stains. Before work itself, the vine should again be soaked in water or wrapped in a wet rag and bag to again give it the flexibility so necessary during weaving.
Material and tools
Material required for the basket: 8 rods for the bottom cross, 7 mm in diameter and 20-25 cm long, for the rigidity of the walls - 15 rods 25-30 cm long, and 5-7 mm in diameter, for braiding - 20-30 pieces of wicker thickness in diameter no more than 4-5 mm, and length up to 1 meter.
Tools that will be needed during work: knife, round nose pliers, pliers, side cutters, awls of different diameters, incl. and a thick curved awl (kochedyk), a weight to hold the work in place and elastic bands or rope.
Weaving bottom
Basket weaving starts from the bottom. You need to take 8 thick rods approximately in length, make a cut in 4 of them, i.e. you need to split it in the middle with a knife or an awl, then insert 4 more rods, so you get a cross bottom.

The braiding of the crosspiece begins with the “rope” technique, the thin ends of two rods are hidden in a crack in the crosspiece, then the rods are separated and one goes above the axes of the crosspiece, the other under the axes, then they change places and so one or two rows pass in a circle.
Then the axes of the cross are divided into two and braided further.

Then you need to make an odd number of rays of the cross, because This is necessary for simple weaving; one of the rods is cut with a side cutter. The rods are moved further apart and the angles between them are made equal so that the bottom is round and the weaving is uniform.

So the weaving continues until the entire length of the rays is braided, the excess ends are cut off.
Basket walls
The next step is to attach 15 side posts into the weave bottom.

It is necessary to bend these posts 90 degrees, set them in a vertical position and tie the upper ends of the posts together with an elastic band or rope.


The border between the bottom and the walls of the basket is then braided with three rods. You need to take three pieces of vines and insert them into the bottom with thin ends near each of the three successively located racks.


The leftmost twig goes around the outside of two posts to the right, goes behind the third post inside and comes out outside near the fourth post. In the same sequence, 2 other twigs of the vine are braided. This is how several rows (2-3 pieces) of braids are woven (the border between the bottom and the walls of the basket) to form a shape.


The weaving of the walls occurs using the usual weaving method, i.e. one rod is behind the counter, the other is in front of the counter.


Basket handle
It is necessary to take a thick rod of the required length and bend it into the shape that the finished handle should look like, sharpen the ends and insert it into the weaving of the wall on both sides.


6 thin rods 2-3 mm thick are inserted next to the thick rod, they are braided around the handle, and if necessary, they are fastened with tape.

First you will need to prepare the rods. To weave a basket we will need rods 2-10 mm thick of different lengths. You can calculate the consumption as follows:
1. For weaving the bottom - approximately 30-50 rods, thickness butt(cut point - thick end of the rod) 2-4 mm, 8 sticks with a diameter of 4-6 mm.
2. For risers (racks) - 16 main ones, 16 additional ones (for bending), 5-10 spare ones, a total of 42 rods, with a butt diameter of 4-6 mm.
3. For the side part - the quantity depends on the number of layered weaves. This model has 5 layer-by-layer weaves, which means that 16 (the number of risers) needs to be multiplied by 5, we get 80 rods, thickness 4-6 mm in the butt.
4. For weaving ropes - 3 ropes of 6 rods each (with replacement) -18 rods, 10 rods in stock, a total of 28 rods, thickness at the butt 4-6 mm.
5. For weaving a handle - 1 thick rod with a butt diameter of 8-10 mm. For braiding you need 8-10 rods, with a diameter at the butt of 5-6 mm, a supply of 5 rods.
TOTAL: approximately 230 rods.
You can watch a video course on preparing rods on the page:
COLLECTION AND PREPARATION OF WILLOW RODS
Basic stages of basket weaving
1. Weaving the bottom 4x4.
DIY willow basket weaving technique
You can weave a 3x3 bottom (for a small basket, or build up risers in the cross). Maybe 5x5. The greater the number of main rods in the crosspiece, the smaller the distance between the risers, which means layer-by-layer weaving looks denser and the work is more aesthetically pleasing. On large bottoms 5x5 or 6x6 you can weave a large basket. You can watch a video on weaving bottoms on the following pages:
WEAVING BOTTOM 3x3
WEAVING BOTTOM 4x4
WEAVING BOTTOM 5x5
2. Next you need to prepare and insert the risers. For a 4x4 bottom you need 16 rods. Be sure to take a supply, because... Risers break during operation and need to be replaced. You can watch a video course on inserting risers into work on the page:
INSERTING RISERS
3. After insertion, the risers must be secured with ropes, first in the plane, thereby securing the bottom, and then again at the bend. Sometimes I fasten the bottom with 1 rope in 3 rods 2 through 1, and the bend with 2 ropes in 3 rods 2 through 1. You can watch a video course on weaving a rope on the page:
LAYER WEAVING IN 1 ROD
In this work I wove layer by layer into 1 rod. In fact, you can braid with 2 or 3 rods, one or 2-3 colors. Colors that can be obtained by ordinary treatment with water (cooking the rods): white, light orange and brown. Options for working with different colors of rods and different types of layered weaving:
5. After the side part is ready, we fasten it with a rope in three rods 1 through 2, the rope on the front side will be under the bend, so I braid this particular rope. You can watch a video course on weaving such a rope on the page:
ROPE IN 3 RODS 1x2
6. We finish the work by weaving the bends. Again, there may be options. In this model I made a false braid; you can use different types of braids or simple curls. You can watch video courses on weaving bends on the pages:
SIMPLE BENDING
FALSE BRAID BEND
6. The final stage of working with the basket is weaving the handle. You can watch a video course on weaving handles on the page:
HANDLE WEAVING
7. After finishing the work, you need to cut off all the remnants of the rods and clean the basket with a brush. This is done to give the surface of the basket a natural shine. Decorative baskets can be treated with wood varnish. But I love natural shine, so I don’t resort to varnish coatings.
How our baskets are created
Wicker baskets are a product that can be used in a variety of areas of our lives. They can serve as ideal packaging for gifts, framing a flower arrangement, as well as a useful household item. Baskets woven from natural materials are very beautiful, which is why they are often used as decorative elements of interiors. Whatever the purpose, wicker baskets are used, they enjoy steady popularity among buyers.
Factory for the production of baskets.
 The basket factory sells its products wholesale.
Master class on crafts made from wicker
We have large production facilities where baskets are created literally from scratch. The first stage of production is obtaining the material, that is, growing the vine. Willow vine is used to make baskets - it is quite soft and easy to weave, but at the same time very durable. The vines are grown in separately designated areas owned by the factory.
Once the vine reaches the required dimensions in length and diameter, it is cut and sent for processing. This process includes sanding, if necessary bleaching for certain models of white baskets or painting with environmentally friendly paints.
Next, the vine, ready for weaving, is sent to the workshops for the production of baskets. This is where our products are created - a variety of baskets for flowers, gifts and other purposes. We create wicker baskets of a wide variety of models, which are developed by our designers. These include deep baskets for gifts and small baskets, models of different shapes, sizes and colors. Some basket models are made using a combination of wicker - light and dark, thin and thick - to create an original weaving pattern and, in fact, the final result.
Finished products are packaged and sent for sale. Baskets are sold from the factory in bulk, in any volume required by the buyer.
Natural materials, high quality.
An important characteristic that all our wicker baskets have is environmental friendliness.
Willow vine is used as the material for creation. Willow vine shoots of different thicknesses allow you to create interesting design solutions for baskets of different models.
Modern technologies for processing wicker and weaving baskets for gifts and other applications make it possible to create high-quality products. Each basket is characterized by high reliability, strong construction, solidly made handles that can hold any load placed in the basket. This makes our wicker baskets versatile, suitable for a variety of needs.
 With large production volumes, the factory maintains excellent product quality. At the same time, natural resources remain untouched due to
using your own willow plantings, intended specifically for creating baskets.
Wholesale baskets are a profitable investment
We offer you to purchase baskets wholesale from the manufacturer. As noted above, these products are in steady demand: baskets for flowers and gifts never go out of fashion, and interesting weaving options and the functionality of baskets help housewives use them to arrange their home life. In this regard, purchasing baskets in bulk is an excellent investment for:
Stores selling consumables, such as flower baskets, etc.;
. flower shops;
. shops and boutiques for gifts and souvenirs;
. stores specializing in household goods.
By purchasing baskets wholesale from the factory, you get a huge price advantage by receiving these great products at cost price.
Who needs wicker baskets? →
How to weave a basket

In the recent past, the ability to weave baskets taught in every family. They wove shoes, baskets, bodies for sleighs, carts, and individual pieces of furniture from wicker. But along with the old way of life, many types of applied art that were widespread at that time began to decline. Gradually, wicker weaving almost disappeared from our everyday life. And then it turned out that the basket for collecting mushrooms and berries cannot be replaced with any bag or bucket. In a wicker basket, the contents are well ventilated, and potatoes, for example, are easily freed from sand - it spills out through the holes. Wicker boxes and baskets are convenient and practical.
Today, due to interest in antiquity, as well as an increase in free time and the desire to make things with your own hands “for home and family,” weaving, like other types of applied art, is experiencing its rebirth.
Which basket to start learning weaving with?
In our opinion, you need to start learning weaving with a simple basket, a durable and beautiful design, which is called cat(photo above). Making such baskets is not difficult. They are distinguished by their capacity, strength, stability (which is especially important when picking berries, mushrooms, potatoes), and are easy to carry (on the arm bent at the elbow). A skillfully made koshik looks beautiful, filled with the gifts of nature, fits well into the interior of a modern apartment, making it more comfortable and homely. In the kitchen and in pantries, onions, garlic, cranberries, potatoes, etc. are stored in baskets.
Amateur weaving does not require a special tool or workshop. All you need is a knife, a piece of wire and pliers.
What are baskets made from?
Branches and twigs are used as material for weaving baskets. First, blanks for the rings are selected. These are branches or shoots of willow, buckthorn, bird cherry, oak, hazel, etc., without damage, knots or other defects. One ring will serve as the handle of the basket, and the other as the base. After inspecting the workpiece, you need to work it on your knee, slightly bending it and securing it with your hands. A loose ring is a compressed spring, and if one of the ends pops out, it can hit hard.
 If the workpiece bends well and does not form any breaks, then a ring can be made from it. To do this, at a distance of 8-20 mm from the end of the branch (depending on the diameter of the thickened part), a smooth cut is made from the outside. The same is done on the thin end of the workpiece, but from the inside. This is necessary so that the thickness of the ring around the entire perimeter is approximately the same. After this, the ring blank is overlapped. First, tie the ends with twine, and then, having made cuts on both sides, carefully tighten them with wire.
Bending a small ring does not require much effort, but when working on the knee with workpieces for large baskets, significant effort and hand support will be required so that the workpiece does not crack or break. The skill is not developed immediately, and therefore, if you fail, you should not despair.
Having made the outer ring, proceed to the inner one. Since it is braided, there are no such high demands on its appearance as on a handle ring. Having made both rings, put them aside and start working on the ribs.
The living lower branches of 10-20-year-old Christmas trees serve as durable material for the ribs of the basket. Having removed such a branch from small twigs and needles, it is worked on the knee, cut to the required length and cleared of bark. The same is done when making ribs from other types of trees or shrubs. The length of the main ribs should be more than half of the inner ring, and the additional ribs should be slightly shorter. The rib should bend evenly along its entire length. To do this, its thick end is cut off, just like the blanks for the ring.
Materials for weaving baskets
The materials for weaving basket baskets are willow twigs, walnut shingles, wire, PVC tubes, etc. The most common and easily accessible are willow twigs. Many willows grow along rivers, in meadows and in low places. However, not all rods are suitable for weaving. Annual shoots 60-80 cm long are used, and the thickness is selected depending on the size of the basket. Twigs prepared in spring and summer can be put into use immediately, while those cut in winter are first warmed up.
The workpiece is cleared of bark, knitted in bunches and stored in a ventilated barn or attic. In winter they are steamed. This rod bends well and is very convenient to work with. If there is a lack of twigs, as well as to make the baskets lighter, the shoots are split in half. Potato baskets are usually woven from unpeeled twigs. Willow wood is used for rings and ribs, and thinner rods are used for weaving.
Sometimes hazel is used to make baskets and boxes. For this, hazel sticks 1.5-2 m long are harvested at the age of 4-6 years. Their diameter at the butt should be from 15 to 30 mm, and the sticks themselves should be straight, without knots or damage. The hazel shoot is cut with a knife or cut down with a hatchet at the very base, so that the butt part does not receive cracks.
Typically, material is prepared for several baskets at once. For beginners, we recommend cutting off a few extra blanks, since not every one will turn into a ring or make shingles the first time.
To make a small basket (for 3-4 liters of berries), it takes 2 hazel blanks for rings and 4-5 for shingles and ribs. Hazel has no waste, since after removing the shingles, the core is used for ribs. The shingles are obtained as follows. The hazel is first slightly bent at the knee along its entire length, and then an incision is made with a depth of 1-2 annual layers per ¼ of the length of the stick’s circumference. From the cut, as a result of bending, the shingles peel off. The hazel is taken under the arm and the shingles are carefully peeled off along the entire length. As you gain skill, this operation is performed more and more confidently. The main thing is to “feel the layer.” In the same way, shingles are torn off from the opposite side and from the sides.
The hazel shingles are completely removed from the entire workpiece. After peeling it with a knife, it is immediately used for weaving, since when it dries it becomes brittle. Making hazel shingles requires experience. Therefore, it is better to start weaving your first cat from willow twigs. In addition to willow rod and hazel shingles, the roots of pine, spruce and other trees are also used for weaving. Usually roots 0 to 10 mm are used. They are carefully removed from the ground and, without tearing them off, begin to be lifted in one direction and then in the other. Thus, sometimes it is possible to obtain a root 3-4 m long. It is split in half; peeled from the bark and used for weaving. Weaving from roots is quick, the products are light and elegant.
Nowadays, wire is sometimes used for rings and ribs, and artificial materials of different profiles (round, oval, flat) and colors are used for weaving. These materials, unlike natural ones, are recommended to be used during the initial acquaintance with the design and weaving of baskets - for educational purposes. This braid is easy to unravel, and the material can be reused many times. Baskets woven using plastic materials look elegant, but they have significant drawback: It’s much more pleasant to pick and take a handful of berries from a bag made from natural materials.
Four steps to weaving a basket


- Braiding the cross. We insert one ring at a right angle. Then we take the prepared rod (shingles, root) and, holding one end between the rings, we braid the cross, as shown in the photo. We tuck the end in and tighten it. We also braid the second cross.
- Next, insert the first three ribs on each side with sharp ends. We braid them first on one side and then on the other. We check whether both halves of the cat are symmetrical. To do this, tie a cord around the middle of the rib. If the contours of the future basket are successful, weaving continues. When the distance between the ribs increases, additional sections are inserted into the spaces between them.
- At the end of the weaving, when all the ribs are inserted, it may happen that the inner ring of the weaving comes to an end, but there is still a gap in the middle.
In this case, it is necessary to align the basket along the entire length by parallel weaving on each side. In this case, the ends of each twig (shingles or roots) are placed under the rib and cut off.
- When braiding the last rows, threading a twig between the ribs is reminiscent of sewing with a needle: it is pulled with force so that there is uniform density and symmetrical alternation. Finishing of a woven product involves removing burrs, cutting off the long ends of the rods, and cleaning with a file or sandpaper.
Try to weave the simplest cat basket. This is not just useful, but also a very exciting activity.
If you are attracted by the original design and elegant appearance of wicker baskets, then you can safely purchase them for home use - you will not be disappointed.
Wicker weave
In addition to their external characteristics, wicker baskets have many advantages:
- The products are made from environmentally friendly natural material - willow vine
- The density of the weave allows you to adjust the level of breathability inside the product
- Willow rod gives products lightness, strength and durability
- Products of any complexity are made by hand by craftsmen
- Wicker baskets are sold at low prices due to the availability of the material
- Products can be painted and varnished to better match the interior
Purchasing wicker products makes you think about how to maintain their neat appearance for a long time and prevent damage. We will please you with the fact that another significant advantage of products made from wicker is their easy care.
As a rule, wicker containers for any purpose, be it vegetable storage boxes, baskets under bathroom sinks, external furniture baskets or built-in baskets for cabinets, do not require special external cleaning. They simply need to be wiped with a dry or damp lint-free cloth. Vegetable baskets and bread bins, of course, need to be emptied periodically by shaking out accumulated debris and crumbs, and the rest depending on their current condition. If you have used a basket to harvest fruits, berries or mushrooms and it gets dirty, just wash it with water or soapy water, rinse well and dry.
When stains appear on a wicker basket, just dry cleaning and rinsing is no longer enough. You will have to dilute the detergent solution with salt and rub it on the contaminated areas using a sponge or soft brush. Then rinse the product with non-hot water and leave to dry away from heating devices and direct sunlight.
Do not use abrasive detergents when cleaning wicker products - this may damage the surface. The same goes for sand or soil particles that accumulate in the crevices of baskets if they are used for gardening. You must first carefully remove the sand and only then wipe the product. If scratches do appear, they will be especially noticeable on the surface of a large basket. To get rid of them, just lightly coat the damaged areas with polyurethane varnish.
To extend the life of wicker products, try not to expose them to too dry air and high temperatures - this can cause cracks in willow baskets. But wicker products are resistant to dampness. This, of course, does not mean that baskets should be left out in the rain. The best thing is to store wicker baskets at normal levels of temperature and humidity. Note that minor deformation of the basket, like a dent, can be eliminated by soaking the area with water until it becomes flexible and trying to return the product to its previous shape.
By the way, if wicker baskets that have already been in use clearly lack their original shine and color, it’s time to get down to business and return them to their former appearance. There are several ways to correct the situation. You can, for example, apply a thin layer of drying oil on the surface of wicker baskets that need restoration. Let the drying oil dry and then cover with a layer of clear varnish. You will immediately notice how your wicker products have changed and become “younger”. And in order to change the shade of the baskets, you should use wood stain. The surface of the product, lightly cleaned with fine sandpaper, should be covered with stain in several layers. A medium-sized, not too hard brush is suitable for this. When the stain is absorbed and dries, you can coat the surface with a transparent colorless varnish.
Did you know that willow wickerwork changes its color to a darker color over time? This is explained by the fact that pigmentation processes under the influence of tannins and dyes contained in willow branches continue in finished baskets woven from them. New products, especially from twigs that have been “barked”—the bark removed artificially or naturally—are usually white. Over the years, the color of wicker baskets acquires shades depending on the type of vine used: from golden and copper to chocolate.
This article is published to replace my old guide; to see the old version look here www.bushcraft.ridgeonnet.com/basic_basket_old_version.htm
I'll start with an introduction to simple terminology...
When you look at the bottom of the basket, the strong straight rods radiating out from the center are called "Spokes". After they are folded up to form the walls, I call them "Racks". (These straight bars creating a profile are usually called “Box”)
All sections of willow that bend between the spokes/posts are called “Weavers” (traditionally called “Weft”).
My knowledge and experience of basket weaving is based on self-teaching. I have not taken any specialized courses, so the instructions below describe my own methods. A specialist may use a technique that differs slightly from my method of making this type of product. Not being an expert, I still want to present my knowledge about basket weaving in this article.

I collect willow twigs for baskets in the countryside. Not all types of willow are suitable for making baskets; some of them produce too brittle a material that cracks when bent too hard during the making of the basket edges. When I'm looking for a suitable willow tree, I simply bend the branch 90 degrees or more, and if it cracks, it's not suitable for the basket... and I have to look for other options. Often the best option is willow with bark colored red, purple and orange. I don't know any names of willow species, I just know what is best and what is worst from what I see.
If you do not have the opportunity to collect the willow yourself, you can buy ready-made rods. Musgrove's Willow (http://www.musgrovewillows.co.uk/) is an excellent company where you can buy about 700 rods for about £20, including postage.
If the collected rods are damp, they must be dried. Baskets made from freshly cut twigs filled with sap lose their shape after a while and become loose. When a willow tree is dried, its bark wrinkles slightly.
Before you start weaving, the rods must be pre-soaked to make them more flexible. If the willow branches have retained their bark, then soaking may take about 1 week. Many people recommend wrapping the rods in a damp cloth and leaving them overnight to “ripen”.
You don't need many tools to make a simple basket like the one pictured. All you need is a pocket knife, pruning shears and possibly an awl. I've made baskets before using just a knife, but using pruners makes the job easier! 
Cut 8 twigs from a thick shoot. Cut them approximately from your elbow to your fingertips. 
Make a split a few centimeters long in the center of four of these branches. 
Insert whole rods into the split to form a cross. It's called "Slath".
(alternate thick and thin ends to even them out) 


Carefully select the thinnest and longest shoots from the collected branches, this will allow you to make good weaving from the very beginning. Take two rods and insert their thin ends into the slot as shown here... 


First we will use a weaving technique called “Twining”. This is a very simple weaving method and is good for firmly holding knitting needles and posts together. The technique consists of holding two knitting rods and twisting them one after the other so that they change places. Each bend always goes in the same direction. After each bend, the next knitting needle (or knitting needles in this case) is placed between the two knitting rods and then the next bend begins... thus holding them in place. Look at the photo... it really is very simple!
Braid four needles around. Make two rows. 


When you have finished weaving two rows around each row of four needles, start braiding each needle individually. Bend each needle outward to braid them one by one. Space the spokes evenly so that when we finish one row of weaving, we end up with evenly spaced spokes, like the spokes of a bicycle wheel. Make a couple more rows of weaving using this method. 


At some point you will get close to the end of the tying rods and will need to extend them. It is better not to add two new rods at once. Look at the photo, in this example I am replacing rod “B” with a new rod labeled “A”. I took rod A, sharpened the end, then slipped it between the rods of the last two rows, then bent it following the weaving order of the old knitting. Now I can cut the old rod B and continue weaving the basket.
When replacing one rod with another, keep the thick end thick and the thin end thin. 
Replacing the second old rod must be carried out a little further in a circle from replacing the first. 
Once you have woven a couple of rows around the knitting needles, we stop using the twisted weaving method and continue to weave in a simple way, which consists of simply running the rod around the inside and outside of the knitting needle. You continue to weave in this manner until the base expands to the desired diameter. However, in order to correctly perform this simple type of weaving, we need an odd number of knitting needles. We have 16 spokes, so we should add one more. Just place it between the rods of the last couple of rows. Sometimes it can be difficult to push a new needle in, so use an awl to widen the hole (if you don't have an awl, you can use a thick metal nail). 

Cut one of the knitting rods and continue to weave as usual, inside and out around the needles. 
To add a new tying rod, place the new one next to the old one and continue weaving. 
Continue weaving until you have weaved the bottom to the desired diameter. In my case, the bottom was made with a diameter of 8 inches. 

The bottom may take on a concave shape... this is good, because... this will give stability to the basket. You can increase the bend by constantly pressing down on the needles as you weave. 
It's time to form the walls of the basket. At this stage, use willow shoots of medium thickness, you will need one for each knitting needle. Sharpen the thick end of each of them. 

Now you need to place a new willow shoot into the weave along each spoke. If you look closely at a willow shoot, you will notice that the thick end is slightly curved; Place each shoot with the concave side facing down. 

Cut off the ends of the old rods at the level of the edge of the binding. 

Now take one of your new posts and bend it down to the left under the two adjacent rods, then turn it up as shown in the first two photos below. Now take the next rod on the left and bend it too. Continue weaving the basket in the same way in a circle. It's a bit of a challenge to keep the posts in place, but try your best.
At this stage, the racks can simply be bent upward, but it is better to bend them as described above, because this makes it possible to create an edge that gives the basket greater stability. 


The last two rods of the racks will not have subsequent racks so that they can be bent; so they just need to be screwed around the first posts. When you twist the last two rods, everything will be tightly connected.
Tie the rods of the racks together at the upper ends so that they do not fall out of their places. 


Now you can start weaving the sides of the basket. You can simply start the main weave immediately after bending the uprights, but for the purposes of this tutorial, we will start with a weaving method called "three rod wale". This type of weave gives a nice edge before starting the main weave; and also helps to firmly hold the upturned rods of the racks in the desired position.
To weave “three rods,” place three new rods along three adjacent posts. Take the leftmost rod and bend it to the right in front of two adjacent posts, then behind the third; and then go back forward. Now take the next rod and repeat the action; then the next one, etc... 


When you finish weaving the second row with three rods, you can untie the upper ends of the rods of the posts. 

Now we can start weaving with the basic method that forms the supporting sides of the basket.
We will use a type of weaving called “French Randing”. This type of weaving is very popular; with its help you can make smooth walls and weave much faster at a good pace.
First of all, you need to add one rod to each post around the circumference of the basket. Choose good, long, thin rods of equal length. Add the twigs one by one so that the direction of the growing tips of the shoots is towards the left hand. Place the butt end behind the post rod, then pass it in front of the next post on the left, then behind the third post, then bring it forward. The binding rod will hold itself in place. Now add the next rod, place the butt behind the next post on the right; weave over the end of the previous rod in the same way. Continue adding rods until you have weaved the entire basket.
Now let's start braiding... start with any knitting rod, just braid it to the left using the same method you used before: forward, back, then forward again. Then take the next weaving rod on the right and do the same... that's it, just continue weaving around the circumference of the basket. 


When you return in a circle to the place where you started weaving, you will see that two knitting rods, instead of one, ended up behind two rods of the posts. You may be confused about which tying rod to start with... Start with the rod that is located at the bottom, then everything will return to order. The photo shows that knitting rod number 1 should be braided before number 2.
Now this row of knitting is completed and you can continue by taking a knitting rod and braiding it in the same way as before. 
Continue weaving using the French welt method until all the knitting rods are braided to the ends. Cut off the individual excess ends of the rods. 

Close the Welt with a row of three rods... 

You can extend the basket to the height you need using the same French welt. One layer of welt will be sufficient for this type of basket. All we need to do now is bend the rods of the posts down and weave them into the edge. There are many different options for edges, which are made by weaving the rods of the posts at the front and back in different combinations. I think you can develop your own design...
For this exact model... take one of the post rods and bend it down to the right. Place them behind the next two posts; in front of the third and fourth pillars; then behind the fifth pillar; then go back forward. Now take the next post on the right and repeat the weaving in the same order. 

The last pair of posts will not be vertical enough to braid around them. However, repeat the same weave, pushing the ends in and out of the edge to achieve the same pattern.
Finally, trim the long ends flush with the edges of the basket. 


If you don't need a handle, then the basket is complete! Great job! 
If you need to add a handle, keep reading...
To form the main part of the handle, you will need a thick flexible shoot of willow or other suitable wood. I used dogwood. Bend it and mark how long the handle you need, then cut it. Point the ends and push them down between the tying rods on opposite sides. 


Now take 4 or 5 long, medium-thick willow shoots and insert them into the weave near the end of the handle 
Wrap these shoots around the handle several times until you reach the other side. Thread the ends under the weave edge of the basket. 


Repeat the last step at the other end to fill the voids in the weave. 
Grab the ends of the rods and pull them so that the braid fits snugly against the handle. Then insert a thin willow rod into the weaving nearby. 

Bend a new piece of willow and begin wrapping it around the ends of the braid to secure the ends in place. After a few turns, hide the end as shown in the illustration. 


Finally, trim the ends. 
The cart is complete! In the center is a basket made entirely of blackberry shoots. To see how to prepare blackberry shoots for baskets, see my old article about baskets.
If you made it to the end, great! 
Excerpt from the old version of the article
Blackberries are an excellent material for many reasons: they dry quickly, are very flexible, beautifully colored, strong, have long shoots and are almost uniform in thickness throughout. I also worked a lot with blackberry shoots without even soaking them before weaving, thereby saving a lot of time.
If you are using willow or blackberry, you will need to dry it. You can tell it has dried out by the loss of weight and shriveled bark. There are several specific species of willow that are suitable for weaving and are best harvested in the winter, if possible in the winter when the sap is less and there are no leaves on the branches.
You may be wondering how to remove thorns from blackberries and make the branches suitable for weaving... the first time I picked blackberries I destroyed a good pair of leather gloves. I have found that it works best to wear leather gloves, but keep a piece of tarpaulin or sturdy material on top. Holding the branch by the growing end, slide your hand (protected by leather or cloth) down the stem, then cut it off at the base. This will be a rough cut to remove all the thorns and leaves, but the stem will still be rough. Set the blackberry shoots aside to dry completely, then push them through the sandpaper while holding it in your hands, this will make the branches smooth and allow you to work with them without problems. The design of the baskets is the same regardless of the material you use. Choose your shoots wisely. Avoid picking blackberries that are too thick or too short to work with and look for long shoots.
Basket weaving is gaining popularity. Now it has become fashionable to place furniture and other handmade items in your house or apartment. It’s especially nice when they are made with your own hands, and not purchased ready-made in stores. You shouldn’t start with complex products; it’s better to choose something simple. For example, weave a basket.
Basket weaving material options
To weave a basket, you can use different materials, including newspaper tubes and plastic bottles. But most often, willow twigs are used. They are pre-harvested and soaked in water or saline, which gives them elasticity. Willow twigs are used to create various products: lampshades, furniture and more.
Wheat or barley straws can also be used. It is quite flexible, so it is convenient to work with it. Products made from this material are airy and have a beautiful golden color.
Birch bark is also suitable for weaving baskets. This material is suitable for children's creativity. Thanks to the unique pattern of birch bark, the products are unique.
But it is from the vine that the most durable baskets are made, which can be used for various purposes.
Master's secrets and tools for weaving baskets
Before you start weaving with wicker, you need to prepare the following tools:
- knives - it is recommended to use a tool of medium length and width with a moderate blade sharpness;
Advice! The knife should be so sharp that it can freely cut thin and medium rods at an angle, but not damage the wood when clearing the bark.
- pliers - it is impossible to work with wire without this tool, although it is used infrequently;
- Phillips screwdriver - self-tapping screws are used to attach the handle to the hoop;
- marking pencil - some elements in the weaving process require preliminary marking;
On a note! It is not necessary to use special marking pencils that are intended for construction work; you can purchase ordinary stationery ones.
- ropes - necessary for tying bunches of vines and fixing some elements;
- base board - the entire work process takes place on it;
Advice! It is desirable that the board be made of hard wood.
- tape measure - needed to mark the hoop;
On a note! It is allowed to use a construction tape measure or an ordinary soft centimeter. You can even use a simple rope for these purposes, which is wrapped around the hoop and then measured with a ruler.
- sandpaper - intended for processing parts in order to give them roughness;
- brushes and varnish - it is advisable to varnish the finished product;
- wire - used to temporarily secure certain elements;
Advice! It is advisable to prepare a soft wire made of aluminum or copper, having a diameter of about 2 mm.
- self-tapping screws - designed for attaching the handle.
On a note! If a fabric handle is provided, there is no need for self-tapping screws.
The diagram below shows the main weaving methods

Step by step weaving a basket from a vine
A master class for beginners on weaving an openwork basket from wicker is presented below. The following steps are performed step by step:

The wicker basket is ready.
Video with lessons on weaving an openwork basket
The Kovalenko brothers became famous in this craft. Many videos have been created with their participation. Below are some of them.
Video: how to weave the bottom of a basket.
Video: how to weave a basket handle.
The lessons of wicker weaving are described in detail in the book by Sidorenko N.V., which is called “Basket Weaving”. The author offers a practical guide with a step-by-step description. Here are the basics for a novice craftsman: preparation, collection of material, weaving process, visual diagrams.

The book can be downloaded in electronic version.
Photos of handmade wicker baskets
Wicker baskets look attractive and are prized for their handcrafted quality.

Ribbons can be used as decoration.

Baskets like the one in the photo are suitable for laundry.


And these are suitable for storing or transporting onions or garlic.


A variety of options allows you to use baskets for different purposes.

Wicker weaving is an interesting activity. It is possible to weave different products, including packaging containers, lampshades or furniture. It is worth noting that they are not the lowest cost. Weaving with wicker requires patience and time, which should be appreciated.