Clock decoupage - step by step instructions for applying a pattern. Features of decoupage watches and photos of the best ideas for implementation. What do-it-yourself clock decoupage design are you looking for? Decoupage lessons clock
Someone draws pictures, assembles furniture on their own, takes amazing photos or knits rugs. And decoupage takes a special place in this list. In fact, decoupage is a kind of applique, familiar to most people since the days of kindergarten. Decoupage decoration takes place exclusively with napkins, both special and ordinary, but with interesting patterns. The design is varnished, and then it becomes incredibly similar to a skillful painting.
Since such a technique is only gaining momentum, the operating instructions are simply irreplaceable. It is easiest to decorate watches, and the path to professionalism begins with them. First you need to select an image.
Which drawing to choose is up to the needlewoman to decide, but the material should be selected more meticulously:
- Multilayer napkins with a pattern;
- Rice paper or special pictures from craft stores;
- You can take and print personal photos, but before starting work, you need to hold them in water for a long time.

Work begins with a wooden clock base, which can be bought at almost any art store. The base must be sanded so that the application lies as evenly as possible.
You can purchase plastic options - they will need to be degreased. A plate is also suitable as a base, only you need to drill a hole in the middle for attaching the arrows. Then the background is made in any possible way. Most often, we are talking about dyeing, aging or sticking rice paper.
The picture needs to be cut out. It is better to carefully tear off with your hands, and not cut with scissors - the torn edge is easier to mask. The drawing is attached to PVA or specialized glue for decoupage. This is the most difficult moment, there should not be a single fold or unevenness. Therefore, for the first time, drawings on rice paper are usually chosen - she will not allow this.
Next, the entire surface must dry. After that, it is covered with a layer of acrylic varnish, and then dries. This scheme must be repeated three times. And after complete drying, the clockwork is attached to the back, the hands and the dial (if needed) are attached. It remains only to insert the battery - and the watch is ready!
Simple decoupage of watch faces
If it is supposed to have a dial on a future wall clock, then you need to decide not only on the appearance.
Can choose:
- Ready drawing with numbers;
- Separate dials;
- Figures made of plastic or wood;
- Apply paint.

Of course, it is most convenient to choose a variant of the drawing with the markup already applied. True, in this situation, the defects will be much more noticeable, and it will no longer be possible to correct the pattern, as is the case with a separate dial. It is very convenient if there is some kind of flaw, it can be covered with a number or markings. The end result is a unique piece of art.
On top of the picture, you can glue ready-made numbers made of plastic or wood, after painting them in any color. True, the numbers will become convex, which does not always look aesthetically pleasing.
You can draw the markup yourself, you just need a steady hand so that the curved lines do not spoil anything. Therefore, if there are no necessary skills, beginner needlewomen are advised to stop at ready-made options.
We make do-it-yourself clock decoupage
It is very important to choose an interesting and beautiful pattern for future watches.
Among the popular:
- landscapes;
- Animals;
- Flowers and plants;
- Fair;
- Abstract patterns.

In addition to the drawing, the clock is decorated with various objects: coffee beans, plastic butterflies, shells or wooden handles (the clock is obtained in the form of a steering wheel), and egg shells are also used. Decoupage with newspapers is very popular, especially in foreign languages.
You can not only create from scratch, but also fantastically transform something already boring. This is especially true of old wooden clocks. They are often decorated with cats, plants and abstraction. And for the mantel clock, the ideas are inexhaustible - you can choose a pattern with imitation of porcelain, marble or stone (so that the mantel clock is combined with the fireplace lining), and even decorate New Year's options with tinsel. Interestingly, drawings are often chosen for decoupage, where there is an imitation of vintage factory dials and other similar topics.
Watch blanks can also be made by hand. If we take the simplest option, then it will be a circle with a hole for the arrows in the middle. But the shape of ordinary round clocks is supplanted by the popularity of square and non-symmetrical figures.
It is very important to start from the place where the clock will hang. In the bedroom, a clock that depicts, for example, a kettle will not be very appropriate.
Do not forget about the desktop clock. The alarm clock can also be decorated using a similar technique. There will be various vintage patterns and cityscapes to the place (you can take the city of Paris as a basis). Particularly popular are shabby chic watches, that is, aged, but still chic. You can buy old watches and restore them, or you can artificially age what you already have.
Blanks for decoupage watches
Almost all components can be purchased at stores that sell items for needlework.
The blanks (in the manufacture of watches) include:
- Watch mechanisms;
- arrows;
- Numbers;
- Stencil;
- Bases made of glass, wood and plastic.

Since decoupage is very popular, you can choose anything to your taste. Accessories can be selected separately, or you can purchase a ready-made set. The form of an unusual base is relevant, for example, in the form of animals (most often decorated with cats) or plants. The pattern may depend on the base, as well as the type of arrows, because beautiful pink arrows are unlikely to fit the fiery pattern.
Pictures for decoupage watches
Of course, the most popular clock designs have a touch of romance.
Most often you can find:
- Flowers;
- dolls;
- Angels;
- Lettering about love;
- Hearts.

Still lifes will also be in place: calm tones will allow you to hang a clock in almost any room and with any style of interior design.
No less popular are reproductions of Renaissance paintings, as well as famous engravings and tapestries. Such watches will suit the pompous palace style, because they emphasize the taste of the owners of the home.
And in children's rooms, you can put a clock with your favorite cartoon characters, animals or toys (for example, Teddy bear). Fortunately, the choice of drawings is limited only by the imagination of the owners.
Decoupage watches in Provence style
It is worth remembering that romantic Provence is part of the country style. It is very close to nature and simple rural life. Decoupage brings this spirit to itself - immediately there are associations with lavender fields and the old French village.
Distinctive features of this style:
- Pastel shades;
- As if sun-bleached color;
- Botanical elements that emphasize the connection with nature.

In general, decoupage in the Provence style suggests the presence of milky shades in combination with pastel colors. Most often these are shades of blue, purple and pink.
Provence is perfectly combined with vintage elements, which will make the watch visually light and incredibly romantic. Especially impressive is a set of kitchen items made in the same technique with the same pattern, for example, mugs, watches and pans. Provence and vintage kitchens will make it much cozier and more comfortable.
But in the hallway, Provence style can be present not only in hours. Such a set would be appropriate: a clock, a calendar and a mirror. All this can be decorated with original floral print frames. A clock with a pendulum decorated with lavender flowers is also very suitable. Such a "house" with a cuckoo will enliven and decorate the interior.
Retro decoupage: record clock
A special place is occupied by retro clocks made from old vinyl records. They are a very good base for watches, and will certainly appeal to all lovers of retro and music.
In order to make such an accessory, you will need:
- The disc itself (you can take a non-working one);
- Printouts with a picture;
- Glue (PVA or specially for decoupage);
- Acrylic paint, preferably in several colors;
- Acrylic lacquer;
- Scissors;
- Various brushes;
- Complete clockwork (that is, with hands);
- Various small details or numbers.

The good thing about a vinyl record is that it has a hole in the middle so you don't have to make another one. It is not at all necessary to completely decorate the record - such a watch, in which the mechanism will simply be inserted, will look incredible. You can add a picture of your favorite singer.
In general, the work process is no different. In the same way, the surface is carefully degreased, if necessary, it is painted. Then, with the help of glue, the drawing is attached, as accurately and evenly as possible. Interestingly, you can add convex details, such as craquelure or even lace. Everything must dry, and then varnished, and the procedure is repeated, in total, three times.
By the way, you can not only leave the watch as it is, but also close it with a special glass for watches - you can find it in the store. True, this applies mainly to standard watch forms.
Watch decoupage master class (video)
Large rhinestones instead of numbers or elements that are related to music (for example, notes) will look great on a vinyl clock. You can look at such watches in large stores like Ikea. It is very important to note that vinyl records most often have a rather large size, therefore, if you want to paint over the entire record, then the picture must be large and clear. Several small ones in a similar style and in approximately the same color scheme will also do. Good luck and creative success!
This section presents step-by-step lessons on decoupage wall clocks. Even if you are a beginner in this type of needlework, detailed master classes with photos on clock decoupage for beginners will help you create a unique interior detail with your own hands.
Decoupage is a fairly ancient art, which today has gained a “second wind”. Using this technique, painting can be imitated: a non-professional is often unable to distinguish a painted surface from a decoupage one.
Original wall clock can serve as an excellent gift or decorate your interior. A variety of materials and patterns for decoupage will allow you to create a clock that will suit any environment.
What do you need to decoupage watches?
- blank. There may be several options: you can update existing watches or modify freshly purchased ones. Specialty stores stock blank watch movements with hands to suit any style. You can purchase a blank made of plastic, wood or thick cardboard.
- The primer that covers the workpiece.
- Acrylic paints, which will allow you to add the necessary touches to the image and paint over the background.
- Synthetic brushes for applying glue, paints, varnishes.
- Glue varnish for decoupage.
- Scissors.
- Napkins or decoupage cards - drawings on specialized paper, united by one motif.
- Lacquer to cover the finished product.
- Materials for creating various visual effects: patina, craquelure lacquer, etc.
You can purchase all these materials in our online store.
Clock decoupage - a master class for beginners
If you doubt that you will master the technique, it is worth remembering that a simple application is the basis. The only thing you need to strive for is to achieve the effect of merging layers. Following the master class for beginners, you will make a wall clock using the decoupage technique with your own hands.
First you need to prepare the surface: if it is a tree, sand it, if it is plastic, degrease it. Next, the background is applied. You can apply paint, perform an aging effect, stick a napkin or rice paper, which will become the background.
Previously, a picture or motif is cut out or torn off. It should be noted that the torn edge is easier to mask. Gluing is carried out with diluted PVA glue or a special composition intended for decoupage. The main thing is that bubbles and folds do not appear. Now you need to let the surface dry and cover it with acrylic varnish. In the master class, you will learn more about the technique, learn how to properly varnish, what paper is better to use for beginners.
Decoupage watches
In this technique, you can process the reverse side of the watch. This will give an aged or stylized product a finished look.
It is preferable that the reverse side also looks attractive. To do this, you need to sand off the paint at the edges and cover the back of the watch with colored varnish. After the varnish has completely dried, it is recommended to walk with an abrasive sponge to make the surface smooth.
Decoupage looks especially impressive on a large wall clock, which everyone can do with their own hands. To add more elegance to the decor, you can use beads. They are recruited on a fishing line to achieve the desired length, after which they are fixed.
When creating scuffs, paint and special wax are used. First, a light layer is applied, then wax and the surface is covered with dark paint. Leave to dry. To form scuffs, it is convenient to use an ordinary kitchen sponge, which is used to process different parts of the watch, giving it the look of antiques. You should be aware that during operation, the side and convex parts are wiped first of all, with this in mind, you need to grout.
The product is covered with acrylic varnish and dried. At the final stage, the watch is given an aged look with bituminous wax, which is applied to the worn parts and rubbed with a rag. This exciting activity will allow you to create an exclusive product for the interior. Such a watch would be appropriate to present as a gift.
Watches are an important and necessary item. In terms of shape and color scheme, they should fit into the overall picture of the interior. This work combines two techniques - stained glass painting and gilding. I am fascinated by the lace of the stained glass painting and the richness of the golden glitter. Unfortunately, the photograph does not convey all the richness and beauty of colors, the brilliance of gold, small craquelure cracks.
In my work I used the following materials: drawing, contour for stained glass painting, paints for stained glass painting, varnish for creating craquelure (cracks), thin and wide large brushes, sponge, water-based stained glass paint, water-based glue-mordan, patal, imitation gold leaf, cashmere patch, water-based gilding varnish, cotton buds, toothpicks, napkins, stationery knife, glass degreaser (dishwasher, window cleaner, alcohol).
We are preparing a drawing for a round clock. I chose a pattern that resembles ribbon lace.
We place the drawing on the table so that it is convenient to draw.

Let's put a glass disk on the picture. We carefully monitor that the pattern is evenly placed on the glass disk. We clean the glass from dust and grease stains.

We take a golden outline for stained glass painting on glass.

We transfer the drawing to the glass with a contour. Before starting work, check the contour, draw a few lines on paper (the tip of the tube may be dry and a large lump of contour paint will come out when pressed hard). Remove defects in the process of work with cotton swabs, scrolling through them (winding a failed line). Change cotton swabs often so as not to smear the glass. Use cotton swabs only for not dried contour. You can also use toothpicks to correct a fresh contour - remove sharp corners, sagging, slight curvature. If the line has dried up and needs to be removed, then cut it out with a clerical knife.

After the contour has dried (it is best to continue work the next day), we fill in the stained glass paint - gold and brown. For ease of use, pour the paint into small containers (for example, a water bottle cap) and use a thin brush.

Apply paint in dots so that brush marks are not visible.

We finish drawing one more row of the picture and fill it with stained glass paint. We fill in enough paint so that it does not spill out through the contour, but the glass does not shine through either. To make the paint fit snugly to the contour, use a toothpick - run the toothpick along the contour, distributing the paint evenly). We dry the work for three or more days. The result of the uniform distribution of paint on glass is checked by light. If you find gaps between the paint and the outline, fill the gaps again with paint and make sure that it fits snugly against the outline.

We prepare varnish to create craquelure and a wide brush. We turn the glass disk over so that the stained glass painting is at the bottom. In order not to spoil the outline, it is better to substitute a bowl that will be located in the center of the circle, or something else. Degrease the surface.


With a wide brush, cover the glass surface with craquelure varnish. The varnish is thick and the surface will not be covered with a thin layer, which is very important for creating craquelure. We apply varnish with chaotic strokes (in different directions). The polish needs to dry, which means it needs to be tacky but not sticky. Pour water-based stained glass paint into plastic dishes. In my example - yellow, pink and lilac.

Sponge alternately apply paint (slap) on a layer of craquelure varnish. It is advisable not to apply paint twice on the same area. Set aside work until completely dry.

You can choose the method of applying paint to craquelure varnish. In this example, stained glass paint is applied to craquelure varnish with a brush.

Here, the stained glass paint is applied with a sponge (by the smacking method). The examples are very large!

One more hint. If you want more defined cracks, add a little acrylic to the stained glass paint, but make sure that when mixing, the end result is transparent. Here is my version of craquelure applied with a sponge.
Currently, the art of decoupage is very popular. It is not surprising, because this activity not only calms, distracts from the daily hustle and bustle, but also has an aesthetic and functional purpose. Today we will analyze the technique of decoupage watches.


Clock decoupage technique step by step
If earlier it was not easy to find templates and materials for decoupage of watches, now they are in abundance in any book or special store for creativity. The range is impressive - dials, stencils, hands and other accessories. Therefore, even beginners can master the newfangled technique, and step-by-step instructions with examples in the photo will greatly facilitate the task.


Cooking a stencil
So, the blank that you purchased in advance in the department for creativity needs to be prepared: degrease if the watch is plastic, or sand it if it is wooden.

Create a background
Choose a style for the background image, depending on the interior and your preferences. Glue the picture to the base. You can use PVA glue diluted with water, or special decoupage glue. It is important to do this very carefully so that there are no wrinkles. Next, dry the workpiece, cover with acrylic varnish and dry again. And so we repeat 3 times.


Choose a style
Today, the most popular is decoupage in the styles of Provence, “Hollywood” and vintage (antique).


If the directions of vintage and Provence are somewhat similar to each other, then the Hollywood style is their complete opposite. It is characterized by the following:
- color contrasts that stand out clearly from the background. The most commonly used colors are red, black, white, blue;

- a lot of glitter, an abundance of rhinestones;
- images of famous Hollywood stars, preferably the very Golden Era of Hollywood - Marilyn Monroe, Audrey Hepburn, Clark Gable, Greta Garbo, etc. In this case, you get a Hollywood style inspired by a retro atmosphere.


Decoupage of the dial
Of course, you can find a ready-made watch face in a special shop, but it’s much more fun to make it yourself. Figures are easy to make from different objects - it all depends on the imagination and, of course, the chosen style for decoupage watches. So, for example, in the style of Provence, wine corks, dried lavender sprigs, etc. are perfect as a dial.


How to make an exclusive retro watch on a record?
A music record is a great option for a clock stencil. The decoupage technique on a vinyl record is identical to that described above. However, there are still some nuances here:

- prime the plate with white paint, let dry;
- for a picture, it is better to take special napkins designed for decoupage. We tear off the two lower layers and apply only the upper one to the plate. We apply glue on top of the napkin with a synthetic flat brush. After drying, cover the workpiece with varnish. Let it dry again and apply a layer of varnish again.

Note: use special glue and decoupage varnish.
- making markings for the future dial. To do this, you can use shells, wine corks and other items;
- we apply at least three layers of acrylic varnish on the watch;
- Glue the sticker on the back of the plate with cardboard. Then we make a hole in the center and glue the mechanism itself. Fasten the arrows and insert the batteries.
Exclusive retro watch is ready! It is also convenient to make them because the center for the arrows is already marked. But keep in mind that the printing round white sticker overlaps quite difficult. It is better to choose the option with a red sticker. 
Clock decoupage is a great gift idea
By the way, a vinyl record watch can be an excellent original gift for a close friend who is fond of music. It's a great idea to use a photo of his favorite artist or band as a picture.
Also, for any holiday, you can make a themed clock, which will be a great option for a gift. On the eve of the New Year, having created such a masterpiece, you will not “puzzle” what to give to your dear person. To the above technology, you need to add just a few bright details:

- make a frame from pine or spruce branches, which can then be easily removed;
- for the image, any Christmas or New Year motifs will go: angels, Santa Claus, candles, snowmen, snowflakes, deer, etc .;
- Figures of the dial can be drawings of Christmas balls or snowflakes.
Moreover, the stores also sell ready-made bases for decoupage New Year's watches.
Spectacular watches can be made for Valentine's Day, and for March 8th. In this case, the style of Provence or vintage will come in handy. Having shown your imagination, try to create something beautiful or use a ready-made detailed master class with examples in the photo.


Master class decoupage clock “Vintage roses”
Vintage style conquers with its comfort and atmosphere of the past years. Antique watches will be a great addition to the interior, will bring a romantic touch to the house.

For decoupage, prepare:
- watch blank (diameter 30 cm);
- embossed acrylic paste;
- acrylic primer;
- transparent modeling gel;
- acrylic paints: pistachio, white, natural umber, peach;
- glue for decoupage;
- drying retarder;
- rice card with notes (letters) and roses;
- dial stencil;
- acrylic matte varnish;
- clockwork;
- palette knife, brushes.

Sequence of work:
1. We apply acrylic primer to the workpiece in a uniform thin layer.
2. For a whiter and smoother surface, it is better to sand it with sandpaper, and then cover with another layer of acrylic primer.

3. Create a colored background. We use 3 shades: pistachio, peach and gray-beige (dilute white paint with a drop of umber). We apply each of them with a sponge in a blurry spot, gently layering the colors around the edges.

4. So that translucent light roses do not get lost on the artistic background, tint the motifs with undiluted white paint on the other back.

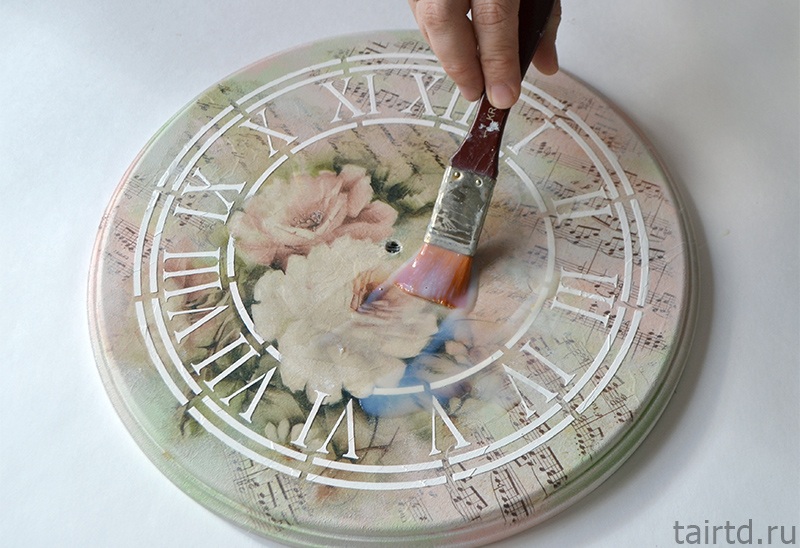
5. Using decoupage glue, glue the torn pieces of rice cards. Immediately musical fragments for the background, and then the main drawing with roses.

6. Soften the borders of the fragments, unite the background. To do this, take a gray-beige neutral tone, the same as in the background. You need a little paint to lightly powder the edges. In the process of work, for lightness and greater transparency, it is better to add a little drying retarder to the paint.

7. To create a relief dial, using a palette knife, apply a relief thin paste through a stencil. Do not try to perfectly level the surface, leave it with traces of strokes - such a texture will look interesting in the process of patination. Once the paste has been applied, remove the stencil and allow the relief to dry.

8. Before proceeding with patination, for additional protection of the decorative layer, cover the watch with acrylic varnish in one layer. Leave to dry.
9. A transparent modeling gel will help to give volume to roses. You need to apply it with strokes using a palette knife. The gel should dry completely, until transparent.

10. Patination will enhance the embossed effect of roses and the dial, help to age the surface. To do this, dilute acrylic paint with natural umber color to a consistency similar to milk with water, and add a drop of retarder. The resulting composition is applied to the surface with a brush so that it falls into all the grooves of the relief.


We also cover the edges of the watch with a patinating compound, wipe off all unnecessary and let the watch dry completely.

12. The final touch is covering the watch with a layer of matte acrylic varnish. It is advisable to apply varnish in two layers with intermediate drying.

To design a wall clock, both special materials and ordinary napkins with pictures can be used.
Picture selection
Before starting work, you need to prepare drawings for decoration. These can be ordinary three-layer napkins, decoupage paper or pictures printed on your own.

Only one thin layer with the image should be separated, if the paper is too thick, it is pre-soaked in water and the unnecessary inner layer is removed.

A watch with a bright small image or translated family photos will look original. Beautiful decoupage turns out with the image of flowers, angels, romantic motifs, hearts, animals.

Pictures should be selected of good quality with clear outlines so that incomprehensible blurry figures do not turn out.

If it is impossible to choose a specific style that is most suitable for the design of the room, then still lifes and paintings are a universal classic solution. Such watches can be presented to any person and they will definitely suit every taste.

Any pictures from cartoons are suitable for decorating children's watches, especially with favorite characters and painted animals. The age and gender of the baby should be taken into account: boys will like cars and robots more, and flowers, princesses and cute compositions are suitable for girls.

Watch preparation
You can use ready-made plastic clocks, after degreasing their surface so that the picture does not slip off during the application process.

To make a watch completely on your own, in the art supply store there are special wooden blanks of any shape and size. Such a surface will need to be pre-treated and painted so that it is even and fits the style.

As a base, it is permissible to use an ordinary wooden or plastic plate. In the center, you will need to carefully drill a hole for the dial.

Drawing process
Decoupage is performed in the following sequence of steps:
- The picture and all the necessary details are cut out of paper. To get a more accurate decoupage, the edges can be torn off by hand - so they will stand out less in the resulting work.
- Glue the pattern to the surface of the clock. This should be done carefully, smoothing out all the folds, bubbles and bumps with smooth movements.
- After drying, cover the surface with a transparent varnish, if necessary, apply several layers, give each individual time to harden.
- At the end of the work, attach the finished clock mechanism and hands to the resulting base, insert batteries - and the unique handmade watch is ready.

Decoupage on a plate
One of the current fashion trends is decorating rooms with antiques. An interesting option is to use an old gramophone record as a dial. It fits perfectly in size, and thanks to the finished hole, you just need to place the clockwork and hands inside.

First, the surface must be degreased with cologne or alcohol. Then a suitable image is pasted on it and covered with a layer of varnish. You can pre-paint a vinyl record with any acrylic paint you like - this will make an even more beautiful and original base. The sticker on the back of the record can be covered with cardboard or a layer of paint.

You can put a photo of your favorite artist or musical group - such a thing will be a wonderful gift for any music lover.

Dial decoration
You can decoupage the clock by applying your own numbers using paint and stencils, or by gluing ready-made numbers. Such details can be found not only in needlework stores, but also in children's kits for preschool development. The numbers should be prepared and painted in advance so as not to touch the base of the dial later.

The clock is suitable as a gift and for decorating a room for a holiday. For this, pictures are used in the appropriate subject - New Year's decorations, images of animals - symbols of the new year, flowers, balls, pictures from postcards, etc.

Some of the most popular are cute pictures of animals, birds, plants and flower patterns. A kitchen clock may have a dial with coffee beans or shells, and it may not be round, but in the shape of a teapot or an apple. An interesting style will give decoration with a pattern of newspaper clippings, especially with inscriptions in foreign languages.

You can either create a new thing or give an updated look to the old familiar dial, complementing it with a beautiful pattern that matches the style of the room.

Decoupage is even used to decorate an ordinary alarm clock, allowing you to emphasize the individuality of its owner. With such an item, the morning will begin with positive emotions, charging with positive and cheerfulness for the whole day.

After varnishing, the surface of the watch will look like a beautiful hand-painted. Clocks are never superfluous and there is always a place for them in any room. Decorated with your own hands will be unique and will appeal to both interior decoration and as a souvenir.